Using Web Access Tokens
General Information
Introduction
The Web Access Token (WAT) feature provides secure, scalable and highly customizable Viewer role access to Sisense assets, without the need to provide credentials or the use of cookies. This functionality is compatible with embedding, as well as standalone deployments.
Web Access Tokens are only supported for Sisense applications that have the Web Access Token feature included in their Sisense license agreement.
Viewer role access is the highest level of access that is implemented using Web Access Tokens. There are no plans at the moment for providing higher levels of experience, such as Designer or Admins.
Intended Users
One of the main advantages of a Web Access Token is the ability to generate sessions with parameters that will override any existing context and settings in the application. All end user actions are volatile and stateless, meaning that several users can access analytical content simultaneously and interact with this content on the viewer level, without affecting one another or changing the asset's original content.
This ability enables mostly large enterprise and OEM customers to infuse Sisense with both anonymous and public access to their assets, while at the same time having strong control over end user permissions.
Technical Basics of Web Access Tokens
Web Access Tokens are a type of JSON Web Encryption token. The tokens conform with IETF standards, providing a standardized syntax for exchanging encrypted data based on JSON and Base64, as defined by RFC7516.
Web Access Tokens provide a URL-safe representation of the data segments separated by "." with a payload that is compressed and encrypted using a public key. This encryption makes it impossible for end users to understand and take advantage of the token's payload.
Overview
Web Access Token-based access is accomplished via the following processes:
- Design of the asset to be shared - The conventional Sisense flow of designing assets in the application, including creating a dashboard with widgets, applying filters and security rules, sharing with team members if required, and so on.
- Preparation of a token configuration - A token configuration is a set of keys needed to sign
tokens before publishing them, and for decryption when WAT-based requests are received in Sisense. The
"kid" (Key ID) payload parameter is the pointer to this set of keys that the system should fetch and
utilize for decrypting the request.
The Secret (Public Key) and "kid" are essential for generating Web Access Tokens.
Numerous Web Access Tokens can be generated using a single token configuration. You may create and use additional separate token configurations depending on the target audience, marketing campaign, or any other approach which is required by your business case.
Preparation includes defining the header and a payload (with claims) to be used for the token generation. - Generation of the Web Access Token - The Web Access Token will be created with the permissions and customization to be applied to the end analytic consumer.
Once a token-based link (with included Web Access Token) is prepared it can be issued to any end analytic consumer. The link gives Viewer access to the asset based on the settings and customization included in the token's claims (that were provided in the payload).
Web Access Token Header, Payload and Secret
A new Web Access Token can be generated based on the required header (with the Key ID), your payload, and the Secret value. (Both the Key ID and Secret are generated when creating the token configuration in the Sisense Admin console.)
Header
The Header includes the metadata of the Web Access Token. The header parameters specify which encryption algorithms, which compression algorithm, and so on, are used by the token. Most of the parameters currently have fixed values, except for "kid" (Key ID), which identifies the token configuration.
Payload
The payload section is where you can specify a claim (or claims) to define the end user configuration and permissions. The "sub" claim is the only mandatory claim. The value of the "sub" claim is the ID of the Sisense user on behalf of whom the access is granted. If no other claims are provided then all of the settings (permissions and configuration) will be inherited as-is from the specified "sub" user in the native Sisense application. If any other claims are provided they will override the corresponding setting or configuration for the end user.
Secret
The Secret is used to sign the Web Access Token in order to ensure that it is trustworthy and the contents of its payload have not been tampered with.
Getting Started
This section describes how to get started so you can design token-based access to your assets using the Web Access Token feature.
- Contact your organization's CSM with a request to activate the Web Access Token license.
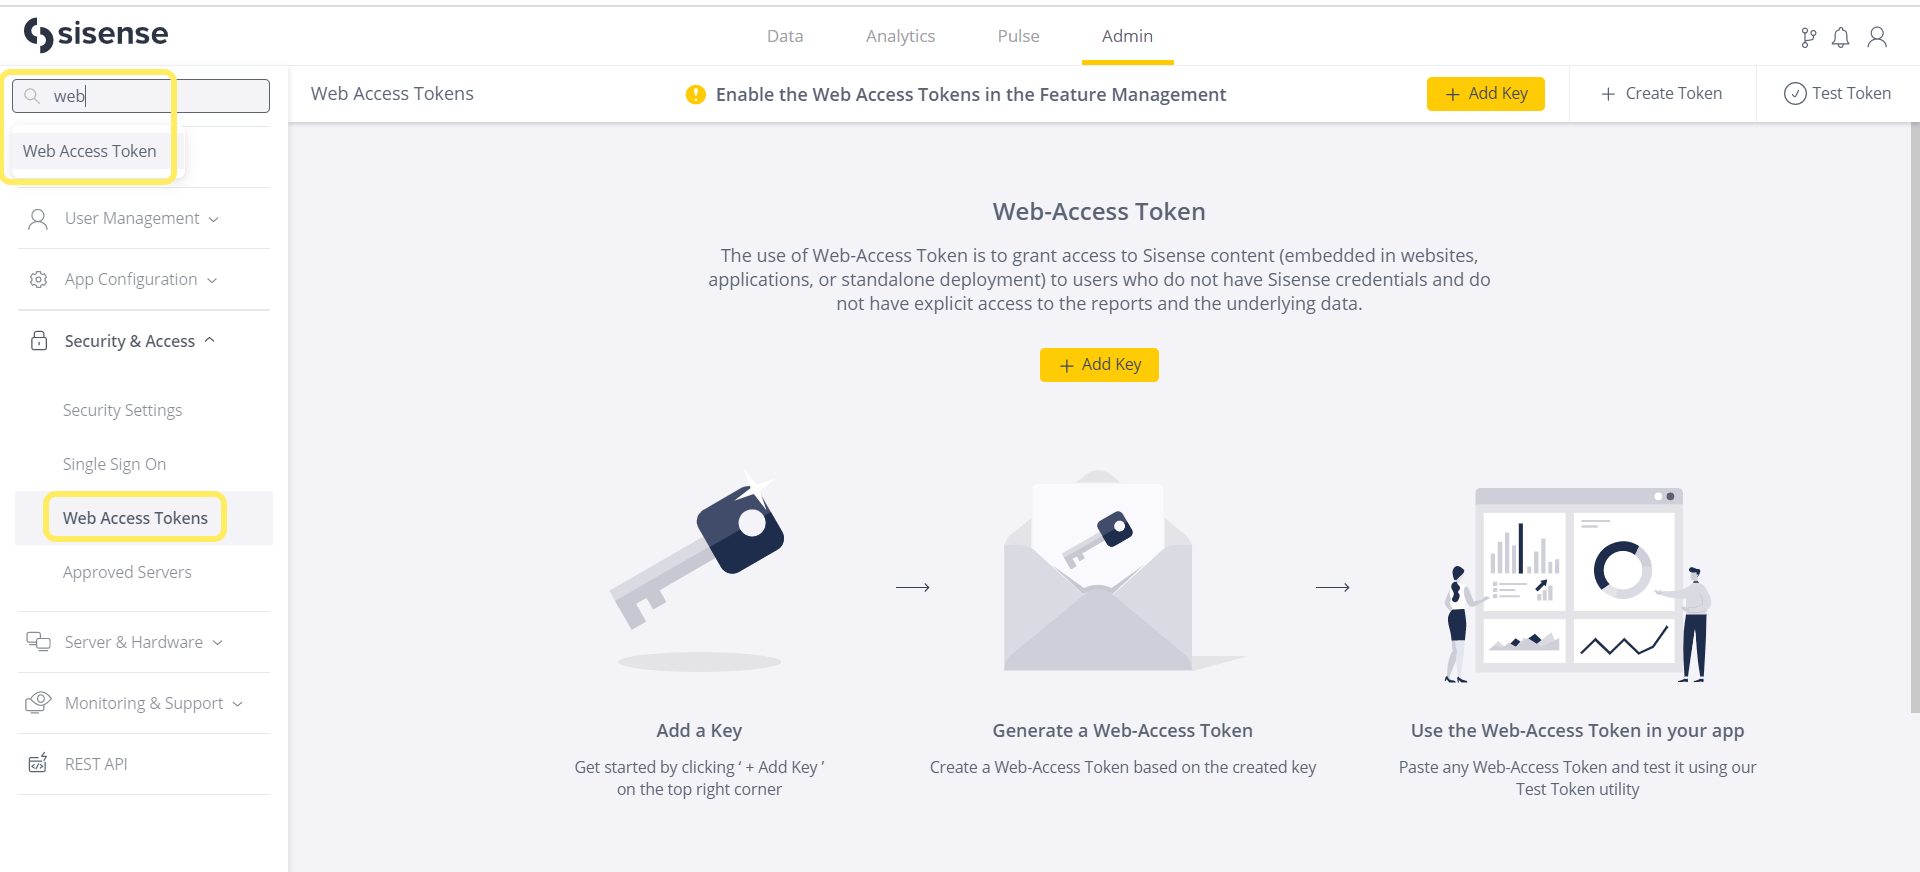
- Navigate to the Admin page, and search for and select Feature Management which is located under App Configuration to activate the Web Access Tokens feature.
.png)
- Create or select a Sisense dashboard or widget intended to be made accessible via the Web Access Token.
- Create or select a target Viewer role user and share the asset with them. Later, the ID of this user will be specified in the "sub" claim for the Web Access Token that will be used to grant access on behalf of this user.
Creating a Token Configuration
When a token configuration is created it provides a secret (public key) value and a Key ID, both of which are required to create Web Access Tokens.
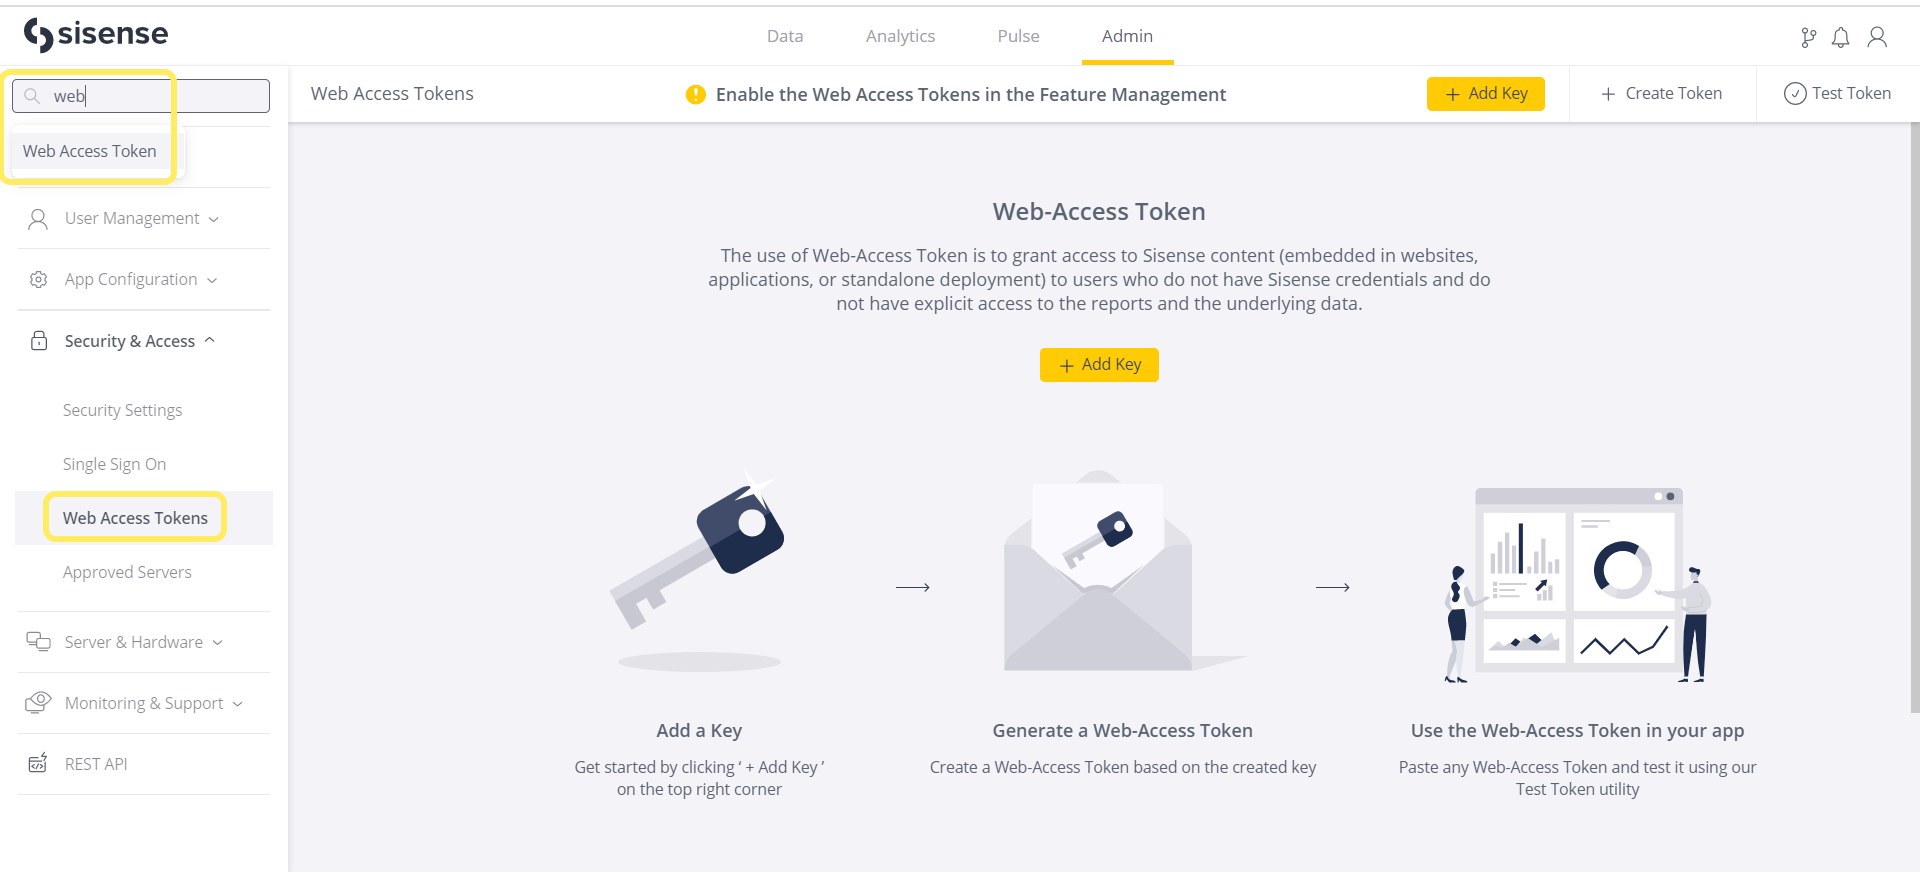
To create a new token configuration:- Navigate to the Admin page, and search for and select Web Access Tokens, which is located under Security & Access.
- Create a new token configuration using the Add Key dialog.
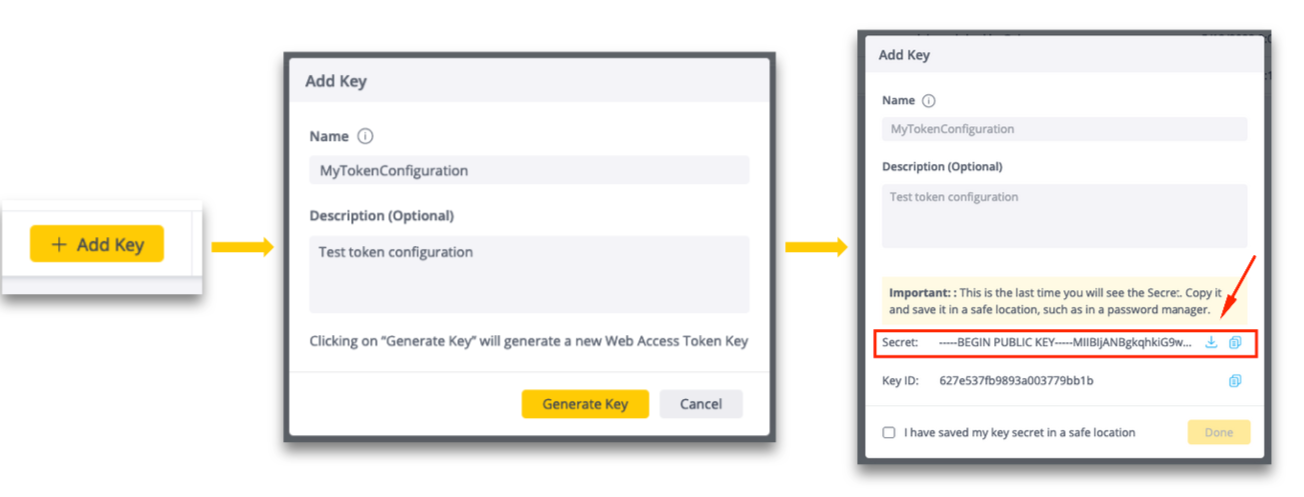
- After you click the Generate Key button you can copy or download the secret from the Add Key dialog.
If you click on the download button (to the right of the secret) a text file with the public key will be downloaded locally using the name of the token configuration and a PUB extension.Note:Make sure to store the secret (public key) in a secure and accessible place for future usage, as it cannot be retrieved from the application afterwards. The Secret value is shown in the Add Key configuration dialog box - once only - upon creation.
Once the token configuration has been created it will appear in the list of Web Access Tokens:
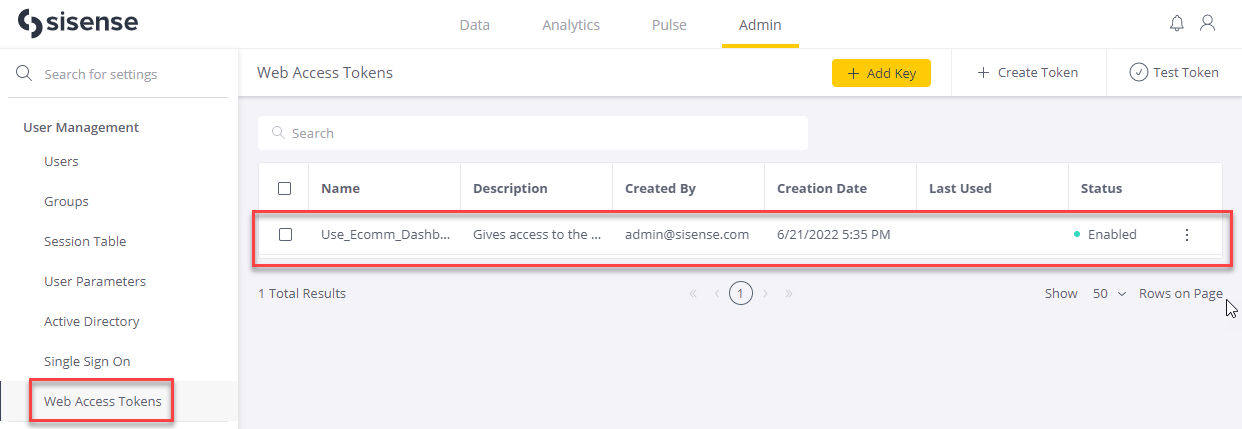
To get the Key ID for an existing token configuration from the Web Access Tokens list, click its three dots menu, select Edit, and then copy the Key ID from the Edit Key dialog.
Options for Creating Web Access Tokens
There are several options for creating Web Access Tokens. They can be created using your own internally developed tools, the Sisense REST APIs, or the Create New Token page in the Sisense Admin console.
Self-hosted Token Generation
If you develop your own self-hosted Web Access Token generation tool it must be based on these approved libraries:
- Python: https://pypi.org/project/Authlib/
- .Net: https://www.nuget.org/packages/jose-jwt/
- Java: https://connect2id.com/products/nimbus-jose-jwt
- Node.js: https://www.npmjs.com/package/node-jose
The Sisense code samples can be helpful during the development process:
-
Depending on the platform and library used in your token generation tool - different requirements might be applied to the public key format. In some cases, \r\n delimiters should be added. Please refer to the official documentation of the relevant library on this matter.
-
Per-dashboard permissions configuration in one token scope are not allowed.
Developing your own token generation tool is the preferred solution for the business case in which shared analytical
content is frequently changed depending on the end-consumer, and therefore should be defined dynamically 'on the
fly' per user.
This should also boost the performance of the overall WAT based solution as there will be less interaction
with third-party services for generating the tokens.
Sisense REST API
The Sisense REST APIs can also be used to generate Web Access Tokens.
The Web Access Token REST APIs are found in the Sisense Admin console on the REST API page. See REST API 1.0 /web-access-tokens.
Sisense Create/Test GUI Admin Panel
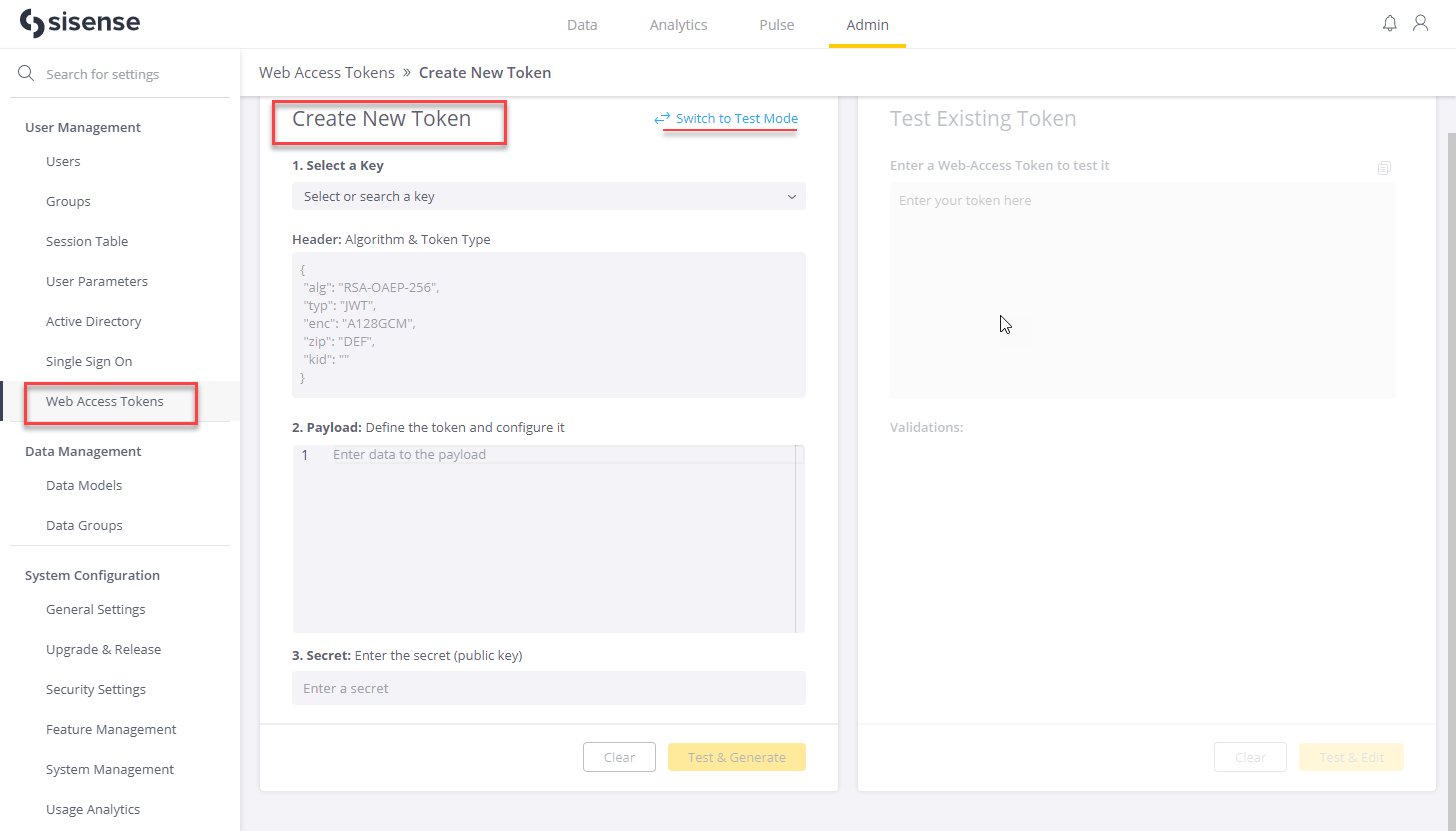
Options to create new or test existing tokens via the GUI admin panel are accessible through the corresponding buttons in the top right corner of the Admin > Web Access Tokens section.
Token Validation
Three dedicated levels of validation were designed to help OEM developers find and prevent token errors.
The scope of the validation levels applied depends on the flow:
- Generate token flow:
- Structure validation
- Logic validation
- Test token flow:
- Structure validation
- Logic validation
- Data validation
Creating a New Token
When creating a Web Access Token, this page uses your payload and the Secret public key value as inputs. It automatically provides the default header, and it automatically pulls the Key ID into the header when the desired token configuration is selected. (Both the Key ID value and the Secret public key value are generated during the token configuration process.)
Preparing to create a new Web Access Token:
- Key - The pull down search bar allows you to select one of the token configurations from the Web Access Tokens page. When a token configuration is selected its Key ID is automatically populated into the "kid" parameter in the header.
- Payload - Paste in your payload, or click in the edit area to automatically pull in an example payload. The example includes a list of all supported claims in the required structure and formats that can be used as the basis for creating your own new payload.
- Secret - Paste the Secret public key value. This should be the Secret that was generated when the token configuration (selected in the first step) was created. Using the wrong public key (that is, the public key for a different token configuration) will result in the error message "Invalid public key".
Once all of the required sections are populated as per your business case - click on the Test & Generate button.
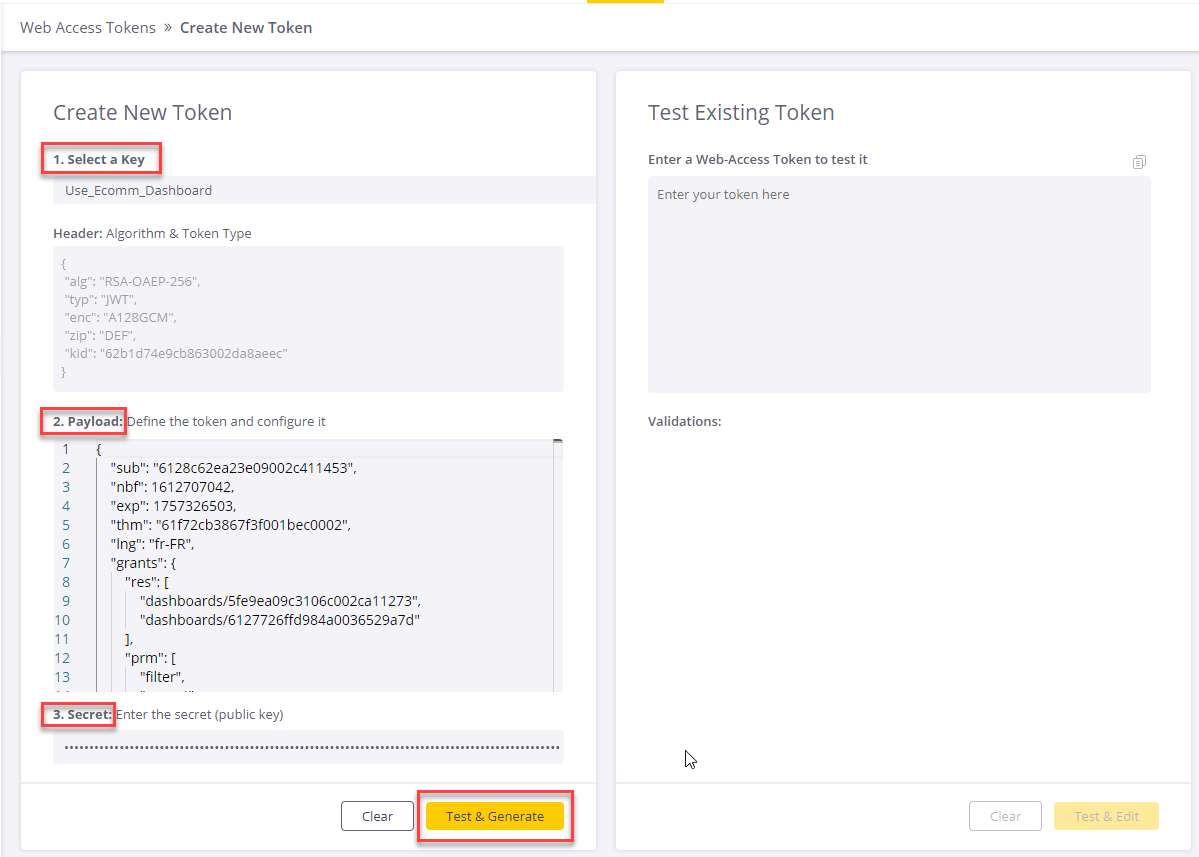
The system will perform structure and logic validations, and generate the token if the validations passed successfully.
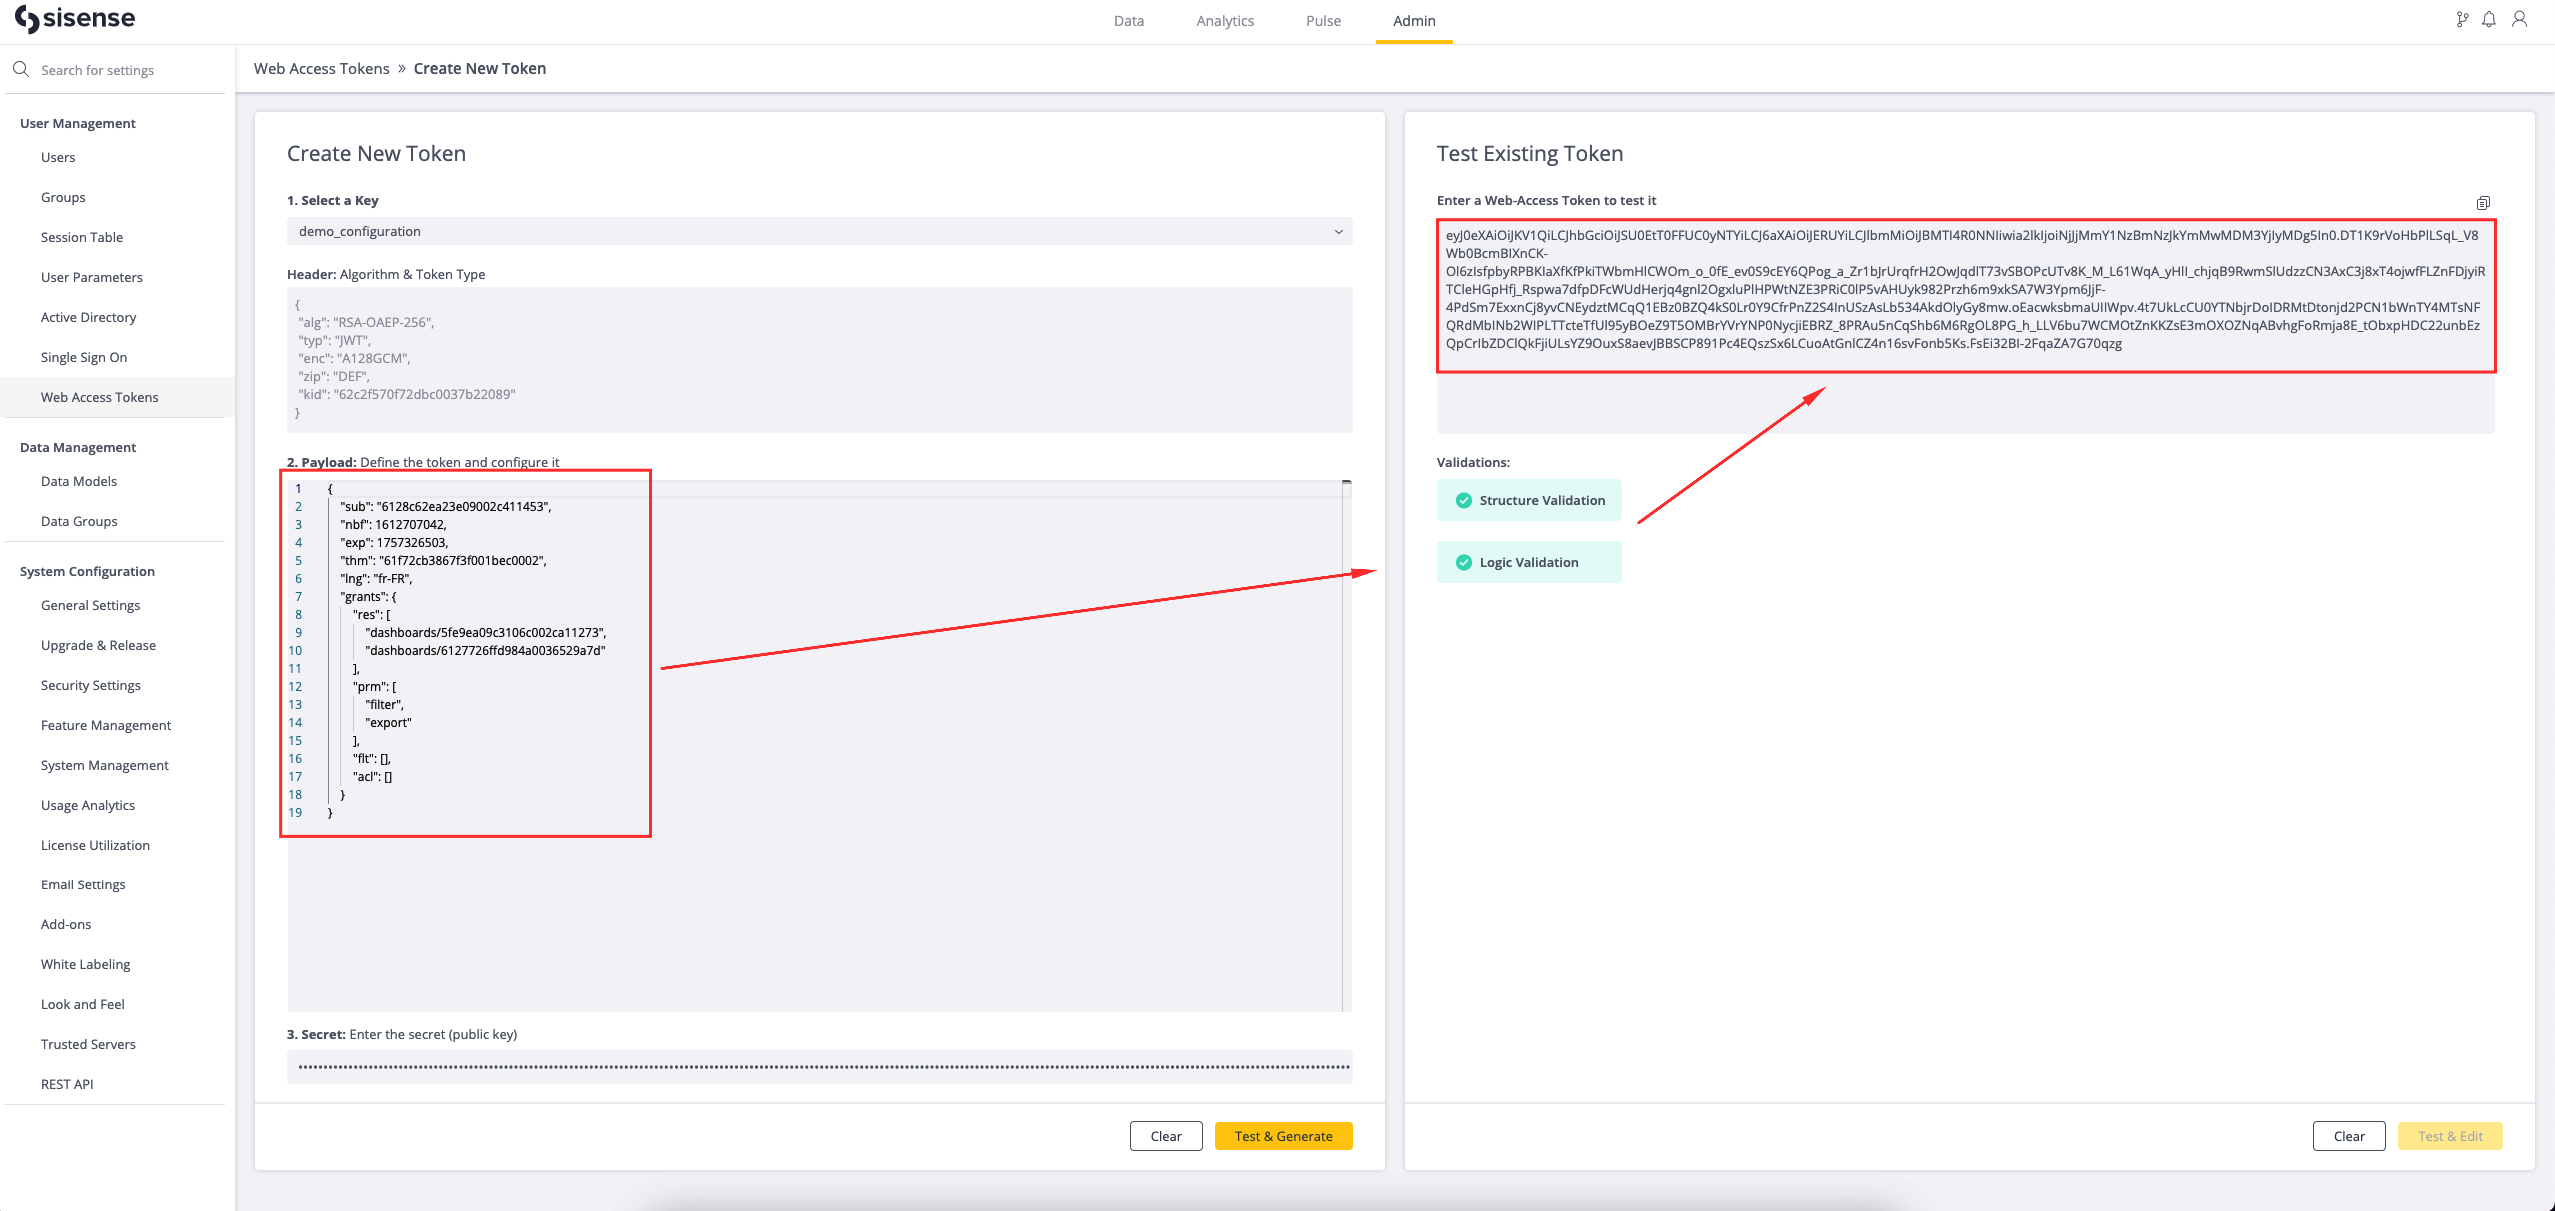
Testing an Existing Web Access Token
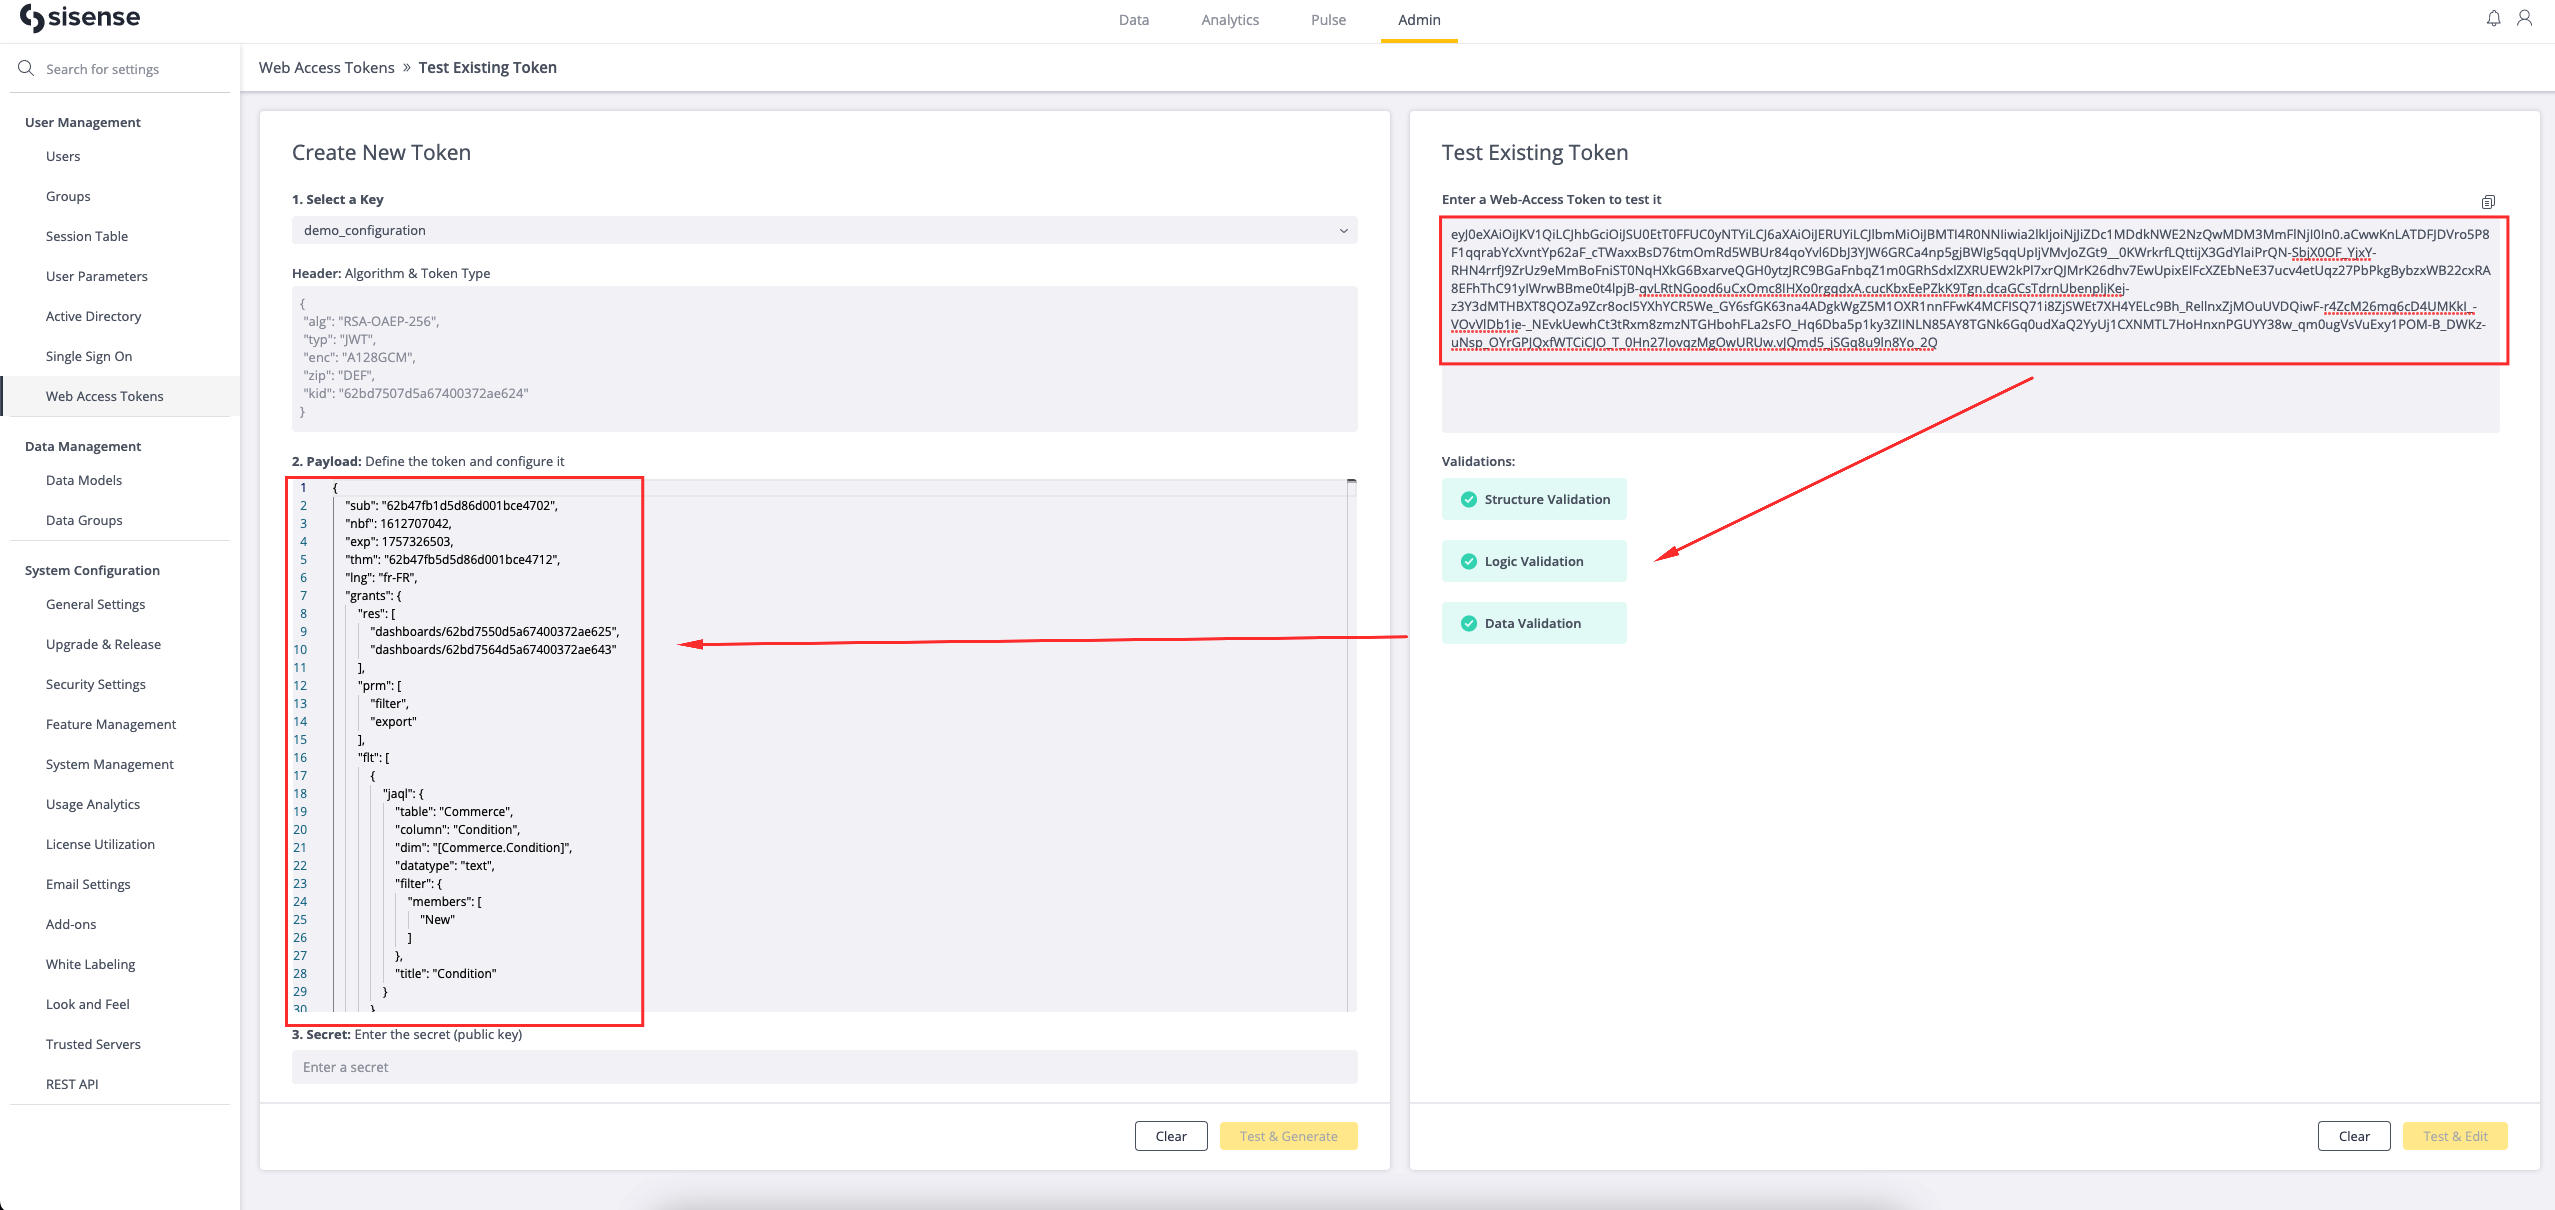
To test an existing Web Access Token, copy the token text into the Test Existing Token area and click the Test & Edit button.
When you click the Test & Edit button the system will run Structure, Logic and Data level validations. If the token passes the validations the token information will be extracted and displayed in the Create New Token area. The secret will not be populated and needs to be entered manually for security reasons.
Web Access Tokens Usage
- Insert the token into the asset's link in accordance with the following format:
mysisense.com/wat/insert_your_generated_token/app/main#/dashboards/dashboard_id/widgets/widget_id - Carefully test the newly-created Web Access Token by accessing it and checking what the end user sees and is able to do.
- Share the link with the users. Alternatively, you can perform the steps for generating a Web Access Token for embedding, if that is your business case.
Supported Claims
Web Access Tokens are mostly intended for users with a programming background, for dynamic control over session lifetimes, data permissions, and user experiences. At the same time, there is the ability to grant access with an as-is reference to a specific 'sub' user's settings.
There are two approaches for defining a token payload:
- Opaque (by reference) tokens with the mandatory "sub" claim. The value of the "sub" claim is the ID of the Sisense user on behalf of whom the access is granted and whose permissions and configuration will be inherited as-is from the native Sisense application.
- Structured (by value) tokens also require the mandatory "sub" claim. Plus they have additional optional claims that override the corresponding setting or configuration for the end-user.
Token Character Limit for Claims
There is a character-based limit for the number of values that can be passed for the claim types permissions ("prm"), resources ("res"), filters ("flt"), and data security ("acl") in the token. See the section below, Structured Tokens (By Value), for a complete list of the claim types.
The total number of characters for these claim types (“prm“, “res“, “flt“, and “acl“) should not be more than 81,200 characters per token. If you need to include more values it may be necessary to change the overall design. For example, instead of passing a data security claim with 400 values, consider using a parent identifier that groups all of the required values.
Opaque Tokens (By Reference)
This type of Web Access Token can be used to give a user the same data permissions, access rights and profile information as the impersonated user. The payload for an opaque Web Access Token must include the "sub" claim which holds the user Sisense ID on behalf of whom access is granted.
To use this approach, enter the Web-Access Token's minimal required parameters, listed below:
- Header
Copytoken_header = {
# --- Fixed set of fields in the token Header ---
# Type of token
'typ': "JWT",
# Encryption algorithm of the Content Encryption Key (CEK)
'alg': 'RSA-OAEP-256',
# encryption algorithm for the JWT claims
'enc': 'A128GCM',
# Compression algorithm
'zip': 'DEF',
# --- Sisense WAT specific fields in the token header ---
# Unique identifier of the token configuration
'kid': "6102ad6c86792300351fd952"
} - Payload
Copy{
"sub": "6128c62ea23e09002c411453"
} -
Signature
Copy-----BEGIN PUBLIC KEY-----MIIBIjANBgkqhkiG9w0BAQEFAAOCAQ8AMIIBCgKCAQEAq/38zSIYIwreL3eKC8ZqCEr+h8ohYgVh4FLlknO+sO+kTC9eln+mHnMExnYPQiBOIFDbY4WL2oa3jB21mo8ooZEJUyJ5fU473YUVKY6nO/OuWjkGyCPZUQ2nXlqIgFV7QZ3KBbkvYM52+TasO6+39+30j1s8tw+57LduzoQIuipOV3JsJQOY/RgKYfUhj6Hz1nrvhDGm/PPx23rf3hYje2QCCuWtk0nNGDmGqQGly3dfpLJukVRViBYPbC2ic6dY1VNHrQvCu7ZzbOqq25a3Qr+PBW1RJ8nsPwEpz4MsdyDbG77nndNHgO4+fp7XbJ4KHfwGAtqB+5Ehygin/mRJuQIDAQAB-----END PUBLIC KEY-----
Structured Tokens (By Value)
Sisense enables you to parametrize context and user permissions per token session, according to business needs. If the token's payload includes the claim, it overrides the existing (native) Sisense value, or permission.
Required parameters for the token's header and payload are identical to that of the Opaque Token approach shown above.
Supported optional claims for Web Access Tokens that can be specified currently in the payload, are as follows:
- "exp"
The "exp" (expiration time) claim identifies the expiration time on, or after which, the JWT MUST NOT be accepted for processing.
Suggested modes of utilizing this claim:
- Security: Dynamically generate an expiration value, per individual user session, based on the time needed for the system to load the session. For example, you may set "exp" to 20 seconds if it takes 20 seconds or less to establish the initial session. Once a token (from the URL) has been used it is no longer needed and the user can interact with the granted assets of the session for as long as they require. After a token has expired its use will result in an error for anyone who attempts to use it, which prevents unauthorized access in the event that the token is exposed.
- Timeline: Specify a timeframe for token-based access to the asset. For example, make it available for a 24 hour period.
- Infinite: Null value or not including "exp" into the payload sets the asset as accessible forever.
Note:
Active sessions are not revoked when the “exp” value expires, meaning that existing users will continue to have the ability to interact with the accessed assets. After the expiration time new WAT sessions will not be granted and an error will be returned.
Type > Unix timestamp
Example:
{
                    "exp": 1757326503
} - "nbf"
The "nbf" (not before) claim identifies the time before which the JWT MUST NOT be accepted for processing.
Type > Unix timestamp
Example:
 {

					"nbf": 1631098685

} - "iat"
The "iat" (issued at) claim defines the time at which the JWT was issued. Currently, there is no logic implemented in Sisense for this claim and it can therefore be defined as per the customer's preferences.
Type > Unix timestamp
Example:
{
						"iat": 1631098710
} - "iss"
The "iss" (issuer) claim identifies the principal that issued the JWT.
Currently, there is no logic implemented in Sisense for this claim and it can therefore be defined as per the customer's preferences.Type > String
Example:
{
						"iss": "any string
} - "grants"
Structural (parent) claim for specifying token permissions("res", "flt", "prm") within. Permissions entered outside of "grants" are ignored.
Type > Object
Example:
{
						"grants": {
						"res": ["dashboards/ID1", "dashboards/ID2"],
						"flt": [{
						... JAQL Filter 1 ...
						}, {
						... JAQL Filter 2 ...
						}]
						}
} - "res"
Specifies the list of dashboards that are allowed to be accessed via the Web-Access Token.
This should be specified in the following format:
"dashboards/dashaboard_id" separated by a comma. The simplest way to obtain it is by copying it directly from the Sisense URL.
If you want to provide access to the widget, and your Web-AccessToken-based link leads to the widget accordingly, there is no need to specify widget_id in the "res", as having a parent dashboard is enough.- "res" is not included in the token's payload: Sharing permissions from native Sisense are inherited, meaning that the end user is able to access the same dashboards as "sub" users in the native Sisense system.
- "res": [ ]: The user is unable to access any of the dashboards or widgets.
- "res": ["dashboards/ID1", "dashboards/ID2"]: The user is able to access only dashboards ID1 and D2, regardless of what dashboards are available for "sub" user in the native Sisense system.
Type > Array of objects
Example:
{
						"grants": {
						"res": ["dashboards/ID1", "dashboards/ID2"],
						"flt": [{
						... JAQL Filter 1 ...
						}, {
						... JAQL Filter 2 ...
						}]
						}
} - "flt"
Specifies filters that should be applied on the dashboard level of the asset in a Web Access Token-based environment. Widget filters are inherited as-is from the native Sisense application. Filters should be specified as per the official Sisense JAQL Syntax Reference.
- "flt" not included: Inherits as-is filters from the native Sisense system for both widget and dashboard levels.
- "flt": [ ]: Erases all existing filters from dashboard level only, and inherits widget level filters, if there are any in the native Sisense system.
- "flt": [{jaql filter1}, {jaql filter2}]: Overrides the original Sisense dashboard filters if any are applied with the ones from the claim:
The filter from the "flt" claim only applies to the dashboard level (regardless of whether a token's link destination is a dashboard or widget).
Type > Array of objects
Example:
{
							"grants": {
								"flt": [
									{
										"jaql": {
											"table": "Commerce",
											"column": "Condition",
											"dim": "[Commerce.Condition]",
											"datatype": "text",
											"filter": {
												"members": ["New"]
											},
											"title": "Condition"
										}
									}
								]
							}
} - "acl"
The Web Access Token enables applying data security rules for each token, and in doing so, dynamically defining the scope of available data for the end analytical consumer, on a per business case basis.
"grants": { "acl": [ {acl1}, {acl2}, etc ] }The overall approach of processing "acl" is similar to other available claims:
- "acl" is not specified or outside of the "grants": { } claim > inherits as-is data security from the native Sisense system, if any exist and were applied to the user from "sub".
- "acl": [ ] > erases all existing data security rules applied to a "sub" user in the native Sisense system. In such cases there is no data security whatsoever applied.
- "acl": [ {acl1}, {acl2}, etc ] > overrides any existing data security applied to a "sub" user in native Sisense to those received from the token.
Structure and format a token's data security as follows:
Copy"grants": {
"acl": [
{
"dataSourceTitle": "Sample ECommerce",
"table": "Commerce",
"column": "Gender",
"allMembers": null,
"datatype": "text",
"members": [
"Male"
],
"exclusionary": false
}
]
}To correctly apply data security, you must include the new "dataSourceTitle" parameter (containing the title of the queried data source) to each "acl" claim object.
Note:
The data security rule is ignored if no widgets are based on the same data source as specified in "dataSourceTitle". Data security, as well as other claims in a Web Access Token flow do not work in 'addition' mode. Settings are either inherited from the native Sisense or replaced with the settings from the "acl" claim, as long as the claim is included in the payload. Therefore, the data security rule is ignored if no widgets are based on the same data source as specified in "dataSourceTitle".
Example:- A dashboard is based on four different data sources; A, B, C and D, each of which has data security configured in native Sisense.
- Passing "acl": [{"dataSourceTitle": "A", ....}] applies data security in the Web Access Token environment to any widget based only on data source A.
- The widgets based on data sources B, C and D have no data security applied or inherited from native Sisense.
Therefore, make sure to specify data security per data source, if such is required in your business case. Alternatively, if you want native Sisense data security to be inherited, do not include the "acl" claim.
- "prm"
Specifies end user permissions for the Web Access Token environment within the scope of the Viewer role level.
Type > Array of strings
Example:
{
							"grants": {
							"prm": [
							"filter",
							"export"
							]
							}
} - "prm": ["filter"]
Regulates the ability to work with filters on the Viewer role level:
- "prm" not included: The user can work with filters on the default Viewer role level.
- "prm": [ ] / "prm": ["export"]: The ability to work with filters is blocked. The user is able to see the filters applied, yet unable to manipulate them. The filter's panel is in read-only mode.
- "prm": ["filter"]: The user can work with filters on the Viewer role level.
Type > String
Example:
{
		                "grants": {
		                    "prm": [
		                    "filter",
		                    "export"
		                    ]
		                }
} - "prm": ["export"]
The exporting of WAT-based assets is only supported when the New Exporting service is utilized in the Sisense instance.
The following claim configurations and settings are considered in the asset's exported copy:
- Filters (including user manipulations)
- Data security
- Look and feel themes
- Interface language
Type > String
Example:
					{
					"grants": {
					"prm": [
					"export"
					]
					}
} - "lng"
Used to define the interface language per each Web Access Token at any stage, by including the "lng" claim with its value into the token's payload.
Listed below are the supported languages and associated corresponding formats:
- Chinese (PRC)"zh-CN"
- Dutch"nl-NL"
- English (US)"en-US"
- French"fr-FR"
- German"de-DE"
- Italian"it-IT"
- Japanese"ja-JP"
- Korean"ko-KR"
- Portuguese"pt-BR"
- Russian"ru-RU"
- Spanish (Argentina)"es-AR"
- Spanish (Spain)"es-ES"
- Turkish"tr-TR"
Type > String
Example:
{
		            "lng": "de-DE"
		            }
See Changing User Language Setting for further information about changing the language in Sisense.
- "thm"
Used to define the Look and Feel (appearance) for end analytical users by including the desired theme's oid into the token's payload. Having a specified UI customization theme affects any user who accesses analytical assets via the token. Otherwise another UI theme, based on the priority, is applied.
Type > String
Example:
{
"thm": "62011a15c2eb04001bbf85e8"
} - "loc"
Supports defining the localization setting. This makes it possible for the dates, times and numbers to be formatted with the localization preferences of the target audience.
Type > String
Example:
{

"loc": "ko-KR"

}
Supported locales include:
- de-DE
- en-US
- es-AR
- es-ES
- fr-FR
- it-IT
- ja-JP
- ko-KR
- nl-NL
- pt-BR
- ru-RU
- tr-TR
- zh-CN
- "trc"
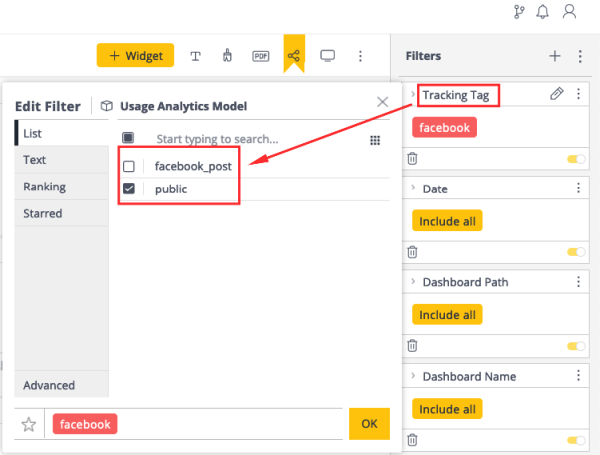
Used to include tracking tags in each generated token. These tracking tags enable the exploration of the Usage Analytics data in terms of the types of Web Access usage.
Example:
{

"trc": [ "facebook_post", "public" ]

}
If the “trc” claim is included in the payload and has values in its array, you will be able to select the tracking tags for those values in the list of the Usage Analytics dashboard filters.
Here is a screenshot showing an example of these tracking tags in a Usage Analytics dashboard filter:

Here is a close up of the dashboard filter:
Note:
In order for the new data to be displayed, the Usage Analytics ElastiCube should be re-built, as it is in the regular flow.
User Parameters
There is no direct integration of the user parameters feature (see Personalization Parameters for Live Data Sources) with the Web Access Token functionality. This means that there is no dedicated claim in the payload that you can use to pass a user parameter to a token. However, you can still make use of user parameters with a following workaround:
-
Create a Sisense user
-
Assign one or more user parameters to this user
-
Include the ID of this user in the
subclaim of the payload
This way, the user parameters will be inherited via the “sub“ user's settings from the native application, and they (the user parameters) will apply to everyone accessing the assets with this WAT.
Using Embedding
Sisense helps you deliver insights at the point of decision making by enabling you to embed Sisense within your application using Web Access Token. For more information, see Embedding Methods and Practices - Video.
Iframe
The Web Access Token feature is compatible with Iframe embedding, meaning that you can infuse Sisense analytical content using Iframe and enable users to access it via the token.
The process is similar to configuring access with native Sisense.
To infuse Sisense analytical content using Iframe:
- Generate a link for an embedded solution with additional parameters, according to your needs: mysisense.com/app/main#/dashboards/dashboard_id?embed=true&l=false&r=true;
- Generate a Web Access Token.
- Insert the token into the embedding link to the asset, according to the following format: mysisense.com/wat/insert_your_generated_token/app/main#/dashboards/dashboard_id?embed=true&l=false&r=true
- Utilize the link in your embedding solution.
Embed SDK
A dedicated wat parameter is available to enable token-based access to the Embed SDK solution. Include the wat parameter with a generated Web Access Token while configuring your Embed SDK and enrich your infusion experience.
See Embed SDK - Getting Started for further information about configuring Embed SDK.
The WAT-based environment provides limited Embed-specific SDK actions usage for aligning a feature's viewer role experience with the Embed SDK capabilities.
The following actions are supported and synchronized with the permissions granted, per token, in a "prm" claim:
- dashboard.applyFilters
- dashboard.export
The following actions are blocked:
- dashboard.removeFilters(filters, persist)
- dashboard.openSimplyAsk()
- dashboard.createWidget()
- dashboard.createTextWidget()
- dashboard.share()
The other Embed SDK actions are unaffected.
The following table describes the matrix for applying filters in WAT-based Embed SDK dashboard:_1000x238.png)
Sisense.js
Enhance your company's embedding needs using Sisense.js, a JavaScript library that enables you to embed Sisense components in web pages without the use of iFrames.
You can access analytical content embedded via the Sisense.js based on the Web Access Token authentication method. Generate the Web Access Token (containing the required configuration and customization) and include it into the Sisense.js constructor's dedicated WAT parameter.
End user experiences in Sisense.js are volatile and are limited to the Viewer role level (as are all Web Access Token use cases).
For more information about configuring Sisense.js, see Customize Sisense with JavaScript.
Working with UI Theme in the Embedding
As a Look and Feel theme can be defined in several places, the following hierarchy of priorities should be taken into consideration:
- Embedded parameter (Iframe/Embed SDK/Sisense JS)
- Web Access Token
- Group association
- System-level (Default)
For more information about customizing the look and feel, see Customizing the Sisense User Interface.
Using Add-ons
Sisense is currently developing full support and compatibility for Sisense-certified add-ons in Web Access Token-based environments.
Considering the possibility of deep customization of add-ons, make sure to verify the flow locally before releasing publicly. Add-ons should be used at your own risk and responsibility.
Testing
An API is provided for testing an (existing) generated token for its structure, logic, and data validation to determine any reason(s) why a token may be faulty, or simply to ensure it has been properly generated. Check REST API 1.0 /web-access-tokens.
Monitoring WAT 'Sessions' Consumption
Commercial Definition of the 'Session'
A WAT session is a request to the server to decrypt the token and grant personalized access based on the token's payload, which from the end user's perspective happens with an initial page load or its refresh.
From a technical perspective, a session is a request for a key to decrypt the token’s payload and setup an initial connection to the Sisense server. Once the initial session is established, all further internal actions and requests within the established connection are not considered new sessions.
Starting a New Session
The following are examples of starting new WAT sessions:
-
Opening a link = new WAT session
-
Refreshing the browser's tab = new WAT session
-
Refreshing a page with an embedded solution = new WAT session
-
Opening the same WAT link in 5 tabs of the same browser by the same physical user = 5 WAT sessions
-
Browsing between 3 tabs/pages of the customer’s embedded solution that invoke reloading the page = 3 WAT sessions
Actions Which ARE NOT Considered a WAT session
Actions that do not involve reloading the web browser's page are not considered a new session. For example:
-
Opening another dashboard from the navigation pane
-
Applying a filter
-
Exporting to PDF/XLS/Image
-
Opening a widget
-
Drilling
Reviewing a Token's Usage Based on the Specific Token's Configuration
- From the Admin page, search for and select Web Access Tokens, which is located under Security & Access.
- Click the icon for the token configuration you wish to review, and select View Usage Statistics, as shown below.
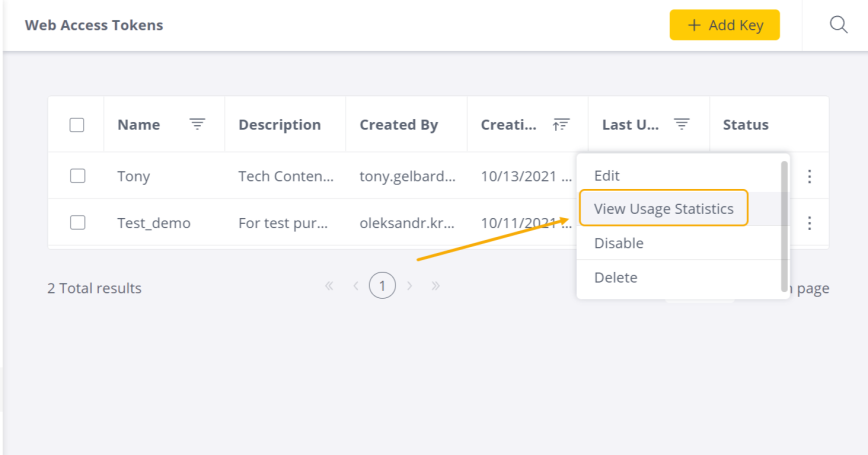
The Usage Statistics window opens showing the current relevant usage statistics, as shown below.
.png)
The following Usage statistics are displayed:
- Last Used: The last time any of the tokens generated with the chosen token configuration
- Total Usage Today: The total amount of sessions since the beginning of the current day
- Total Usage: The total amount of sessions based on this token configuration
Usage statistics are nil if any of the tokens based on this token configuration has not been used.
Usage Statistics data is displayed depending on your specific time zone. All the data is stored in Coordinated Universal Time (UTC), irrespective of your current location. Sisense receives the data stored in UTC time zone, and the data transforms to your specific user time zone, following which you are able to view it.
Using WAT with RESTful API
In addition to Sisense's UI capabilities to work with Web Access Token configurations, RESTful API commands can be used to achieve the same results. See REST API 1.0 /web-access-tokens.
Limitations
-
Currently, there is one documented limitation for the Web Access Token functionality. (See Token Character Limit for Claims for more details.) Please note that any feature or capability not described in this document cannot be considered as fully-supported. For additional information contact Support.
-
WAT is not compatible with the Sisense Multitenancy feature.