Network Tunnels (Beta)
Last updated: November 17, 2026
| Tier | Deployment |
|
|
|
Network tunnels allow Sisense connect to databases in your private network that are not exposed to the internet. Sisense connects to an SSH server that you run and control, called a bastion, which forwards the connection to your database. The database stays private, and you do not need a VPN, a public database endpoint, or shared credentials.
Note:
Network tunnels are currently available only for Sisense Cloud (managed) deployments.
Overview
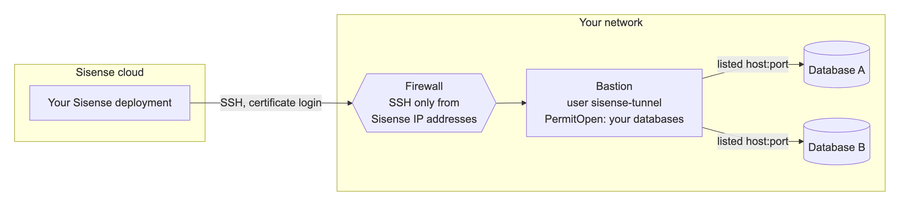
How It Works
-
Sisense signs in to the bastion with an SSH certificate issued by a certificate authority that belongs to your Sisense deployment. You do not create a password or key for Sisense, and no Sisense private key is stored on the bastion.
-
One line in the bastion user's
authorized_keysfile trusts these certificates: only for this tunnel, only from Sisense IP addresses, and only for port forwarding. -
Three settings on the bastion limit the Sisense user to forwarding connections to the databases you list, with no commands, no file transfer, and no other destinations.
Setup Steps
Setting up a tunnel takes about 30 minutes if one person does both the Sisense and the bastion steps.
| Step | Who |
|---|---|
| 1. Preparing the Bastion | The team that runs the bastion |
| 2. Adding the Tunnel in Sisense | Sisense administrator |
| 3. Authorizing Sisense on the Bastion | The team that runs the bastion |
| 4. Confirming and Testing the Tunnel | Sisense administrator |
| 5. Connecting a Database Through a Tunnel | Anyone who creates connections in Sisense |
Prerequisites
Sisense
-
You are a Sisense administrator.
-
The number of tunnels you can create is limited. When you reach the limit, Sisense shows "Tunnel quota reached". To raise the limit, contact Sisense Support.
Bastion
You can use an existing bastion if it meets these requirements. One bastion can serve several databases.
| Requirement | Details |
|---|---|
| Linux server with OpenSSH server 7.2 or later | Certificate login with these restrictions requires OpenSSH 7.2 or later. Keep OpenSSH updated, because the SSH port is reachable from the internet. |
| Public IP address or DNS name | Sisense connects over the internet. Sisense rejects private addresses (10.x, 172.16–31.x, 192.168.x, and similar). |
| SSH port open to the Sisense IP addresses | Sisense reads the bastion's host key when you add the tunnel, so open the port before Adding the Tunnel in Sisense. |
| ED25519, ECDSA, or RSA (2048 bits or more) host key | Sisense rejects weaker host keys. Current Linux distributions already have an ED25519 key. |
| Network access to each database | The bastion must reach each database host and port. |
The commands in this topic were tested on Ubuntu 24.04 and Amazon Linux 2023. They work on current Linux distributions that use systemd, such as Debian, Red Hat Enterprise Linux, Rocky Linux, and AlmaLinux.
Sisense IP Addresses
Allow SSH to the bastion from the Sisense IP address of your Sisense deployment's region. Sisense also shows the addresses when you add the tunnel.
| Sisense Region | IP Address |
|---|---|
| Europe | 52.49.40.184
|
| United States | 16.59.194.105
|
All Sisense Cloud deployments in a region share that region's address; the certificate, not the address, identifies your tunnel. If the addresses change, Sisense notifies you in advance (see Managing Network Tunnels).
Supported Databases
You can connect these databases through a tunnel: Connecting to PostgreSQL, Connecting to MySQL, Connecting to SQL Server, Connecting to Oracle, and Connecting to Amazon Redshift.
A tunnel forwards one database host and port over TCP, so every tunneled connection needs a single host (host or host:port), not a list of hosts or a custom connection string. The following connection options do not work through a tunnel:
| Database | Not Supported | Use Instead |
|---|---|---|
| PostgreSQL, Amazon Redshift | SSL mode verify-full |
verify-ca
|
| MySQL | SSL mode VERIFY_IDENTITY |
VERIFY_CA
|
| Microsoft SQL Server | Windows authentication; named instances (server\instance) |
SQL Server authentication; the host and the instance's TCP port |
| Oracle | Connection types other than Service ID and Service name (for example, TNS) | Service ID or Service name, with the host and listener port |
Preparing the Bastion
The team that runs the bastion performs these steps as a user that can run sudo.
Listing and Checking Your Databases
Write down each database as host:port, exactly as your Sisense connections will use it:
-
Use lowercase:
db.internal.example.com, notDB.Internal.Example.com. -
Always include the port, even the default: PostgreSQL
5432, MySQL3306, SQL Server1433, Oracle1521, Redshift5439. -
A host name and its IP address are different entries. If some connections use the name and others use the IP address, list both.
-
Put IPv6 addresses in brackets:
[2001:db8::10]:5432.
From the bastion, check that each database is reachable (replace the host and port):
timeout 5 bash -c '</dev/tcp/db.internal.example.com/5432' && echo reachable
If you do not see reachable within 5 seconds, allow the bastion's private address in the database's firewall or security group, then check again.
Creating a Dedicated User for Sisense
Create a user that exists only for Sisense, with no password and no shell. This topic uses sisense-tunnel; any valid Linux user name works.
sudo useradd --create-home --shell /sbin/nologin sisense-tunnel
sudo install -d -m 700 -o sisense-tunnel -g sisense-tunnel /home/sisense-tunnel/.ssh
sudo install -m 600 -o sisense-tunnel -g sisense-tunnel /dev/null /home/sisense-tunnel/.ssh/authorized_keys
Limiting What the Sisense User Can Do
To limit the Sisense user:
-
Add this block at the end of
/etc/ssh/sshd_config. In thePermitOpenline, list your databases, separated by spaces:CopyMatch User sisense-tunnel
AllowTcpForwarding local
PermitOpen db.internal.example.com:5432 10.20.0.15:3306
ForceCommand /bin/false -
If
sshd_configusesAllowUsersorAllowGroups, addsisense-tunnelto it, and make sure noDenyUsersorDenyGroupsline matches the user. -
Check the configuration and apply it:
Copysudo mkdir -p /run/sshd && sudo sshd -t && echo "configuration OK"
sudo systemctl try-reload-or-restart sshd 2>/dev/null || sudo systemctl try-reload-or-restart sshIf you do not see
configuration OK, fix the line that the error names and run the check again.
The following table describes what each setting does:
| Setting | What It Does |
|---|---|
AllowTcpForwarding local
|
Sisense can open connections through the bastion, but cannot open listening ports on it. |
PermitOpen
|
Connections can go only to the databases you list. |
ForceCommand /bin/false
|
Blocks commands and file transfer, even if the server allows SFTP. Sisense never runs commands, so this does not affect the tunnel. |
Important:
PermitOpen is required. Without it, anyone who can create database connections in Sisense can reach any address the bastion can reach, including services on the bastion itself.
Opening the SSH Port to Sisense
In your firewall or cloud security group, allow TCP to the SSH port (usually 22) from the Sisense IP Addresses. Do not open the port more widely for Sisense, and leave your other rules unchanged.
Adding the Tunnel in Sisense
A Sisense administrator performs these steps.
To add a tunnel:
-
Go to Admin > App Configuration > Network Tunnels and click Add Tunnel.
-
Enter the tunnel details:
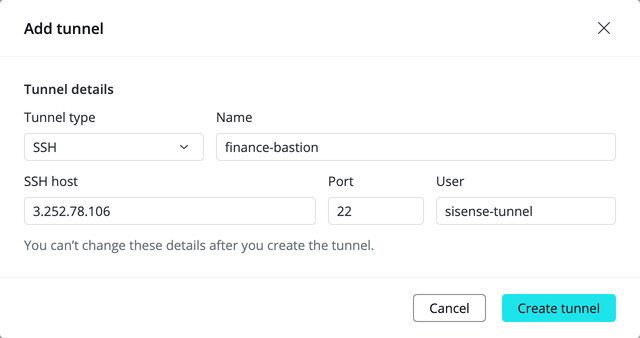
Field Value Name A name your team will recognize, such as finance-bastion. You can use letters, digits, spaces, dots, underscores, and dashes.Tunnel type SSH SSH host The bastion's public IP address or DNS name. Port The bastion's SSH port, usually 22.User The dedicated user on the bastion, such as sisense-tunnel.Note:
You cannot change these details after you create the tunnel. To change them, delete the tunnel and add it again.
-
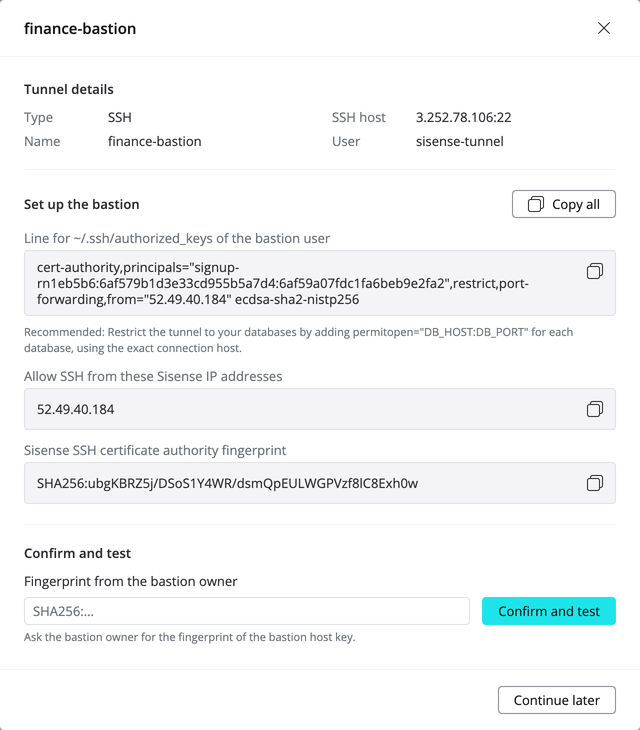
Click Create tunnel. Sisense connects to the bastion to read its host key, then shows the setup details:
-
Line for ~/.ssh/authorized_keys of the bastion user
-
Allow SSH from these Sisense IP addresses
-
Sisense SSH certificate authority fingerprint
-
-
Click Copy all and send the text to the bastion team, or keep the window open if you authorize Sisense on the bastion yourself. If you click Continue later, the tunnel appears in the list with the status Not verified. To return to it, click Continue setup.
The setup details also call for restricting the tunnel to your databases with a Match User block in sshd_config. This is the configuration described in Limiting What the Sisense User Can Do; if the bastion team has already done it, no further change is needed.
Authorizing Sisense on the Bastion
The team that runs the bastion performs these steps.
To authorize Sisense on the bastion:
-
Add the line from Sisense, unchanged and on one line, to the user's
authorized_keysfile. Paste it between the twoEOFlines:Copysudo tee -a /home/sisense-tunnel/.ssh/authorized_keys >/dev/null <<'EOF'
cert-authority,principals="…",restrict,port-forwarding,from="…" ecdsa-sha2-nistp256 AAAAE2VjZHNh…
EOFThe line starts with
cert-authorityand ends with a long key. -
Make sure the SSH port allows the addresses that Sisense listed under Allow SSH from these Sisense IP addresses. If they differ from the firewall rule you created, update the rule.
-
Get the bastion's host key fingerprint:
for f in $(sudo sshd -T | awk '$1=="hostkey"{print $2".pub"}'); do [ -f "$f" ] && ssh-keygen -lf "$f"; doneExample output:
256 SHA256:l1ARrH0Ajpk9X4IsEaQMfzJcB7/iWEBrU4hQwxQbs1E root@bastion (ED25519)
256 SHA256:YxybcCgnlORovGBWcH6g645MH6vaVpQ63cdIor2Jtio root@bastion (ECDSA)
3072 SHA256:+z2Z/blWldPIRmhHR6ZuItRHvO7PXhBMjooS7u9KatI root@bastion (RSA) -
Send the
SHA256:…value from the ED25519 line to the Sisense administrator. If there is no ED25519 line, send the ECDSA value; if there is neither, send the RSA value.Important:
The fingerprint lets Sisense verify that it is talking to your bastion and not to an impostor. The fingerprint is not secret, but the administrator must be sure it came from you, so send it through a trusted channel, such as your ticket system or a call.
Run each command and compare the result with the expected output in the comments:
getent passwd sisense-tunnel
# ends with :/sbin/nologin (or :/usr/sbin/nologin)

sudo ls -ld /home/sisense-tunnel/.ssh /home/sisense-tunnel/.ssh/authorized_keys
# drwx------ … sisense-tunnel   and   -rw------- … sisense-tunnel

sudo ssh-keygen -lf /home/sisense-tunnel/.ssh/authorized_keys
# one line per Sisense tunnel, ending in (ECDSA); the SHA256 value equals
# "Sisense SSH certificate authority fingerprint" shown in Sisense

sudo sshd -T -C user=sisense-tunnel,host=sisense,addr=52.49.40.184 | grep -Ei '^(allowtcpforwarding|permitopen|forcecommand)'
# allowtcpforwarding local
# forcecommand /bin/false
# permitopen <your databases>

rpm -q openssh-server 2>/dev/null || dpkg-query -W -f='${Version}\n' openssh-server
# 7.2 or later
In the sshd -T command, put your region's Sisense IP address after addr=. If the command does not print the three lines shown, another Match block (often in /etc/ssh/sshd_config.d/) takes precedence for this user. Move the settings into that block, or make sure that block does not match this user.
Confirming and Testing the Tunnel
A Sisense administrator performs these steps.
To confirm and test a tunnel:
-
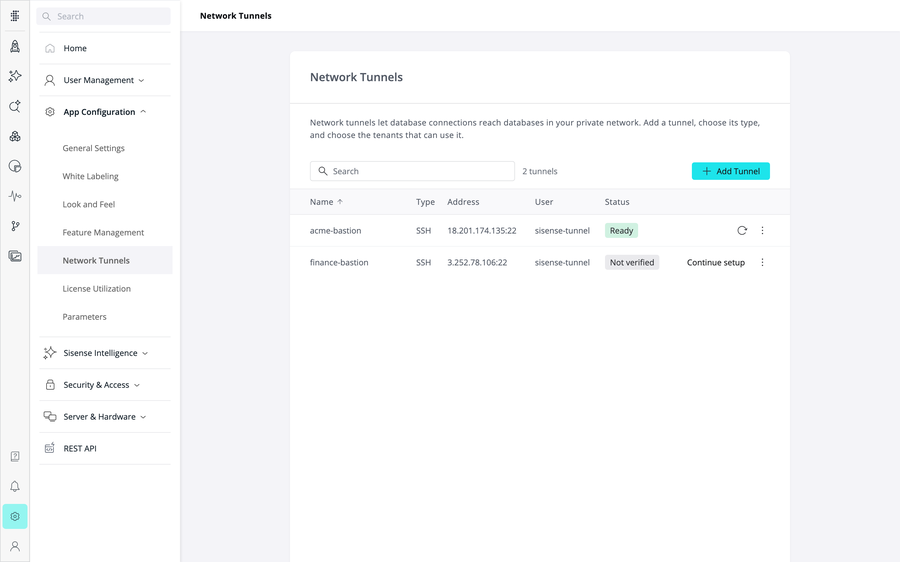
On the Network Tunnels page, find the tunnel (status Not verified) and click Continue setup.
-
In Fingerprint from the bastion owner, paste the fingerprint from the bastion team.
-
Click Confirm and test. Sisense checks the fingerprint, then signs in to the bastion with a test certificate.
-
When "Test passed" appears, click Done. The tunnel's status changes to Ready.
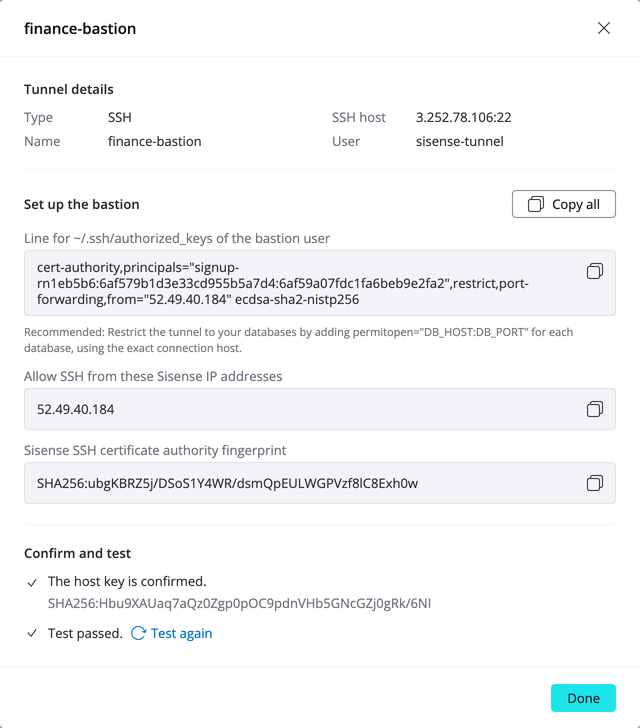
If an error appears, see Troubleshooting, fix the cause, and click Test again.
Note:
The test proves that Sisense can sign in to the bastion. It does not connect to your database; connecting a database through the tunnel does.
Connecting a Database Through a Tunnel
Anyone who creates connections in Sisense can use a tunnel whose status is Ready.
To connect a database through a tunnel:
-
Create a connection as usual (for example, when you add data to an ElastiCube or a live model), and select a Supported Databases.
-
In Location, enter the database host exactly as it appears in
PermitOpen, in lowercase. For PostgreSQL, MySQL, and Redshift, enterhost:port. For SQL Server and Oracle, enter the host in the server field and the port in the port field. -
Select Use SSH tunnel.
-
In SSH host, select the tunnel. The list shows only tunnels set up in your deployment.
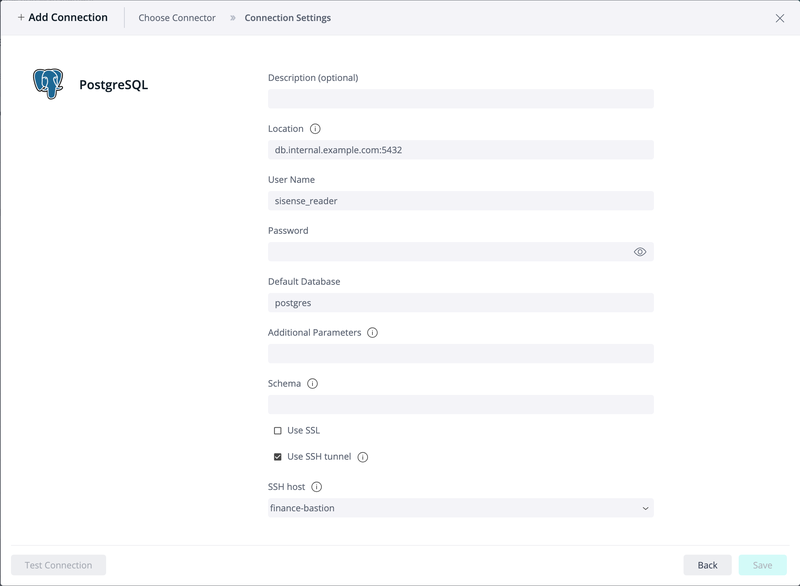
-
Complete the database user, password, and the rest of the form as usual, and continue. When the list of databases or tables appears, the connection works end to end.
Managing Network Tunnels
To manage tunnels, go to Admin > App Configuration > Network Tunnels.
| Status | Meaning | What to Do |
|---|---|---|
| Ready | The last test passed. | Nothing. To check again, click Run test. |
| Not verified | Setup is not finished. | Click Continue setup and finish authorizing and testing the tunnel. |
| Test failed | The last test failed. | Click View details to see the error, then see Troubleshooting. |
Adding or Removing a Database
To add or remove a database:
-
On the bastion, update the
PermitOpenline, then check and apply the configuration as described in Limiting What the Sisense User Can Do. -
Run
sudo pkill -u sisense-tunnel. This ends the open tunnel sessions so that they sign in again with the new list; Sisense reconnects automatically within a minute.Important:
This command interrupts any queries running at that moment, so pick a quiet time. Until you run it, a removed database is still reachable through an open tunnel, and an added database is still refused.
Deleting a Tunnel
To delete a tunnel:
-
On the Network Tunnels page, in the tunnel's row, click
 , then click Delete.
Important:
Database connections that use the tunnel stop working. You cannot undo this.
-
On the bastion, remove the tunnel's line from
authorized_keys, then end its open sessions withsudo pkill -u sisense-tunnel. -
When no tunnels are left, also remove the user, the
Matchblock, and the firewall rule.
Revoking Access in an Emergency
Remove the Sisense lines from authorized_keys to stop new sign-ins, then run sudo pkill -u sisense-tunnel to end the open sessions. Open tunnels keep working until you end them; removing a firewall rule alone does not end open sessions.
Handling Bastion and IP Address Changes
-
Bastion rebuilt or host keys changed - To protect you from impostors, Sisense refuses to connect to a bastion whose host key changed. Delete the tunnel, add it again, and remove the old line from
authorized_keys. -
Sisense IP addresses changed - Sisense notifies you in advance. Update the firewall rule. Then click View details for the tunnel and replace the tunnel's line on the bastion with the new line shown there (the addresses are part of the line).
Auditing Access
The bastion's SSH log records every Sisense sign-in with a key ID that starts with tunnel-manager:. Sisense Support can match it to Sisense records.
Security Considerations
-
What Sisense can do on the bastion - Sisense can only open connections to the databases in
PermitOpen. Theauthorized_keysline trusts only this tunnel's certificates (principals), only from Sisense IP addresses (from), and allows only port forwarding, with no terminal, agent, or X11 forwarding (restrict). The no-login shell andForceCommand /bin/falseblock commands and file transfer. -
Keys and passwords - Sisense stores no password and no private key on the bastion. Each tunnel creates its own key in memory. Sisense's certificate authority is a non-exportable key in a cloud key-management service dedicated to your deployment. It signs each tunnel's key with a certificate that is valid for one hour and is renewed while the tunnel runs. The bastion checks the certificate at sign-in; a session that is already open stays open after its certificate expires.
-
Verifying a line from Sisense - Every line from your deployment has the same certificate authority. Run
sudo ssh-keygen -lf /home/sisense-tunnel/.ssh/authorized_keysand compare the value with the Sisense SSH certificate authority fingerprint that you read directly in Sisense, not in the message that carried the line. -
Who can use a tunnel - Only Sisense administrators can create a tunnel, and each tunnel works only after the bastion team adds its line. When a tunnel is Ready, it is available to all tenants in your deployment. Anyone who can create database connections can connect through it, but only to the destinations in
PermitOpen.
Troubleshooting
If the information below does not solve the problem, contact Sisense Support and include the tunnel name, the time of the failure, and the exact message.
When Adding a Tunnel
| Message | Cause and Resolution |
|---|---|
| The bastion must be reachable from the internet; private and internal addresses are not allowed | Use the bastion's public IP address or DNS name. |
|
Could not complete an SSH handshake with the bastion The bastion did not complete an SSH handshake in time |
Sisense cannot reach the SSH port. Check the address and the port, that the firewall allows the Sisense IP addresses, and that the SSH service is running. The second message appears when the firewall silently drops the connection. |
| The bastion host key is too weak (RSA keys need at least 2048 bits) | Create an ED25519 host key (sudo ssh-keygen -A creates any missing default keys). If sshd_config lists HostKey lines, add HostKey /etc/ssh/ssh_host_ed25519_key. Apply the configuration and try again. |
| A tunnel with this name already exists. Enter a different name. | Choose another name. |
| Tunnel quota reached | Delete a tunnel you no longer use, or contact Sisense Support. |
When Testing a Tunnel
| Message | Cause and Resolution |
|---|---|
| This fingerprint doesn't match the host key. | Usually, the bastion team sent the fingerprint of a different key type. Send the ED25519 fingerprint. If it still does not match, check with the bastion team that the address is correct: a mismatch can mean you are not talking to your bastion. |
| The bastion refused the login: check that the authorized_keys line is installed for the bastion user |
One of the following:
Run the checks in Verifying the Bastion Configuration. If the server sets |
| The tunnel could not connect to the bastion | Check the firewall rule and that the SSH service is running. |
| The bastion presented a different host key than the one confirmed at registration | The host key changed. Delete the tunnel and add it again. |
|
The bastion did not complete the SSH login in time The tunnel did not become ready in time |
The network or the bastion is slow. Click Test again. If the problem persists, check the bastion's load and network path. |
| Too many tunnel tests are running; try again shortly | Wait a minute and click Test again. |
When Connecting a Database
| Message | Cause and Resolution |
|---|---|
| Select the SSH host to connect through | Select a tunnel in SSH host. |
| SSH tunnel: The tunnel is not ready: an admin must test it successfully first | The tunnel is not Ready. Confirming and Testing the Tunnel. |
| An SSH tunnel needs a single database host (host or host:port) | Enter one host, optionally with :port, not a list or a connection string. |
| An SSH tunnel needs the database server address (a connection string cannot be tunneled) | Fill in the host field of the form. |
| SSH tunnels do not support Windows authentication | Use SQL Server authentication. |
| SSH tunnels need the SQL Server host and port; named instances (server\instance) are not supported | Enter the host, and enter the instance's TCP port in the port field. |
| SSH tunnels support the Oracle connection types "Service ID" and "Service name" | Change the connection type to Service ID or Service name. |
| SSH tunnels do not support the SSL mode verify-full yet | For PostgreSQL or Redshift, use verify-ca. |
| SSH tunnels do not support the SSL mode VERIFY_IDENTITY yet | For MySQL, use VERIFY_CA. |
| The connection fails although the tunnel is Ready (for example, MySQL: "Communications link failure … The driver has not received any packets from the server.") |
Possible causes: the host and port do not exactly match a To find the host and port that Sisense requested, run the following command on the bastion:
Then add exactly that host and port to |