Connecting to PostgreSQL
Last updated: June 10, 2026
| Tier | Deployment |
|
|
|
Sisense enables quick and easy access to databases, tables, and views contained within PostgreSQL databases.
You can import your PostgreSQL data Live models, using Introducing Live Models or into a Sisense ElastiCube.
To add data from PostgreSQL:
- In the Data page, open or create a new data model.
-
In the Model Editor, click
 . The Choose Connector window is displayed.
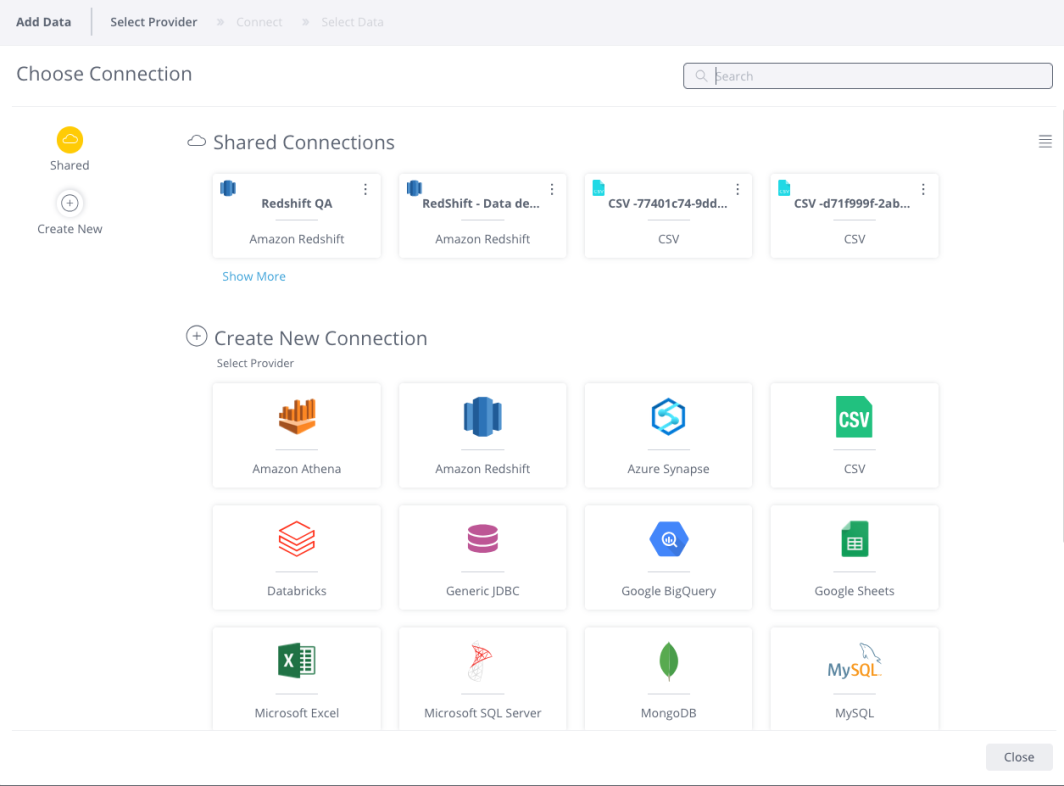
- Choose an available managed connection, or create a new connection, for PostgreSQL. The PostgreSQL area is displayed.
- Enter the following details:
- Location: Enter the address of the remote server (host:port) of the database.
- Default Database: If you are accessing PostgreSQL with a non-Admin user, enter the name of the
default database you'll use for authentication. If you are using Admin credentials to access PostgreSQL, you can
leave this field empty.
The Default Database is an optional property in the connection to a data source. When specified, it acts as a starting point or shortcut, automatically selecting a database during the connection setup to streamline user workflows.
IMPORTANT:
The default Database is not a security feature. It does not restrict Sisense users from accessing other databases within the data source. Access should be regulated through user permissions in the PostgreSQL database management system.
- (Optional) Select Encrypt Connection to configure the driver to encrypt all communication with the PostgreSQL instance before sending it over the network, and then select Trust Server Certificate.
- (Optional): For secure connections, select Use SSL. The following fields are displayed:
- Select SSL Mode: Select the relevant mode to determine whether or with what priority a secure
SSL TCP/IP connection will be applied with the server. There are six modes:
- disable
- allow
- prefer
- require
- verify-ca
- verify-full
- SSL Root Certificate: Enter the full path of the SSL certificate authority (CA) certificate(s) in .crt format.
- SSL Certificate: Enter the file name of the client SSL certificate in .crt format.
- SSL Key: Enter the file name of the client SSL key in .key.der format.
- SSL Password: Enter the SSL password.
- Select SSL Mode: Select the relevant mode to determine whether or with what priority a secure
SSL TCP/IP connection will be applied with the server. There are six modes:
- (Optional) In Additional Parameters, enter additional configuration options by appending
key-value pairs to the connection string. For example:
UseDeclareFetch=1;Fetch=500;
For a full list of connection string options, click here. -
Click
 . A list of tables in the database is displayed. All tables and views associated with the database will appear in a new window.
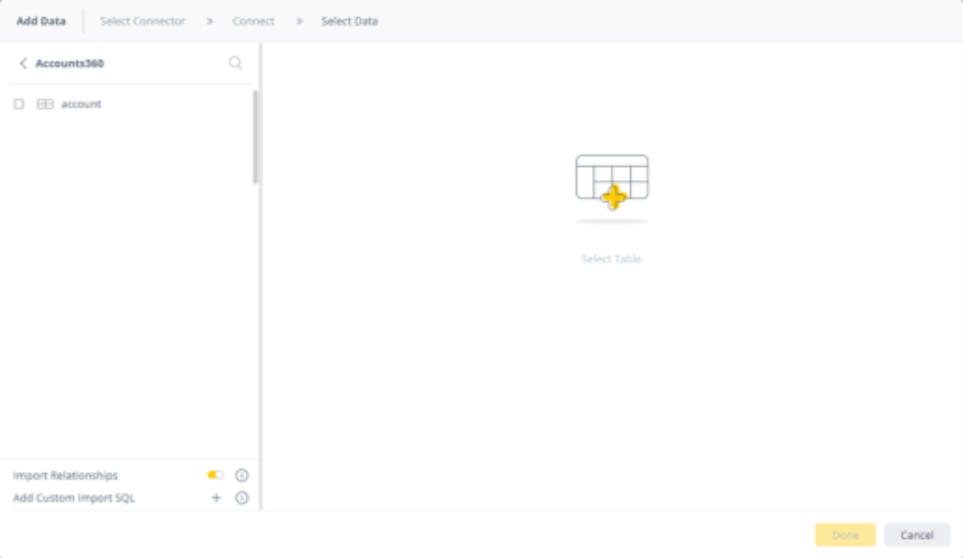
- From the Tables list, select the table or view you want to work with. You can click

next to the relevant table or view to see a preview of the data inside it. When you select the table or view, two new options are displayed at the bottom of the list, Import Relationships and Add Custom Table Query (Live models) or Add Custom Import SQL (for ElastiCubes). - (Optional) By default, existing relationships between tables are automatically replicated in the Live model or ElastiCube. You can disable this by toggling the Import Relationships switch.
- (Optional):
- Live: Click + to customize the data you want to access with SQL. See Creating Custom Live Table Queries for more information.
- ElastiCube: Click + to customize the data you want to import with SQL. See Importing Data with Custom Queries for more information.
- After you have selected all the relevant tables, click Done; the tables are added to your schema in Sisense.
Note:
If your custom import or Live query converts TIMESTAMP WITH TIME ZONE data (for example, using PostgreSQL's TIMEZONE() function), the result also depends on the TZ ConfigMap setting, the OriginalDBTimeInEC parameter, and the time zone of your PostgreSQL session. See How Time Zone Settings Affect Timestamp Data.
Troubleshooting
Timeout Issues
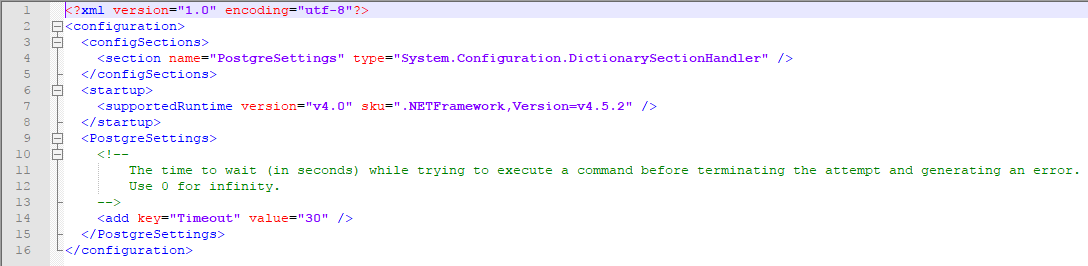
The default connection timeout limit to PostgreSQL data sources is 30 seconds. You can modify this limit by editing
the Sisense.Connectors.PostgreSqlConnector.dll configuration file. In the configuration file, under the
section PostgreSettings, set the value of the parameter Timeout to change the connection timeout
limit. This is useful if you received a Timeout exception when trying to connect.
The configuration files are located here:
/opt/sisense/storage/connectors/postgresql/description.json
PostgreSQL JDBC driver provides the following connection parameters, which are set in the Additional Parameters field:
- loginTimeout = int
Specify how long to wait for the establishment of a database connection. The timeout is specified in seconds. - connectTimeout = int
The timeout value used for socket connect operations. If connecting to the server takes longer than this value, the connection is broken. The timeout is specified in seconds and a value of zero means that it's disabled. - socketTimeout = int
The timeout value used for socket read operations. If reading from the server takes longer than this value, the connection is closed. This can be used as both a brute force global query timeout and a method of detecting network problems. The timeout is specified in seconds and a value of zero means that it's disabled.
Alternatively, they can be specified in a configuration file and will be applied to all connections.
{
"fileVersion": "config://sisense/connector/postgresql#2",
"configurationType": "json",
"payload": {
"provider": "PostgreSQL",
"displayName": "PostgreSQL",
"version": "1.1.0",
"category": "Database",
"isAccumulativeSupported": true,
"sqlForTableSchema": "where",
"isLiveSupported": true,
"isCountableSupported": true,
"isWebECMSupported": true,
"startAsUser": false,
"isLiveRelationsSupported": true,
"connectionPoolConfiguration": {
"useConnectionPooling": false,
"refreshPeriod": 60000,
"connectionIdleTimeout": 120000
},
"jvmParameters": [
"-Xmx4G",
"-server",
"-Dfile.encoding=UTF-8",
"-Duser.timezone=UTC"
],
"connectionParametersDelimiter": "&",
"connectionStringParameters": {},
"connectionProperties": {
"socketTimeout": 0,
"connectTimeout": 0,
},
"connectionSetFunctions": {
"autoCommit": false
},
"statementSetFunctions": {
"fetchSize": 5000
}
}
}
Conflict with Recovery Error
If you receive a "conflict with recovery" error message, set the following configuration on your PostgreSQL database:
enable hot_standby_feedback = on along with "max_standby_streaming_delay = -1"
For more information, refer to the PostgreSQL documentation on this error, here.