Setting Up ElastiCube Sets
Previous Steps
Sisense ElastiCube Sets are collections of ElastiCube models with identical schemas that allow you to query running ElastiCubes within the ElastiCube Set while other ElastiCubes are building.
Note:
From Sisense V6.5 onwards, you can query ElastiCubes during accumulative builds without ElastiCube Sets. However, to ensure that your users can query ElastiCubes after a failed build, you can implement ElastiCube Sets to handle your queries while Sisense rebuilds the failed ElastiCube.
Grouping ElastiCubes into ElastiCube sets has several benefits:
- Allowing viewers to query the most up-to-date cubes within an ElastiCube Set.
- Reducing server load during builds by using multiple nodes in which only the non-building node is queried.
- Achieving data redundancy by running builds interchangeably across multiple nodes.
To maximize availability and reduce build and dashboard response times, Administrators can distribute resource allocation across multiple Sisense nodes. By adding ElastiCubes across multiple servers to a single ElastiCube Set, Administrators can configure ElastiCube Sets to run builds interchangeably via the Sisense Orchestrator Service so the most up-to-date and complete ElastiCubes are queried.
The Sisense Orchestrator Service is an automated service that can be configured to synchronize builds across the ElastiCube Set. If you change your schemas within any of the ElastiCube s, you must manually change the schemas in all of the ElastiCubes and rebuild the cube entirely.
The tutorial below provides an overview of how ElastiCube Sets work and how to set them up.
This page provides the following information:
-
Instructions on Creating ElastiCube Sets and Deleting ElastiCube Sets.
-
A walkthrough for how you can create a set and configure the Sisense Orchestrator Service. See Setting Up ElastiCube Sets.
-
(Optional) Instructions on how to implement and configure the Sisense Orchestrator Service. See Setting Up ElastiCube Sets.
-
How to update an ElastiCube within an ElastiCube Set.
Creating ElastiCube Sets
From the Admin page, Administrators can create ElastiCube Sets.
ElastiCube Sets require at least two ElastiCube s. The Administrator can add multiple ElastiCubes to a set, however, ElastiCubes can only be part of a single ElastiCube Set at a time. After an Administrator creates an ElastiCube Set or adds an ElastiCube to an existing set, the ElastiCube is disabled in the original server and no further actions can be performed outside of the set.
Sisense recommends that you develop ElastiCubes in a development environment or separate ElastiCube to ensure they work before adding them to an ElastiCube Set.
Note:
Build nodes used in high availability configurations should not be included in your ElastiCube Set. If you have implemented high availability, only query nodes should be included in the ElastiCube Set.
To create an ElastiCube Set:
-
Click Admin and select the Data Sources tab on the left.
-
For the relevant ElastiCube you want to add to the ElastiCube Set, select
 and click Create ElastiCube Set.
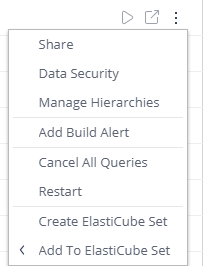
-
In the Create ElastiCube Set window, enter a name for the set and select the ElastiCubes you want to include in the set.
-
From the Routing Strategy list, select a strategy for how you want to route traffic to your ElastiCube Set.
-
From the Failover ElastiCube list, select which ElastiCube you prefer to use if the other ElastiCubes in the set are not available. Failover ElastiCubes only handle queries when an ElastiCube that is part of the ElastiCube Set fails.(Note: this feature is available in Sisense V6.7 onwards).

-
Click Create.
-
In the Existing Dashboards popup message, indicate if you want to associate your ElastiCube ’s dashboards with the ElastiCube Set or maintain the association with the original ElastiCube.

-
Click OK. The ElastiCube Set is created and displayed in the Admin page.
After you have created an ElastiCube Set, you can configure the ElastiCube Managing Drill Hierarchies, Access Rights, and Data Security.
Adding ElastiCubes to ElastiCube Sets
After you have created an ElastiCube Set, you can add more ElastiCubes to the set.
When you add an ElastiCube to an existing ElastiCube Set, any dashboards associated with that ElastiCube are passed on to the ElastiCube Set.
Note:
You cannot add ‘localhost’ to an ElastiCube Set. Instead, you can add your localhost as a new server with its IP address as the server name and then add ElastiCubes from it to an ElastiCube Set.
To add an ElastiCube to the ElastiCube Set:
-
Click Admin in the upper right corner and select the ElastiCubes tab on the left.
-
For the relevant ElastiCube you want to add to the ElastiCube Set select
 and click Add to ElastiCube Set.
OR
In the ElastiCube Set table, click
 and select Edit
  and select the ElastiCubes to be added to the set. Click Save after you have selected the relevant ElastiCubes.
The ElastiCube is added to the ElastiCube Set and displayed in the ElastiCube Set table on the Admin page.
Deleting ElastiCube Sets
Administrators can delete ElastiCube Sets. Deleting an ElastiCube Set removes the set from the Admin page and any dashboards associated with that set.
To delete an ElastiCube Set:
-
Hover over its title and click the Trash
 icon.
icon. -
Click Delete to confirm that you want to delete the ElastiCube Set.
Overcoming Build Failures in ElastiCube Sets
In Sisense , if an accumulative build fails, you must rebuild the ElastiCube that failed entirely to ensure the validity of the ElastiCube.
If you use the Sisense Orchestrator Service, Sisense recommends that you define the value of the Queue key as “FullUpdateExisting, Full”
"queue": ["FullUpdateExisting","Full"]
In this configuration, the Sisense Orchestrator Service attempts to build the set using accumulative builds and in the event of a failure, a full build is initiated.
Retrieving a Token
As part of the config.json file, you must provide a token that Sisense uses for authenticating your ElastiCube Sets.
You can retrieve this token through Sisense’s API documentation. After you retrieve the token, save it as the value of apiKey in the config.json file.
To retrieve a token:
-
In Sisense, access the API documentation, select Admin > REST API.
-
In the REST API Reference site, select Version 1.0 in the top-right corner of the page.
-
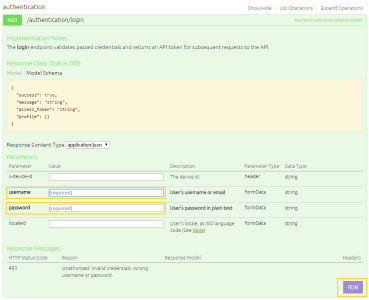
Open the authentication method.
-
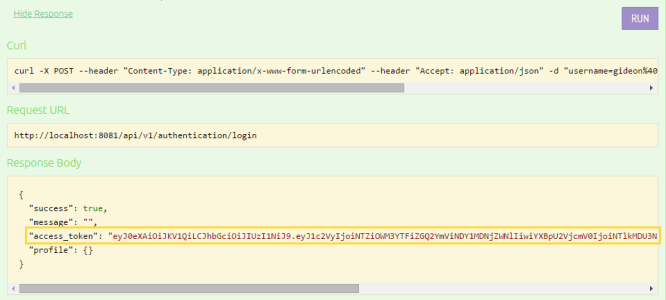
Enter your login credentials and click Run. The access_token is displayed in the Response Body below.
-
Copy the token and paste it into the value of apiKey in the config.json file.
Updating ElastiCubes within an ElastiCube Set
The Sisense Orchestrator Service automatically updates your data across ElastiCubes within an ElastiCube Set. If you want to modify the schema, for example, by adding new tables, you must manually rebuild the ElastiCubes and then import that ElastiCube to the other machines hosting your ElastiCube Set.
While rebuilding your ElastiCube, you should deactivate the Sisense Orchestrator Service to prevent it from updating the ElastiCubes with different schemas.
After the schemas are identical for all the ElastiCubes across the ElastiCube Set, you can reactivate the Sisense Orchestrator Service to automatically update your ElastiCubes.
To update an ElastiCube within ElastiCube Set:
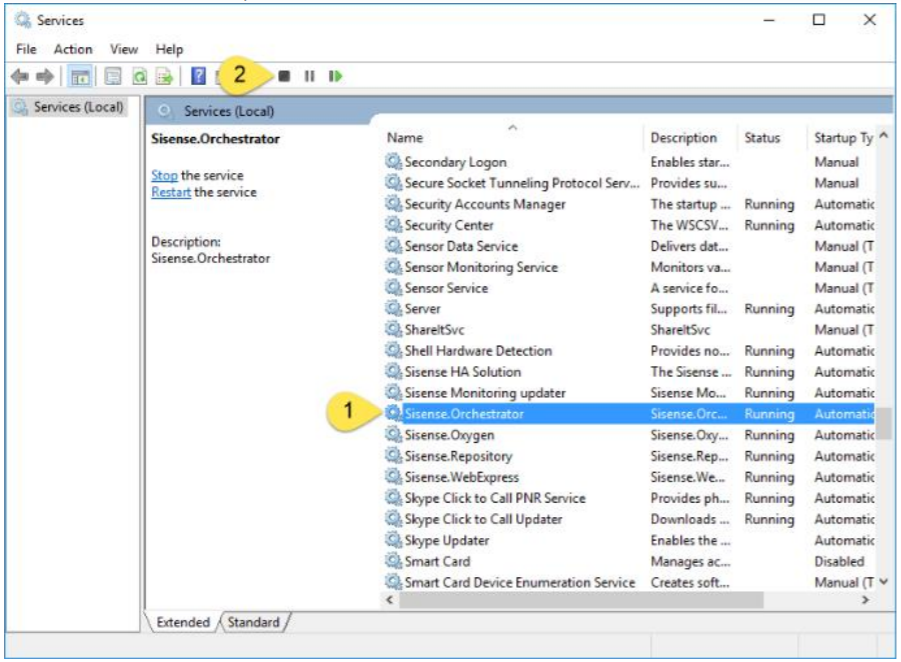
- Stop the Sisense Orchestrator Service. Open Windows Services, select Sisense.Orchestrator, and click
 .
.
- Apply your schema changes to the ElastiCube and run a full build.
- Export the ElastiCube and import it on your other machines. For more information, see Importing and Exporting ElastiCube Data.
- In Windows Services, restart the Sisense Orchestrator Service by selecting Sisense.Orchestrator and clicking
 .
.
ElastiCube Permissions
When ElastiCubes are put into a set their permissions from the ElastiCube is carried over to the set, but when the ElastiCube Set permissions change this does not flow back to the individual ElastiCube. This can lead to Data Administrators not having access to ElastiCubes that they should be able to edit on the Data page.
You can work around this by using the REST API v0.9 to apply the permissions to the ElastiCube, not the ElastiCube Set.
PUT http://url/api/elasticubes/IP/cube name/permissions
The Data page does not consider the permissions on the set but on the actual ElastiCube itself which cannot be edited from the Admin > Data Models page.
Next Steps
.r.