Performing an Upgrade
After backing up your Sisense files and configuration, the next step is to upgrade Sisense. If you are hosting a single Sisense server, then you can upgrade Sisense using the Sisense Installer. If you are hosting multiple Sisense servers, you can use the Multi-Node Deployment tool to silently upgrade each of your servers remotely.
Best Practice: Upgrade a staging environment so you can know how the upgrade will affect your users and your configuration before upgrading your production environment.
Upgrading a Single Server Environment
To install the latest version:
-
Download the latest version of Sisense. For more information, see Installing Sisense.
-
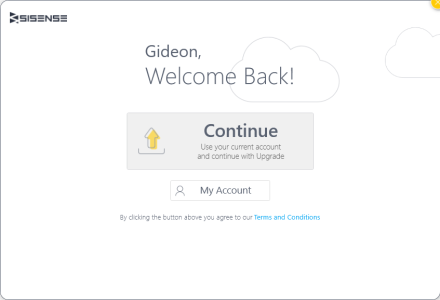
Run the installation file as a Windows Administrator. Sisense automatically detects if a version is already installed, and displays the upgrade wizard.
-
Click Continue.
-
Click Upgrade.

Upgrading a Multi-Node Deployment
To upgrade a Multi-Node deployment, you can use the Multi-Node deployment tool. This tool supports Sisense V7.2 and later. The Multi-Node deployment tool remotely installs or upgrades Sisense on your server to the version you select in the tool.
Before proceeding with the installation, ensure that the relevant Communication Ports for Multi-Node Deployments are available on each of the servers. See Communication Ports for Multi-Node Deployments for more information.
To upgrade a Multi-Node deployment:
-
Download the Deployment Wizard. See Installing the Multi-Node Deployment Wizard if you have not already downloaded and installed it.
-
After installing the Deployment Wizard, the screen below should be displayed. If you have closed the Deployment Wizard, in your Sisense High Availability Configuration directory, run SisenseHAWizard.exe.
-
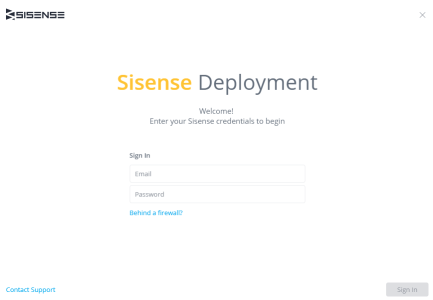
Enter your Sisense login credentials and click Sign In.
-
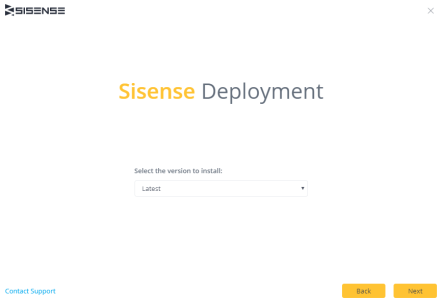
Select the version of Sisense you are upgrading to.
-
Click Download Agent Installation to install the Sisense Agent and click Next.
-
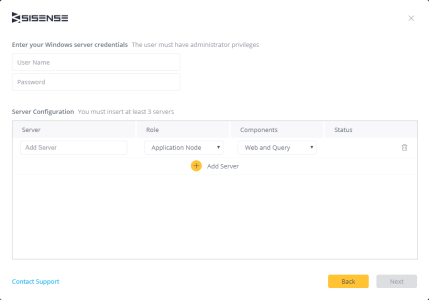
In the Deployment Wizard, enter your Windows server credentials. These credentials will be used to connect to each of the servers in your environment, so the user name and password should be the same for each server and the user must have Admin privileges.
-
In the Server Configuration area, enter the address of your server in the Add Server field.
-
In Role , select the role of the server. There are two possible roles,Application Node and Build Node. If your server is going to support Sisense's web services or act as a query node, select Application Node. If your server is going to be the build node where ElastiCubes are built and then distributed to other nodes, select Build Node.
-
If you selected Application Node as your server's role, you need to define what components it will support. There are three options you can select:
- Web: Supports the web services of Sisense
- Query: Responsible for running queries and hosting ElastiCubes
- Web and Query: The server will support the web application and act as a query node
-
Click Add Server and repeat Steps 6-8 for each server you wish to add.
-
After each of your servers has been configured, click Next.
-
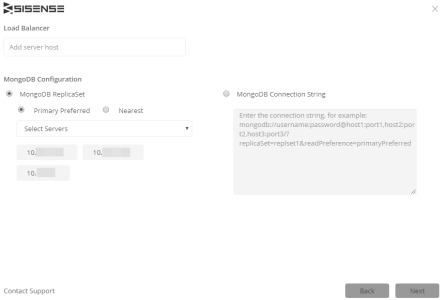
(Optional) If you have a load balancer, enter its IP address in the Load Balancer field. Your load balancer routes requests from your application nodes to your active query nodes to maximize performance and capacity utilization. This ensures communication between your load balancer, Sisense, and the nodes in your Multi-Node environment.
-
In the MongoDB Configuration area, create a replica set for supporting your application database. This ensures that each application database has the same metadata about ElastiCubes, dashboards, and filters.
-
Click Next. Sisense will automatically complete the setup of your Multi-Node environment. Close the Deployment Wizard once the setup is complete. After you have created your environment, the next step is to define how builds are distributed across all your servers. See Distributing ElastiCube Builds to Query Nodes.
Next Steps
.r.