Report Manager
The Report Manager is a Sisense certified add-on. This means that it comes installed together with Sisense and you do not need to perform any separate download or installation. However, it is a premium add-on and is only available if you have purchased a license. For purchasing information, contact your CSM. If licensed, the Report Manager is enabled by default, and can be disabled by an administrator if desired.
Overview
The Sisense Report Manager is an advanced UI-based report scheduler with highly-flexible scheduling capabilities including event-driven triggers and custom filters. Builders can set up and enable customized reports to be sent to a wide audience including non-Sisense users through a centralized tab within the Sisense product. The centralized view allows for live status updates, bulk operations, error alerts and more.
Report Manager is available to all organization tenants, so each tenant can schedule and send reports independently, without relying on the system tenant for configuration. The system tenant can enable Report Manager at the system level for all tenants.
The following are some of the functionality and benefits of the Report Manager:
-
Integrate Analytic report scheduling into workflows using event triggers through a Sisense API endpoint.
-
Highly-Flexible Report Scheduling: With the Report Manager, Sisense Admins can set up advanced schedules including custom end dates, as well as hourly, weekly, and monthly reporting options to meet a wide range of needs.
-
Custom Attachments/Links: Send reports with custom attachment settings. Select between PDF attachment, CSV exports of included pivots and tables and/or a dashboard link.
-
Save reports to specified path: Save scheduled reports at specified intervals for archival or common repository for shared use.
-
Centralized View of Reporting Jobs: Admins and dashboard designers will have a single page to view all their reporting jobs through the Sisense header.
-
Prioritize Jobs: Prioritize jobs in the event of delays or high-load so the system knows accurately which job to handle first.
-
Error Reporting: Get alerted at a global level or if an individual job fails for better monitoring and compliance. Also, define who gets the error alerts.
-
Report Scheduling to Non-Sisense users: Leverage the Report Manager to set up dashboard reports for non-Sisense users.
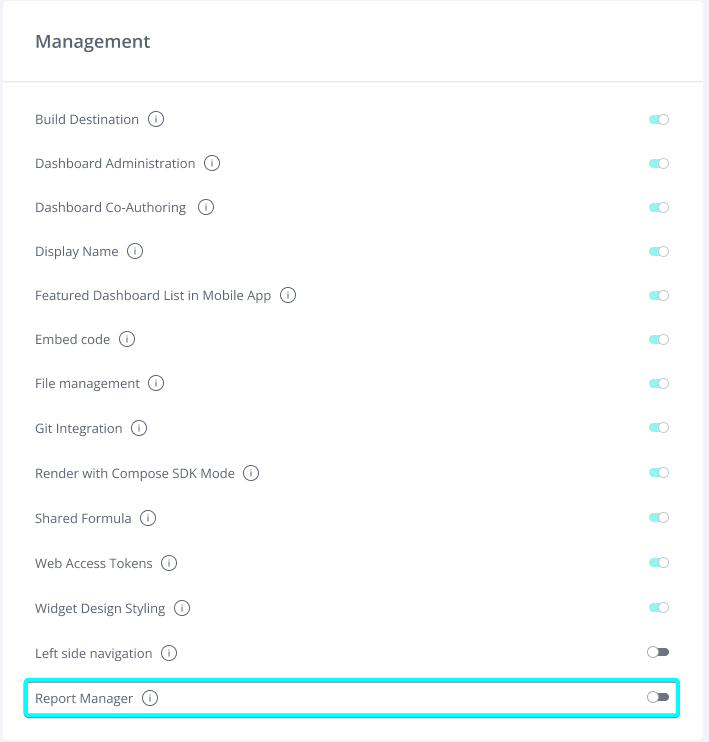
Disabling the Report Manager
Only administrators can disable the Report Manager. To disable it:
-
Select the Admin tab.
-
Select Feature Management > Management.
-
Toggle the switch off.
Administrator Settings
Sisense Administrators can configure how many reports can be sent simultaneously, which features will be accessible to users when creating reports, to where error notifications are sent, etc.
In multitenant environments, there are 2 levels of Report Manager admin permissions - system tenant admin and tenant admin.
-
System Tenant Admin: A system tenant admin has access to all settings and functions, can configure global settings, and modify the default settings. A system tenant admin can manage the reports created by users in the system tenant.
-
Tenant Admin: Can modify settings (except global settings) for their tenant and manage all reports created by users in their organization tenant.
All tenants can schedule reports using Report Manager
Feature Management
The ![]() icon is displayed for Administrators next to the Reports on hold toggle.
icon is displayed for Administrators next to the Reports on hold toggle.

Click the ![]() icon. The Settings window is displayed.
icon. The Settings window is displayed.
![]()
The Settings window enables Administrators to set which features Designers/Viewers will be allowed to use or configure. These options do not change the settings for existing reports:
-
Archiving: Show/hide the "Archive To" section for the report format configuration in the UI.
-
Priority: Show/hide the "Priority" selection for the report configuration in the UI. All the new reports will be created with a "Normal" priority by default.
-
Event Based: Show/hide the "Event Based" report option for the report scheduling configuration in the UI.
-
CSV Export: Show/hide the "CSV" report format option for the report configuration in the UI.
-
XLS Export: Show/hide the "Excel" report format option for the report configuration in the UI.
-
XLS Combined Export: Show/hide the "Excel" for all dashboard widgets report format option for the report configuration in the UI.
-
PDF Export: Show/hide the "PDF" report format option for the report configuration in the UI.
-
Dashboard Link: Show/hide the "Dashboard Link" report format option for the report configuration in the UI.
-
Jasper Excel: Show/hide the "Jasper Excel" report format option for the report configuration in the UI. This option appears if the Jasper Reports add-on is installed in the system. This setting is only available to the System Tenant Admin.
-
Jasper PDF: Show/hide the "Jasper PDF" report format option for the report configuration in the UI. This option appears if the Jasper Reports add-on is installed in the system and is only available to the System Tenant Admin.
Note:
Toggling the above features on/off (via UI or REST API) does not impact the previously created reports. For example, if a report has been created with “Combined Excel” option enabled, and an Administrator set this option to be disabled, then the report will still be exported into the Combined XLS format.
Additional features that can be enabled:
-
SFTP Enabled: When enabled, reports are archived via SFTP to a server designated on a per report basis. A list of SFTP server credentials must be provided in the “SFTP Servers” and a server must be selected for each report, if recipients are not designated. This replaces the default archiving process.
-
User Report Owner For Non-Sisense Users: When enabled, reports for recipients that do not have a Sisense user are sent with the report owner credentials. Otherwise, reports for these recipients are sent with the credentials of the configured “Non-Sisense User Email”.
-
Send Reports to Non-Sisense Users: When enabled, reports will be allowed to be sent to non-Sisense (external) users.
-
Show Error On Sending To Non-Sisense Users: Enable to show an error message when a report is sent to an external user and when “Send Reports to Non-Sisense Users” is disabled.
-
When the Show Error On Sending To Non-Sisense Users option is ENABLED and when Send Reports to Non-Sisense Users is DISABLED - Error message will be displayed after the report execution. There will also be a validation error upon saving such a report: “All recipients must have a Sisense user”.
-
When the Show Error On Sending To Non-Sisense Users option is DISABLED and when Send Reports to Non-Sisense Users is also DISABLED - there will be a warning message in “Last run” section of the report, and report will be sent to only Sisense users but not non-Sisense (external) users. There will also be a validation error upon saving such a report: “All recipients must have a Sisense user”.
-
Global Options
Note:
The settings in this section are only visible to System Tenant Admins.
In the same window, the following options can be configured:
-
Number of simultaneous reports: The amount of reports that the Report Manager can run at the same time. Modify this number cautiously to one that your system can handle. If the number of reports to be generated exceeds this threshold, new reports will be sent to the pending reports queue.
-
Maximum Export Retries: This is the number of times the Report Manager engine will try to generate a report in case of a failure. The default value is 3.
-
Report Generation Timeout: The limit in seconds for the report generation time per recipient. When report generation times out, a corresponding message will be sent to the recipient. Enter “0” for unlimited waiting time.
-
Example: If the value is configured to 300 seconds (5 minutes), then after 5 minutes of report generation (for a single recipient) if there was no success response for the report generation (for all report types in total), an email will be sent to the recipient indicating that there was a timeout and that this should be fixed manually, or the report should restart.
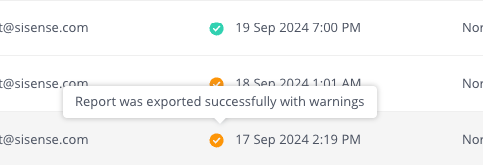
When the report for all the recipients is completed, if at least one of the recipients received a timeout, the following will occur:
-
Report status - successful with warnings. The icon color becomes orange. The tooltip text reads: “Report was exported successfully with warnings”.
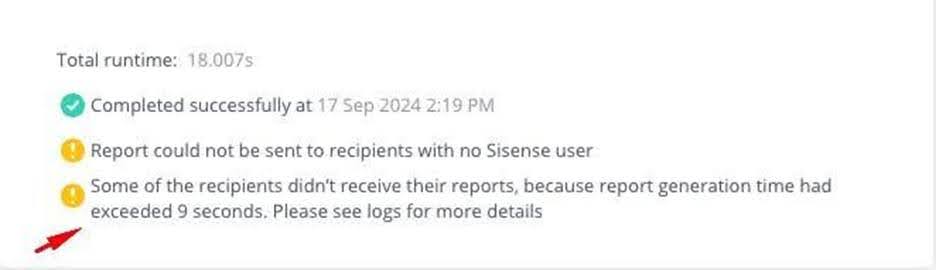
-
The error message for the report in the UI: “Some of the recipients didn’t receive their reports, because report generation time had exceeded X seconds. Please see logs for more details”.
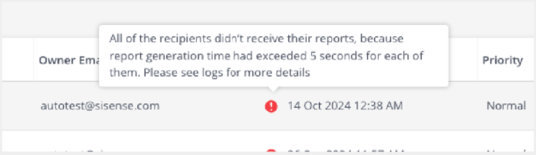
-
If only one recipient was set for the report and it failed due to this issue OR all recipients failed because of this issue, the message in the UI will be displayed with a red icon: “All of the recipients didn’t receive their reports, because report generation time had exceeded X seconds for each of them. Please see logs for more details”.
If a report fails with a timeout, all recipients for whom the report generation was not successful due to the timeout will receive an email notification with the reason why their report was not sent.
-
-
Remove BOM from CSV: Removes the UTF-8 BOM from exported CSV files
-
Additional Options
In the same window, the following options can be configured:
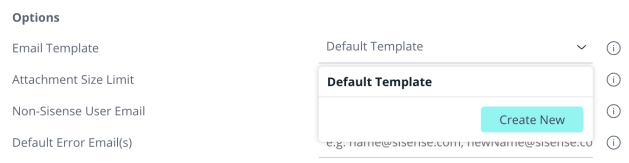
- Email Template: A list of existing email templates that can be selected by default. You can also create a new or modify an existing template using this control.
-
Attachment Size Limit: Limit in MB for the size of attached files to the email. If the limit is exceeded, report files will not be included in the email. Instead, a warning indicating that the limit has been exceeded will be displayed in the email. Default value is 25. Enter “0” for unlimited attachment size. When the limit is reached, the report will be considered as successful, but a report recipient’s email will contain a warning message (this message is configurable in translations). It is possible to configure a custom warning message via the template configuration.
-
Non-Sisense User Email: The email of a Sisense user that will be used to export reports to non-Sisense (external) users. External users reports will have the data security applied for this Sisense user.
-
Default error email(s): The email addresses where error notifications are sent when no specific email address has been defined for the report in the Send error notification to field when the report was created. You can add a comma-separated list of email addresses of both Sisense and non-Sisense users.
-
SFTP Servers: A list of allowed SFTP servers and their credentials. The parameter requires an array of server objects. Each server object includes:
-
host - Required. Server IP.
-
port - Required. Server port.
-
username - Required. Username to use when connecting to server.
-
password - Optional. Password to use when connecting to server (not required if authenticating with a privateKey).
-
serverName - Required. Is used as the server display name on report creation/editing view.
-
privateKey - Optional. Used for connecting via SSH to some servers which configurations may require a private key for authentication. PEM and OpenSSH formats are supported.
-
allowOnlyToGroups - Optional. An array of user group IDs. If provided, only users in the provided group are allowed to archive reports to the server. If not provided, all users can archive reports to the server.
-
For example:
[
  {
    "host": "my.host.com",
    "port": "",
    "username": "username",
    "password": "sftpserverpassword",
    "serverName": "My Server",
    "allowOnlyToGroups": ["609048af5da057002cbc4e43"]
  },
  {
    "host": "my.second.host.com",
    "port": "",
    "username": "username",
    "password": "sftpserverpassword",
    "serverName": "My Server",
    "privateKey": "-----BEGIN RSA PRIVATE KEY-----MIIBOgIBAAJBAKj34GkxFhD90vcNLYLIn…. ",
    "allowOnlyToGroups": ["609048af5da057002cbc4e45"]
  }
]
-
Local Export File Path: The local server path to save the exported files to. The path will be created if it does not exist.
-
CSV date format: The CSV date format will be translated based on these configurations. There are default date format values configured. The configured date format will be used for all report recipients.
Note:
If no format is selected, the date is presented as stored in the data source.
-
Time Zone: The time zone used for report schedules.
- Delete Exported Files: Select to delete exported files on report compilation. When enabled, all temporary report files are deleted on report compilation.
-
Allow Empty Excel Files: When enabled, an empty Excel file will be sent even if there is no data in the Excel file. When disabled, a report will be considered as a failed report in case there is no data for the Excel file for at least one recipient and a relevant error message will be displayed in the report status.
Configuring Email Templates
The Report Manager is installed with the default email template. To add a new email template:
-
As an Administrator, click
 (the Settings icon).
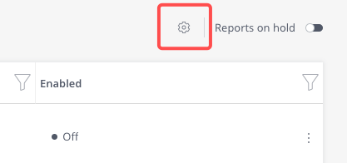
-
In the Settings window, expand the Email Template drop-down options, and click Create New.
-
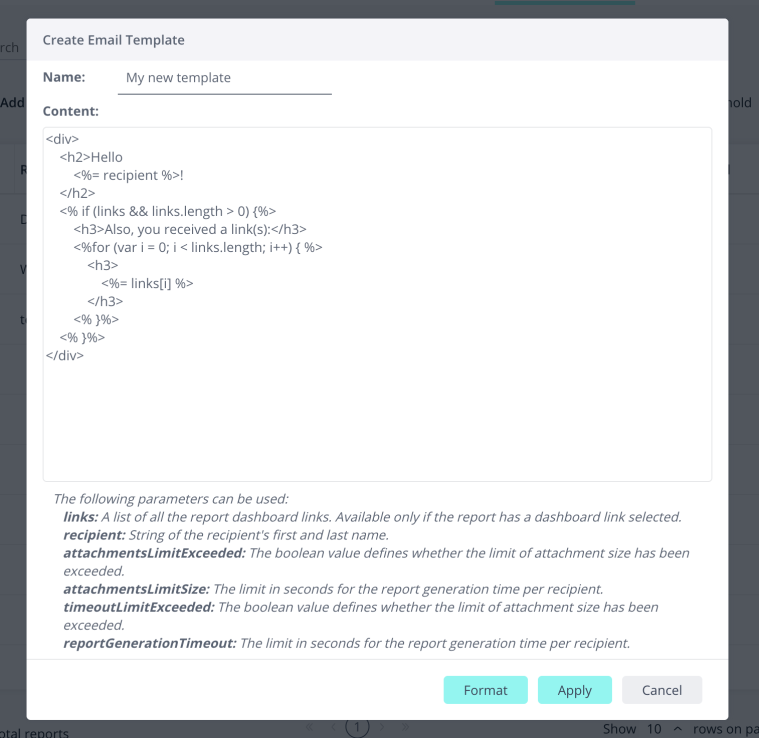
Modify the template, provide a name in the Name field, and click Apply.
-
You can add a code block that will show a warning message in case an attachment size for a recipient is exceeded. For that, you may add code like this:
Copy<% if (attachmentsLimitExceeded) {%>
<div style="color:red;">
{{ attachmentsLimitExceededMsg }}
</div>
<% }%>The message text is stored in the
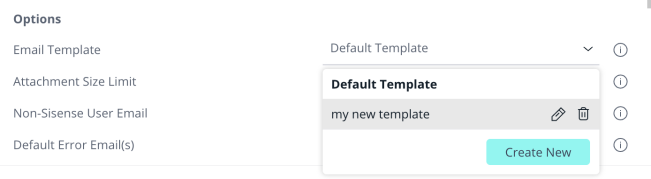
attachmentsLimitExceededMsgvariable which is defined in the translations files.Your newly created template will appear in the list.
-
You can select the new template and it will become the default template for every report.
-
You can edit your custom templates by clicking the pencil icon or remove them by clicking the trash can icon.
-
After all changes, click Submit at the bottom of the Settings window.
Note:
When a default email template is set, the template is applied to all tenants. Additionally, each tenant can add their own custom email templates and select one of them to be used for all reports within their tenant.
Email Template Parameters
The following email template parameters can be used when creating an email template:
-
links: A list of all the report dashboard links. Currently it is always a link to a single dashboard, due to the fact that it is possible to only create one report per dashboard. This option is available only if the report has a dashboard link selected as an option for the report format.
-
recipient: String of the recipient's first and last name, or an email address if there is no defined first and last name.
-
attachmentsLimitExceeded: The boolean value defines whether the limit of attachment size has been exceeded. Can be used to conditionally show an error message in case the attachment size is larger than the configured “Attachment size limit” value.
-
attachmentsLimitSize: The maximum size of attachment files in megabytes. Shows the “Attachment size limit” value from the Report Manager configuration for email recipients to see the limit.
-
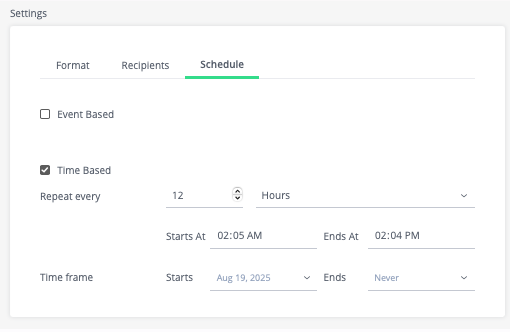
Schedule: Choose from an event-based trigger such as a job completion or time-based reporting. Time-based reports can be sent at hourly, daily, weekly, or monthly intervals. After choosing the interval, complete the form by entering the requested values.
Translations
The Report Manager supports translations. By default the Report Manager comes with en-US translations. You can set the Report Manager to use different translations depending on the current Sisense language. If translations are not defined for a given language, the Report Manager will use en-US translations as a fallback.
Note:
These settings can only be modified by a system tenant admin. The changes will be applied globally across all tenants.
The translation files are located in: /opt/sisense/storage/translations
The translations files containing the Report Manager translations are the following:
-
intl.ReportManager.json - contains translations for UI
-
intl.ReportManager.errors.json - contains translations for error messages visible in the UI and in the error emails
-
intl.ReportManager.email-templates.json - contains translations for email templates content
Modifying Translations
If you need to modify existing translations, for example, for the en-US language:
-
Navigate to the en-US folder inside the translations folder and find the three translation files that are described above.
-
Open the one you need to change and modify the values. Make sure that you do not modify the translation keys (they start from “@reportManager”), otherwise the translation for the specific key will not be found and you will see translation keys instead.
-
Save your changes to the file.
Adding New Translations
If you want to add, for example, French translations to the Report Manager:
-
Navigate to the en-US folder inside the translations folder and find the three translation files that are described above.
-
Copy the translation files to the fr-FR folder inside the translations folder.
-
Modify translation values in the files. Make sure that you do not modify the translation keys (they start from “@reportManager”), otherwise the translation for the specific key will not be found and you will see translation keys instead.
-
Save your changes to the files.
The following is an example of modified translations for French:
![]()
Translating Email Templates
Modifying translations for the email templates is done the same way as any other translation as is already described above.
To modify the translations for the base email template preinstalled by the Report Manager:
The default template (with translations) appears as follows:
<div>
<h2>{{ hi }} <%= recipient %>!</h2>
<% if (links && links.length > 0) {%>
<h3>{{ receivedLinks }} </h3>
<%for (var i = 0; i < links.length; i++) { %>
<h3><%= links[i] %></h3>
<% }%><% }%>
</div>
The template is named “base”. To find it in the translations:
Navigate to translations/en-US/intl.ReportManager.email-templates.json and find all the translations that contain “base” in their keys:
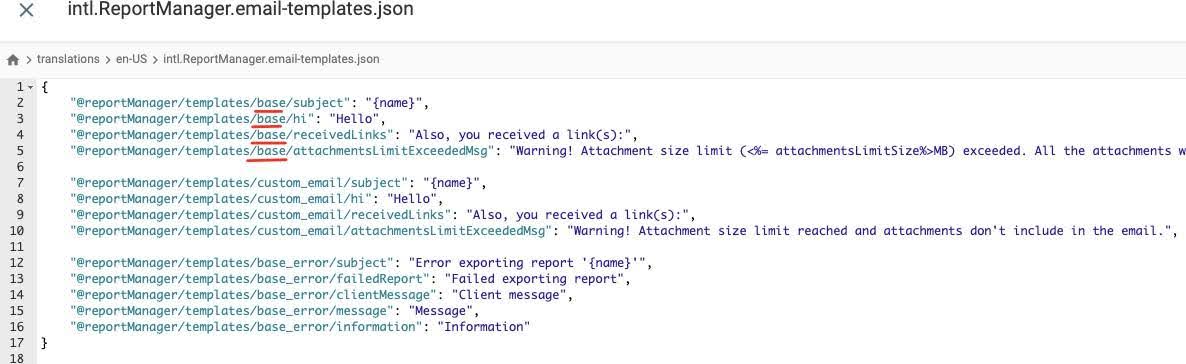
The format of the template key is <prefix>/<template name>/<key>. For all of the templates, the prefix should be @reportManager/templates. For the default template, the template name is “base”. The keys are the text values that are present in the template and which will be replaced with the relevant values. The keys inside the template should be wrapped with “{{ }}”. In the example above, the keys are:
![]()
and
![]()
In the translations they match the keys with the same names:
![]()
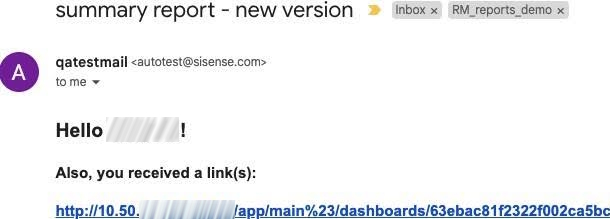
This means that “{{ hi }}” and “{{ receivedLinks }}” will be replaced with “Hello” and “Also, you received a link(s):” and the resulting email generated by the Report Manager will appear as follows:
The following is an example of modifying the translation text:
![]()
The resulting email will be:

There is another key in the template named “subject”, which is used for the email subject:
![]()
You can set any value or use the reserved “{name}” value which will replace the email subject with the report name that a report designer configures for each report:
The result of the subject modification can be seen in the previous image above.
All of the emails may contain a warning message when the total size of the attachments is exceeded. For the base template, this warning text is configured via the translation “attachmentsLimitExceededMsg” translation key. The warning message will be displayed in any case when the limit is exceeded (see the “Attachment Size Limit” configuration option in the Administrator Settings & Feature Management section of this topic). You can modify the text according to your needs:

Having done the text configuration, using the default template, report recipients may receive the following warning in the emails when the attachment size exceeds the configured value:

Additionally, the emails may contain warning messages that the report generation wait time was exceeded. For the base template, this warning text is configured via the “reportGenerationTimeoutExceededMsg” translation key. Just as with the attachment size limit, you can modify the text according to your needs and have it translated to any language.
To add email template translations for other languages, copy and modify similar translations to other languages’ folders as described in the Adding New Translations section.
Translating Custom Email Templates
To translate custom email templates, you must add translations for every email template (by the template name) and every language that you would like to have it translated to.
For example, if you have created a template named “my custom template”. The template content is the following:
<div>
<h2>{{ greeting }} <%= recipient %>!</h2>
<span>{{ disclaimer }}</span>
</div>
This template has two keys: “greeting” and “disclaimer” that you would like to translate. To replace the keys with the translated text, add translations into the translation files for each language that you want to translate to.
For example, for English translations, navigate to the translations/en-US/intl.ReportManager.email-templates.json file and add translations for subject and the “greetings” and “disclaimer” keys. Make sure that you specify the correct template name in the translation key - “my custom template”:
![]()
Note:
It is mandatory that you add translations for the “attachmentsLimitExceededMsg” in all of your custom templates, otherwise the email will not contain the translated text, but only a variable name.
The warning message will be displayed whenever the limit is exceeded. However, you can manually configure the style and text via the template if-block that can be added to your template. It may look similar to this:
<% if (attachmentsLimitExceeded) {%>
 <div style="color:red;">
  {{ attachmentsLimitExceededMsg }}
 </div>
<% }%>
Finally, save the changes and make sure that you set “my custom template” as a default (see Configuring Email Templates). The email reports received by your recipients will be translated to English according to the translation file that was configured.
Adding Reports
-
In the top navigation bar, click Report Manager.
-
In the Report Manager, click Add New Reports.
-
Enter the following information:
|
Field |
Required |
Description |
|
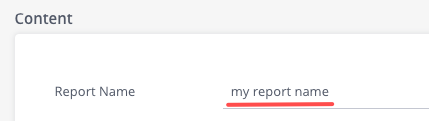
Report Name |
yes |
Unique name of the report per owner. |
|
Dashboard |
yes |
Select the dashboard the report is based on. |
|
Custom Filters |
no |
Custom filters will apply for all recipients and override any existing dashboard filters. Editing of the custom filters is applied to the filters JAQL query directly. For convenience, you can fetch the current dashboard filters by clicking Fetch dashboard filters and update the imported JAQL query. |
|
Priority |
no |
Is presented only for Admins. Normal by default. Used when there are multiple reports that should be exported at the same time and there is not enough capacity to export all of them due to concurrency settings. In this case, the Scheduler will export the high priority reports first. |
|
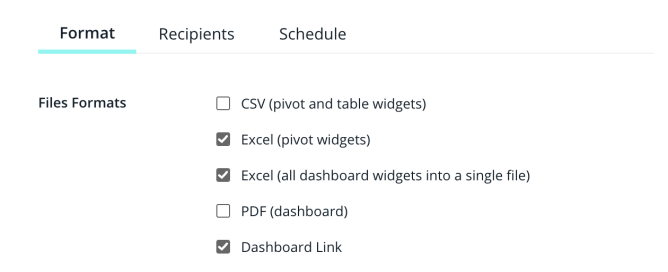
Format |
yes |
Select the format of the report, CSV, Excel, PDF, or a Link to the dashboard. You can select one or multiple formats. CSV files are generated only for Pivot and Table widgets. Each widget is exported as a separate file. Excel files are generated either for Pivot widgets only (each widget as a separate file) or a single Excel file with the widgets that can be exported either to CSV or Excel. Note: If the Jasper Report add-on is installed, there is an additional format option to export the dashboard to either PDF or Excel using the configured Jasper template. If the option is selected, all the widgets with a configured Jasper template are exported to a single file. |
|
Archive to |
no |
Required if recipients are not specified. This is a shared folder location where the expected value is a valid UNC path. You must ensure that the server has access to this path. All exported files will be saved to this location with the file name: ReportName_YYYY_MM_DD[identifier] If Overwrite existing files is selected, the last identifier part is not added to the file name and old files with the same name will be overwritten. If recipients are not specified, the report will be archived with the report owner permissions. In case archiving is done to an SFTP server, a server must be selected before specifying the path on the server. If archiving on a remote server shared folder, make sure the full path exists on the destination server. In addition, the folder has to be shared between the servers. |
|
Recipients |
no |
Required if Archive to is not specified. Enter one or more recipients. As you begin to type, the relevant Sisense users’ email addresses are displayed. Select the relevant users or groups. The Sisense dashboard must be shared with a user or group, otherwise the user/group will not appear in the autocomplete list. If a report has 2 recipients - a group and a single user, and the user is also part of this group, the report will be sent only once to the recipient. Non-Sisense users will get reports for either the special non-Sisense user configured in the settings or the report owner credentials. See the “Configuring the Report Manager” section for an example. Note: Administrators can disable the option to send reports to non-Sisense users. See the “Configuring the Report Manager” section for an example. |
|
Send error notification to |
Recipients that will get an email if there was an export error. |
|
|
Schedule |
yes |
Select either Event or Time. Event: Enter a list of event names separated by a comma. All the events should be triggered after the report was last executed for the report to be executed again. To trigger an event use the '/report_manager/events' endpoint in the REST API. Time Based: Select a frequency:
|
-
Click Done. The report is added to the Report Manager page.
Managing Reports
After you have added reports to the Report Manager, you can manage them from the main page of the Report Manager.

The Reports table displays a list of reports and the following information:
-
Report Name: The name of the report.
-
Dashboard Name: The name of the dashboard the report is based on.
-
Owner Email: The name of the owner of the report.
-
Last Run: The date and time the report was sent. The icon indicates if the report was sent successfully, with warnings, or failed.
-
Priority: The priority of the report, High or Normal.
-
Status: The current status of the report., Not running, Pending, or Running.
-
Enabled: Indicates whether or not the report is scheduled to be exported.
You can sort the information displayed by Report Name. You can filter the information displayed by the following columns: Owner Email, Priority, Status, and Enabled. Click ![]() or
or ![]() in the headers to see the available sorting and filtering options. In addition, at the end of each row you can open the report’s menu that includes the following options:
in the headers to see the available sorting and filtering options. In addition, at the end of each row you can open the report’s menu that includes the following options:

-
Edit: Edit the report. This opens the same screen as the Add New Reports button, but with your current report’s details.
-
Duplicate: Create a copy of the report. The copied report has (1) added to the report name and is disabled by default.
-
Delete: Delete the report.
-
Turn subscription on/off: Turn the subscription on or off. Turning a subscription off does not stop running reports; it only prevents future reports from being sent. Reports that are turned off will be deleted from the pending queue.
-
Send Report/Cancel Report: Activate or cancel the report. This changes the status to Running/Not Running.
-
Reports on hold: Set all reports to “on-hold” if you want to stop sending all reports and clear your queue. Reports will not be sent until this option is disabled.
You can delete multiple reports, modify multiple subscriptions, or send and cancel multiple reports from the Reports table with a single action. When you select a report by clicking the checkboxes on the left side of the table, additional options are displayed above the table.
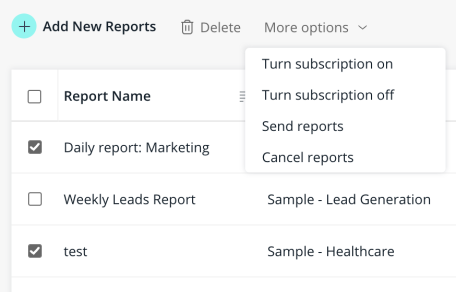
Select the relevant reports and select the action you want to perform on the selected reports.
Setting Permissions
Your permissions determine what reports you can see and what actions you can perform. You can manage your users’ permissions through the REST API report_manager/permissions end points (GET and POST).
You can set your users’ permission by setting the boolean values below to True or False:
-
edit: Allows the user to edit a report.
-
edit all: Allows the user to edit all reports including reports made by other users.
-
create: Allows the user to create reports.
-
display all: Allows the user to view all system reports.
-
delete: Allows the user to delete logged in user reports.
-
delete all: Allows the user to delete all reports including reports made by other users.
-
run now: Allows the user to run logged in user reports.
-
run now all: Allows the user to run all system reports including reports made by other users.
-
high priority: Allows the user to set reports as high priority.
-
cancel: Allows the user to cancel logged in user reports.
-
cancel all: Allows the user to cancel all reports including reports made by other users.
-
report manager access: Gives the user role access to the Report Manager.
Note:
-
If the basic level permission of the action is false, even if the extended permission is true the user cannot access this report. For example, if ‘edit’ is false, but ‘editAll’ is true, the user cannot edit any report.
-
Only Administrators have access to modify role permissions.
Viewer Access
Note:
These settings can only be modified by a system tenant admin. The changes will be applied globally across all tenants.
The Report Manager allows users with Viewer (consumer) roles to access the Report Manager and schedule reports for themselves and other users. To enable this functionality, the add-on must be configured:
-
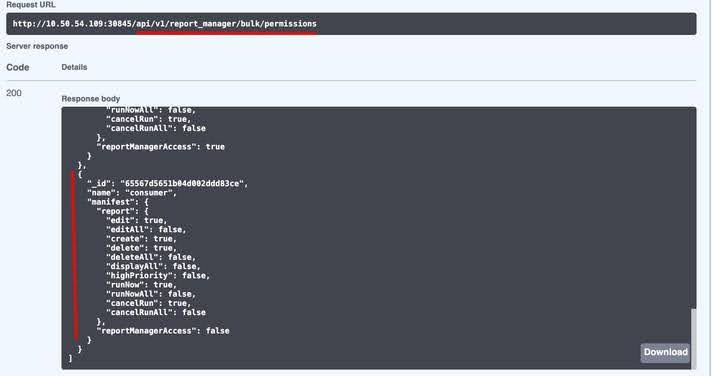
Set add-on permissions for “Consumer” via the Rest API:
-
Open api/v1/report_manager/bulk/permissions and check the permissions for “consumer”:
-
Copy the manifest object for “consumer”.
-
Navigate to the
POST /report_manager/permissions/{name}API and use the copied object to edit the “consumer” role permissions. Make sure “reportManagerAccess” is set to “true”, and configure the remaining properties if needed.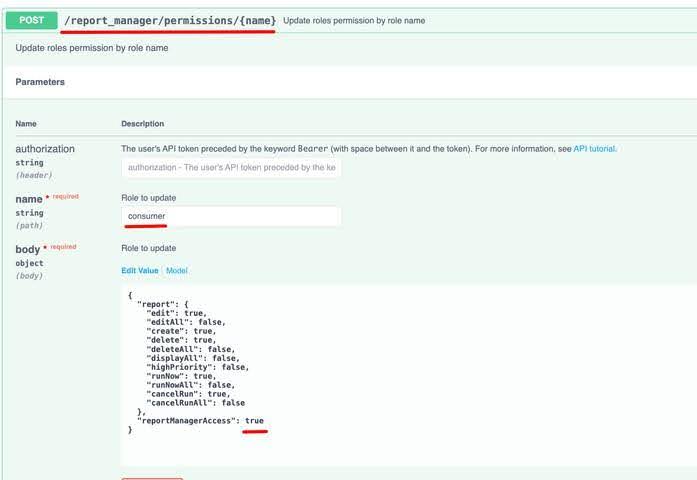
-
-
To enable viewers to select other users as recipients, you must allow viewers to query users and groups via the API. Navigate to Admin > Rest API > v0.9 tab and find
POST /roles/{idOrName}/manifest/{path}. Click Try it out and set the parameters as follows, once for the “manage/users” and once for the “manage/groups” manifest path and click Execute: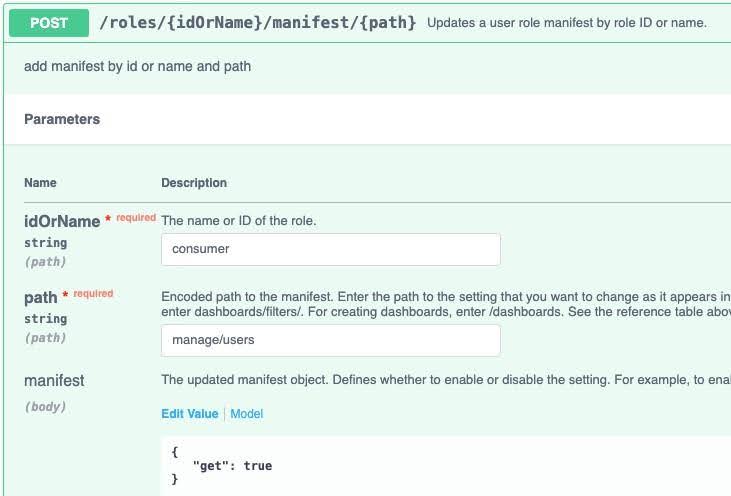
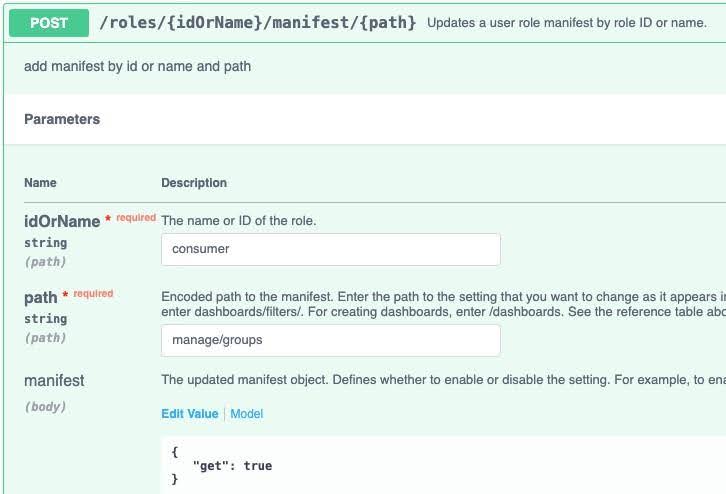
Important:
Make sure that allowing users with a “Viewer” role to query other users and groups is not a security concern for your organization.
Additional Information
-
Using SSL: The Report Manager cannot work if the SSL certificate is not valid.
-
Time Zones: The server uses the UTC time zone to log the report creation date and update date.
-
All time-based reports that are recurring (not once) are saved with a CRON format. For more information, see http://crontab.org/.
-
Trigger event based reports: To trigger event-based reports, use the
POST /report_manager/eventsREST API endpoint: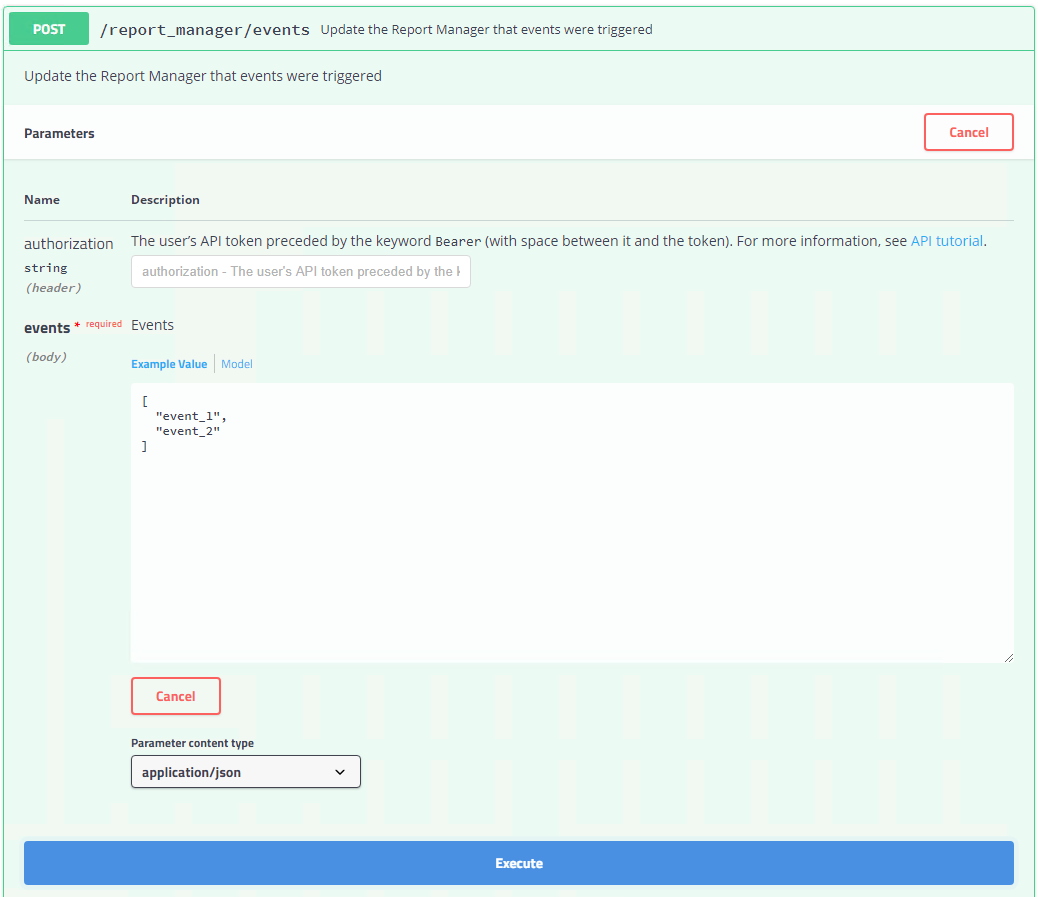
The endpoint body is an array of strings. Each string is the name of an event.
Above, you can see an example in which two events are triggered: “event_1” and “event_2”.
When this endpoint is triggered, the request time is saved as the last triggered time of the relevant event. An event-based report is exported only after all its events are triggered. An event is considered as triggered if it was triggered after the report's last execution date.
Limitations
-
If a recipient that did not have a Sisense user is added as a user, the Report Manager Engine service/pod should be manually restarted.
-
Widgets of type “Table with aggregation” are not exported to CSV or Excel.
-
You can only customize the branding and look-and-feel using the out-of-the-box feature. See Changing the Look and Feel.
-
URL parameters are not passed to the Report Manager when navigating using the top Sisense navigation bar.

-
When the Report Manager is used with the Export Modifications add-ons:
-
The
exportModification.maxColumnsNumberandexportModification.maxRowsNumberoptions are not supported. -
Combined Excel export results will not be modified by the Export Modification add-on.
-
-
Users who authenticated to Sisense using Web Access Token do not have access to the Report Manager.
-
When using the Dashboard Co-Authoring functionality, private versions of dashboards are used for generating reports.
-
Not all columns in the reports table have sort and filter options.
-
When the multitenancy feature is enabled, the Jasper Reports formatting options are only available for System Tenant users.
Troubleshooting
-
Alias - In case you are using an alias, make sure it is configured properly in Sisense.
-
Dashboard Sharing - Make sure the dashboard to export is shared with all of the report recipients.
-
In addition, in case the report is shared with a non-Sisense user, the dashboard to export should be shared with the non-Sisense user configured in the Configuration Manager page.
-
Add-on exceptions - In case of add-on exceptions, the PDF export will fail. Try disabling all add-ons other than the Report Manager.
-
Report generation can consume a high percentage of server resources. Use the Number of simultaneous reports option from the settings to control the amount of reports that the Report Manager can run simultaneously.
-
If a proxy URL is configured, make sure to include the protocol as well, for example: https://analytics.com
-
If a report is sent to an Admin user, make sure the Admin user is shared with the dashboard.
-
The Report Manager is installed on the External Plugins pod. The pod has 1GB RAM allocated, but large CSV files might require more than that. In case of CSV file failures, you can increase the External-Plugins pod memory.
-
Multi-node environment - make sure the load balancer and the firewall is configured to allow websockets.
-
If there is a custom PDF layout applied to the dashboard, the layout is respected even if custom filters are applied. That means the height of the Pivot Widget in the custom layout might not fit the new size of the widget once custom filters are applied, therefore the Pivot Widget is cut off.
Try removing the custom PDF layout by making various changes to the dashboard layout. For example, change the position of a widget.
-
Restart the “external-plugins“ pod after enabling/disabling “Export to Excel V2“ or “Export to PDF and Image V2“.