Managing Tables and Columns
Last updated: June 11, 2026
| Tier | Deployment |
|
|
|
After you have imported your data into Sisense, it is time to shape it into a data model that can support your dashboard and provide accurate information to your viewers.
You can modify your data on two levels: Table level and Column level.
Important:
Table and column names must not contain a "[" or "]" character. If your table or column names contain the "[" or "]" characters, change the name to exclude them.
Any changes you make to your schema are reflected in the ElastiCube only and do not affect the data in your data source.
For a short overview of managing the tables and columns in your data model, see the video below:
Table Level
You can manage tables imported into the ElastiCube through the Navigation Pane or through the table itself in the schema.
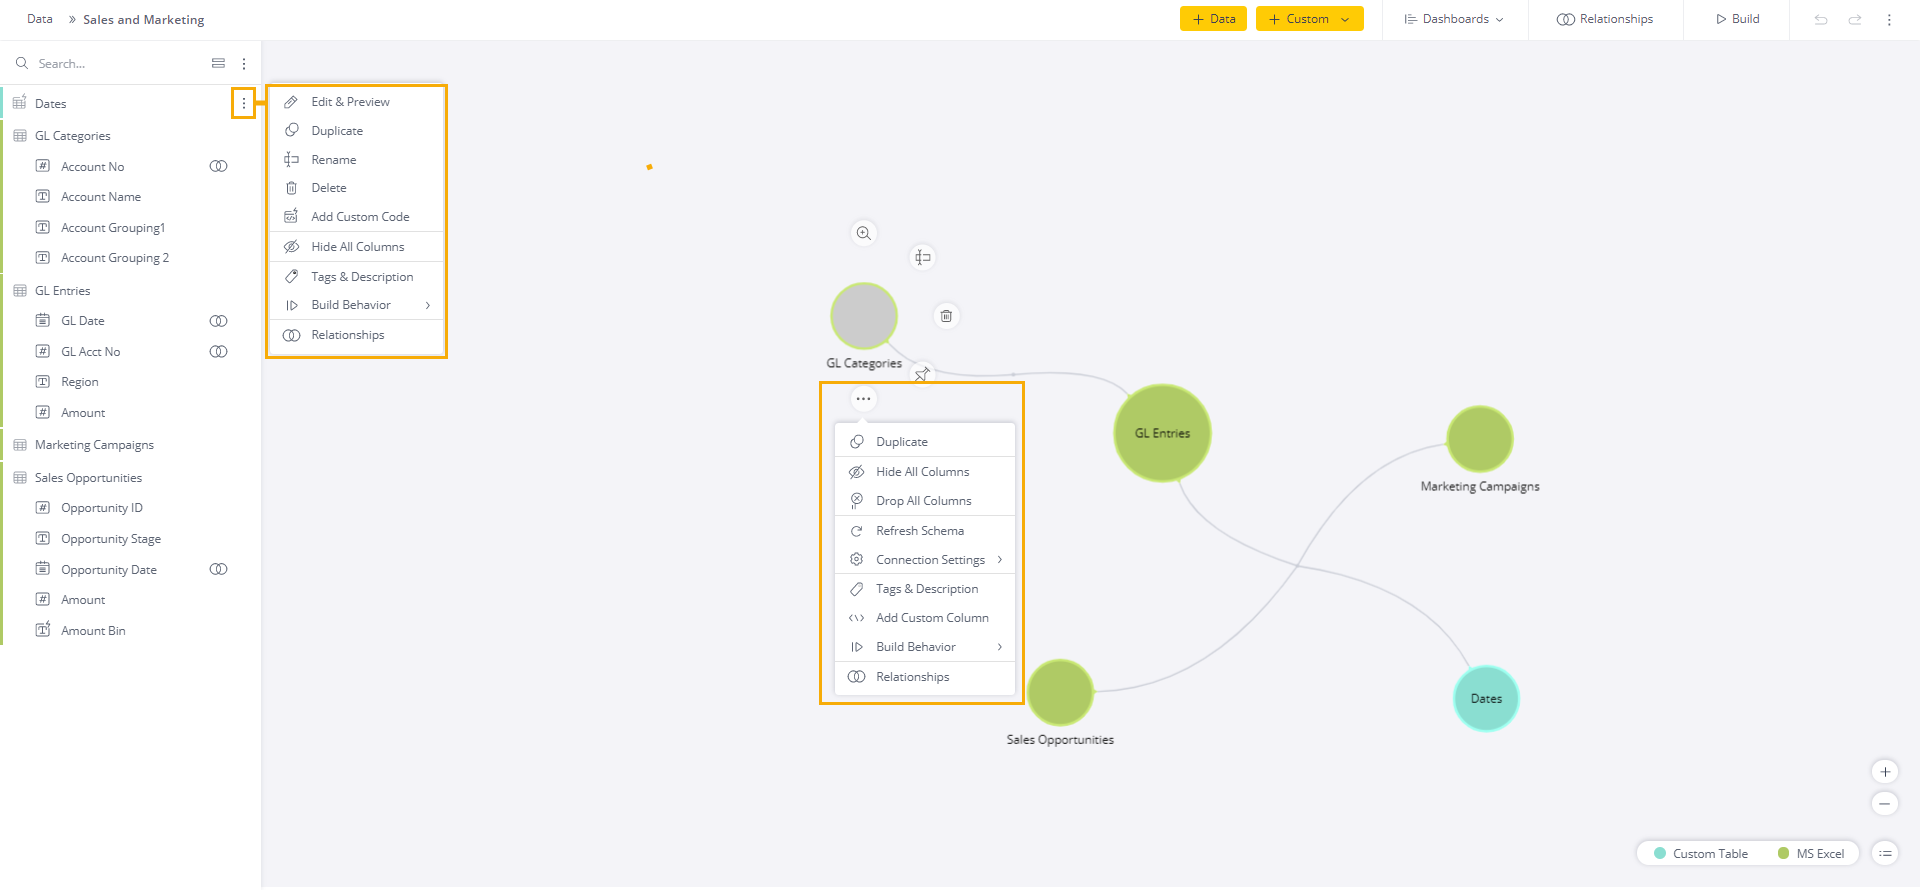
The table below describes the menu options available from the Navigation Pane and the table's menu.
| Icon | Description |
|---|---|
.png)
|
Displays a preview of your table's data. |
.png)
|
Rename the table. Note: Table names cannot contain square brackets. |
.png)
|
Delete a table. |
.png)
|
Use Python-based custom code on your data or query new data from any source. |

|
Hide all the columns in a table. Hidden tables are not seen by Viewers, but might be used for custom calculations. Hidden tables are built with the rest of the ElastiCube. |

|
Display all hidden columns in a table. |

|
Duplicate the table. |

|
Hide a table. Hidden tables are not seen by Dashboard Viewers, but might be used for custom calculations. Hidden tables are built with the rest of the ElastiCube. |

|
After dropping columns, you can restore them by clicking Restore all columns. |

|
Restore all dropped columns for a table. |

|
Update a table's columns if there was a change on the data source without having to add the table again. |

|
Update the connection settings for a table. |

|
Tag a table with metadata that you can use to organize your data and search for it later. See Creating Data Dictionaries for more information. |

|
Allows you to add a custom column to the ElastiCube. See Adding a Custom Column for more information. |

|
Define the build behavior for a specific table. See Defining ElastiCube Build Settings for more information. |
.png)
|
Displays related tables together side by side. See Creating and Removing a Relationship Between Tables for more information. |
Note:
Hiding columns of models generated via custom import query with UDF (User Defined Function) or Stored Procedure is not supported.
To view your table's metadata, including its name, path, provider, location, and the number of columns it contains, hovers over the table in the schema or in the Navigation Pane.
Column Level
You can manage tables imported into the ElastiCube through the Navigation Pane. Columns that are part of a table are displayed below the table. On the left side of the column is an icon that indicates what type of data is in the column, Numeric, Date, or Text. You can click this icon to convert the column into another data type.

An icon that indicates if the column is connected to another column through a relationship. You can hover over the icon to view more details or disconnect the relationship.
For each column, you can hover over its name to display a menu from where you view the following options for managing your columns:
| Menu Option | Description |
|---|---|
| Duplicate | Duplicates the column in the table. This is useful if you need the same column with some modifications. |
| Rename |
Rename the column. Note: Column names cannot contain square brackets. |
| Hide | Hide a column to import the data associated with this column, but also make this column unavailable to dashboard designers and viewers. |
| Drop | Remove column from the table.
After dropping a column, you can restore it by clicking Restore. |
| Restore | Restore a column that was dropped. |
| Indexed | Index the column data for quicker processing in subsequent builds. |
| Description | Tag a column with metadata that you can use to organize your data and search for it later. See Creating Data Dictionaries for more information. |
| Change Data Type | Change the data type of your column in the ElastiCube. This does not change the column type in the original data source. |
| Is Accumulated by | Enable accumulative behavior for date and integer fields in tables imported by the JDBC connector. See Enabling Accumulative Build for Connector for more information. |
| Edit Relationship | You can only edit a column's relationship when the column is connected to another table. |
| Relationships | Displays related columns together side by side. See Creating and Removing a Relationship Between Tables for more information. |
Note:
Hiding columns of models generated via custom import query with UDF (User Defined Function) or Stored Procedure is not supported.Renaming Tables and Columns
Tables and columns in the data models differentiate between original, identity, and display names if enabled by an Administrator in the Admin tab > Feature Management page by turning on the Display Name toggle. This allows data designers to rename tables and columns without affecting their dependent assets, such as widgets or alerts.
-
To rename a table or column, click
 > Rename for the relevant table/column.
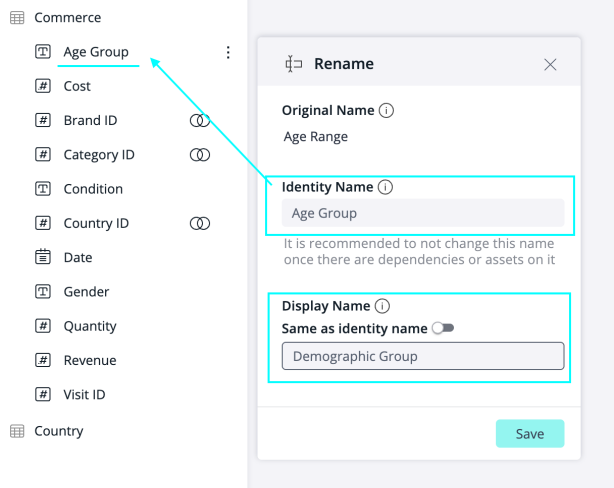
The Rename window appears, displaying the following three associated names:-
Original Name – The physical table/column name in the data source.
-
Identity Name – The logical name in the data model schema, used as a table/column unique identifier. It is initially assigned based on the Original Name at the mode creation time. Changing it will cause existing queries relying on it to fail.
-
Display Name – The customizable alias to be displayed in dashboards. Changing it will present an updated name to users in the Analytics page, but will not affect existing assets.
-
-
In the Display Name section, if the “Same as identity name” toggle is on, switch it off.
-
Enter a new name in the Display Name field.
Note:
While you can rename the Identity Name or the Display Name, it is recommended that you rename the Display Name. This will change the name that is displayed to users without changing the name used in the data model schema, thus not affecting existing assets and ensuring that existing queries relying on the model will not fail due to the name change.
-
Click Save.
-
Build/Publish the model for the changes to the Identity/Display Name to take effect.
Note:
-
Display name will be enabled by default for NEW deployments. Upgrading customers can enable it manually in the Feature Management page.
-
After updating the display name, the metadata titles (such as row, value, column, category titles, etc.) for previously created widgets will not be retroactively updated. The new name will be presented and used for auto-generated titles for newly created widgets only.
-
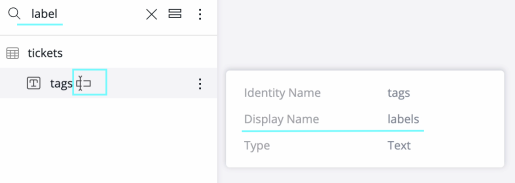
Search behavior:
-
In the Data page: The search returns results matching either the Identity or Display name. If the search term was matched to a Display name, the ‘rename’ icon will be displayed next to the result:
-
In the Analytics page: The search returns results matching the Display name.
-
Limitations
The following limitations currently exist; they may be addressed in a future version:
-
Metadata Aliasing – Search inside the data browser on the Analytics page returns the Identity name instead of the Display name when both the Display name and Metadata aliasing are applied.
-
Smart field suggestions (both field names and table names) are not updated after publishing a live model. This functionality works correctly for ElastiCubes. Workaround: Manually trigger the
POST suggestion/refreshAPI.
Hidden Tables and Columns
In the UI, hidden tables and columns behave as follows:
- They are unavailable for selection by designers from the data browser.
- They are unavailable to viewers when drilling down.
- If a designer used a column or table in their widgets, once it is hidden, the widget will still behave as before, even though the column or table is no longer selectable.
- They can be used in data security rules.
- Data modelers can unhide tables and columns.
- Analytical Engine can access and use all tables and columns, including hidden columns and tables, for its calculations and join path.
Note:
The above describes the UI behavior for hidden tables and columns. For column-level security, see the Column-Level Security plug-in.