Installing Sisense on OpenShift
Last updated: June 10, 2026
| Tier | Deployment |
|
|
Prerequisites
- General prerequisites: Checking the Prerequisites and Planning Your Configuration.
- Linux OS supported by Sisense. See Minimum Requirements for Sisense in Linux Environments for more information.
- Pre-installed OpenShift. You must also be connected to your Kubernetes cluster (i.e., you can do
occommands, such asoc get pod, and others). For more information, see Preparing an OpenShift Environment. - A licensed Red Hat Pull Secret.
- Access to your cloud CLI and credentials.
-
Create your Sisense project (namespace).
CopyNAMESPACE_NAME=sisense #for example
oc new-project ${NAMESPACE_NAME} --display-name ${NAMESPACE_NAME} -
Create the Role. It will be assigned to the serviceAccount used by the installation. Make sure to name the role
sisenseand assign it to the relevant namespace.-
Create the file
role.yamlwith the following content:CopyapiVersion: rbac.authorization.k8s.io/v1
kind: Role
metadata:
name: sisense
namespace: <NAMESPACE_NAME>
rules:
- verbs:
- get
- list
- watch
- create
- update
- patch
- delete
- use
- deletecollection
apiGroups:
- '*'
resources:
- '*' -
Save it, and run the command
oc apply -f role.yaml. -
Create new SecurityContextConstraints (scc) named
sisenseto allow sisense pods to get the necessary permissions. -
Create the file
scc.yamlwith the following content:CopyallowHostDirVolumePlugin: false
allowHostIPC: false
allowHostNetwork: false
allowHostPID: false
allowHostPorts: false
allowPrivilegeEscalation: false
allowPrivilegedContainer: false
allowedCapabilities: null
apiVersion: security.openshift.io/v1
defaultAddCapabilities: null
fsGroup:
type: RunAsAny
groups: []
kind: SecurityContextConstraints
metadata:
annotations:
name: sisense
priority: null
readOnlyRootFilesystem: false
requiredDropCapabilities:
- KILL
- MKNOD
- SYS_CHROOT
runAsUser:
type: RunAsAny
seLinuxContext:
type: RunAsAny
supplementalGroups:
type: RunAsAny
volumes:
- configMap
- downwardAPI
- emptyDir
- persistentVolumeClaim
- projected
- secret -
Save it, and run the following commands:
Copy# Create the scc
oc apply -f scc.yaml
securitycontextconstraints.security.openshift.io/sisense created
# Attach sisense scc to all service accounts on your namespace
oc adm policy add-scc-to-group sisense system:serviceaccounts:${NAMESPACE_NAME}
-
-
Manually label your Kubernetes nodes. Each of your nodes must have at least one of the following labels and values:
-
node-${NAMESPACE}-Application=true
-
node-${NAMESPACE}-Query=true
-
node-${NAMESPACE}-Build=true
And remove node taint node-role.kubernetes.io/master:NoSchedule from all nodes.
For example:
oc label node ${your_node_1} node-${NAMESPACE}-Application=true --overwrite=true
oc label node ${your_node_1} node-${NAMESPACE}-Query=true --overwrite=true
oc label node ${your_node_2} node-${NAMESPACE}-Application=true --overwrite=true
oc label node ${your_node_2} node-${NAMESPACE}-Query=true --overwrite=true
oc label node ${your_node_3} node-${NAMESPACE}-Build=true --overwrite=true

oc taint nodes --all node-role.kubernetes.io/master:NoSchedule-
Note:
-
If you are using a cloud managed OpenShift, you may not be able to use the
oc label nodecommand, and you will have to modify the node labels via the Cloud/OpenShift provider’s UI or CLI command. -
If you have more than three nodes not including master, you do not need to remove the last taint (i.e., there is no need to run the last command above).
-
Ensure the maximum number of open file descriptors (
ulimit -n) is set to a minimum of 65535 (both soft and hard limits) across all Sisense nodes:Copyfor node in $(oc get node --no-headers | awk '{print $1}'); do
echo "--------------------------------"
echo "Validating node ${node}"
oc debug node/${node} -- chroot /host /bin/bash -c "ulimit -n"
done
# Output example
--------------------------------
Validating node node1
Temporary namespace openshift-debug-lvn8s is created for debugging node...
Starting pod/node1-debug-lhtj7 ...
To use host binaries, run `chroot /host`. Instead, if you need to access host namespaces, run `nsenter -a -t 1`.
65535
Removing debug pod ...
Temporary namespace openshift-debug-lvn8s was removed.
--------------------------------
Validating node node2
Temporary namespace openshift-debug-hxf8n is created for debugging node...
Starting pod/node2-debug-dmvtl ...
To use host binaries, run `chroot /host`. Instead, if you need to access host namespaces, run `nsenter -a -t 1`.
65535
Removing debug pod ...
Temporary namespace openshift-debug-hxf8n was removed.
--------------------------------
Validating node node3
Temporary namespace openshift-debug-lgf5d is created for debugging node...
Starting pod/node3-debug-s8gbm ...
To use host binaries, run `chroot /host`. Instead, if you need to access host namespaces, run `nsenter -a -t 1`.
65535 -
Install your own Storage Classes (or you can use the same Storage Class for both RWX and RWO):
-
One for RWX (Read/Write many, for the Sisense apps themselves)
-
One for RWO (Read/Write once, for the stateful sets, such as
MongoDB/ZooKeeper/RabbitMQ)Storage Class installation exampleFor this example, assume there is an NFS server with an NFS path, so we will install an NFS Storage Class, and we will use it for both
RWXandRWO.Copy# Create the serviceAccount that will be used by the nfs-client-provisioner
oc create sa -n ${NAMESPACE_NAME} nfs-client-provisioner
# Grant the permission which allows host mounts and any UID by a pod
oc adm policy add-scc-to-user hostmount-anyuid system:serviceaccount:${NAMESPACE_NAME}:nfs-client-provisioner
oc adm policy add-scc-to-user hostmount-anyuid system:serviceaccount:${NAMESPACE_NAME}:nfs-subdir-external-provisioner
# Attach sisense scc to all service accounts on your namespace
oc adm policy add-scc-to-group sisense system:serviceaccounts:${NAMESPACE_NAME}Create the file
nfs-values.yamlwith the following content:(Example for NFS server:
10.192.168.32)(Example for NFS path:
/mnt/share)Copynfs:
server: <Your NFS server address>
path: <Your NFS server path>
serviceAccount:
name: nfs-client-provisioner
create: falseRun the installation command:
Copyhelm repo add nfs-subdir-external-provisioner https://kubernetes-sigs.github.io/nfs-subdir-external-provisioner/
helm install nfs-subdir-external-provisioner nfs-subdir-external-provisioner/nfs-subdir-external-provisioner --values nfs-values.yaml
# After a minute or 2 (maybe less) you'll see the new Storage Class (nfs-client) installed:
oc get sc
NAME PROVISIONER RECLAIMPOLICY VOLUMEBINDINGMODE ALLOWVOLUMEEXPANSION AGE
gp2 kubernetes.io/aws-ebs Delete WaitForFirstConsumer true 27h
gp2-csi ebs.csi.aws.com Delete WaitForFirstConsumer true 27h
gp3 (default) ebs.csi.aws.com Delete WaitForFirstConsumer true 27h
gp3-csi ebs.csi.aws.com Delete WaitForFirstConsumer true 27h
nfs-client cluster.local/nfs-subdir-external-provisioner Delete Immediate true 21h
Installing Sisense on OpenShift
-
Enter the following:
Copy# Must run this command before installing Sisense for the first time:
oc adm policy add-scc-to-user privileged system:serviceaccount:${NAMESPACE_NAME}:${NAMESPACE_NAME}-mongodb
export SISENSE_VERSION=<YOUR SISENSE VERSION>
wget https://data.sisense.com/linux/sisense_installer-${SISENSE_VERSION}-DockerHub.tar.gz
tar -xvf sisense_installer-${SISENSE_VERSION}-DockerHub.tar.gz
cd sisense-${SISENSE_VERSION}
vi openshift_config.yaml -
Edit the values as needed. See Installing Sisense on Linux, step 5 ("Deployment"), for information about the various parameters.
Ensure that these parameters are configured as follows:-
is_openshift: true(*required) rwx_sc_name: "<Your RWX Storage Class name>"rwo_sc_name: "<Your RWO Storage Class name>"
-
Sample openshift_config.yaml file:
### INSTALLATION PARAMETERS
### RedHat OpenShift 3.11-4.7
## Run from supported OS, Run the following before:
## oc login [openshfit-api-server] -u username -p password

#1. node: Internal DNS name.
#2. roles: Sisense node role: 'application,query' or 'build'.
k8s_nodes:
  - { node: ip-10-0-135-208.eu-west-3.compute.internal, roles: "application, query" }
  - { node: ip-10-0-172-186.eu-west-3.compute.internal, roles: "application, query" }
  - { node: ip-10-0-165-194.eu-west-3.compute.internal, roles: "build" }

## Deployment size is used to determine the maximum pod limits allocated for application
## Possible values: small/large
deployment_size: "small"

## Sisense will use Kubernetes ClusterRole in order to manage the tenant
cluster_visibility: true

## Installing on OpenShift 4.0+ (oc cli is required) - true/false
is_openshift: true

## In case of offline installation (private or public docker registry is required) - true/false
## If your docker registry is private Sisense will generate a pull secret for you
offline_installer: false
## An IP or DNS name for your Docker registry
#docker_registry: ""
## Whether your registry requires credentials to pull images or not
private_docker_registry: false

## Enable delta approach for shared dashboards/widgets
enable_widget_deltas: false

## Update current installation. - true/false
update: false

## show maintanace page during upgrade process
notify_on_upgrade: true

## Application DNS Name.
#1. When empty, first node external_ip will be configured
#2. When is_ssl is true, configure the CN name
#3. Add http:// or https:// as a prefix when using external Load Balancer for Commom name
application_dns_name: ""

## Linux user of the servers (UID 1000)
linux_user: "sisense"

## SSH Key Path or Password is required, when ssh_key is empty, password will be prompted
ssh_key: "~/.ssh/id_rsa"

## To define user other than UID 1000, configure the following parameters
run_as_user: 1000
run_as_group: 1000
fs_group: 1000

# Cloud LoadBalancer service  - true/false
cloud_load_balancer: false

# Support high availability
# Load sisense service in active/active redundancy
high_availability: true

### OpenShift storage types: nfs (client), nfs-server, cephfs, trident.
## The following StorageClass should be exist in openshfit
## RWX and RWO Storage classes are mandatory prerequisite for Sisense.
## In nfs-server: NFS Server will installed in OpenShift, it will use RWO Storage class.
storage_type: ""

## RWX Access Mode StorageClass name (e.g: Ceph RBD, Trident, NFS, etc..).
rwx_sc_name: "nfs-client"

## RWO Access Mode StorageClass name (gp2 sc, default gcp sc, Azure disks sc, or any RWX sc)
rwo_sc_name: "gp2"

## NFS Client details
nfs_server: ""
nfs_path: ""

## Disks size (GB)
## No need to change mongodb_disk_size, zookeeper_disk_size
sisense_disk_size: 70
mongodb_disk_size: 20
zookeeper_disk_size: 2

## System time zone.
## Format for example:  UTC | US/Central | US/Pacific | US/Eastern | Asia/Jerusalem | Asia/Tokyo | Etc/GMT+6
timezone: "UTC"

## Name of Namespace
namespace_name: sisense

## Gateway port of api-gateway service - endpoint of Sisense in Non-Secured mode.
gateway_port: 30845

### SSL SETUP
## Activate Secured Sisense in HTTPS, define key and cert certificates.
is_ssl: false
ssl_key_path: ""
ssl_cer_path: ""

### UNINSTALL SISENSE
## Uninstall Cluster service like kube-prometheus-stack, nfs
uninstall_cluster: false

## Uninstalling Sisense Kubernetes components from the Kubernetes managed - true/false
uninstall_sisense: false

## Removing all Sisense data - true/false
remove_user_data: false-
Run the installation:
./sisense.sh openshift_config.yaml

# After it shows you your configuration and you're ok with it, just type "Y" or "y" and hit enter
The following Configuration will be delegated to Sisense Installation, Please confirm:
{
  "k8s_nodes": [
    {
      "node": "ip-10-0-135-208.eu-west-3.compute.internal",
      "roles": "application, query"
    },
    ...
    ...
    ...
  ],
  "deployment_size": "small",
  "cluster_visibility": true,
  "is_openshift": true,
  "offline_installer": false,
  "private_docker_registry": false,
  "enable_widget_deltas": false,
  "update": false,
  ...
  ...
  ...
  "namespace_name": "sisense",
  "gateway_port": 30845,
  "is_ssl": false,
  "ssl_key_path": "",
  "ssl_cer_path": "",
  "uninstall_cluster": false,
  "uninstall_sisense": false,
  "remove_user_data": false
}
Do you wish to install Sisense develop.13958 (y/n)? y # Hit Enter-
Wait for the installation to complete.
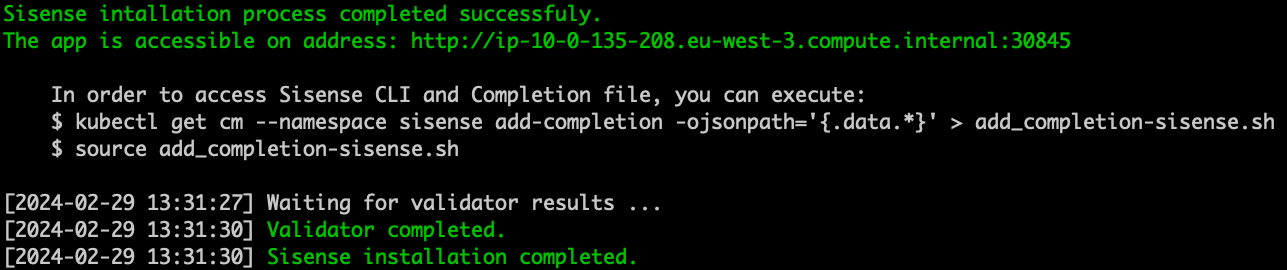
-
If this is a first installation, then once this is done, you must add an OpenShift route which will connect to the external API gateway service.
For example:Copyoc expose svc api-gateway-external
route.route.openshift.io/api-gateway-external exposed
oc get route api-gateway-external
NAME HOST/PORT PATH SERVICES PORT TERMINATION WILDCARD
api-gateway-external api-gateway-external-sisense.apps.doviopenshift.k1t5.p1.openshiftapps.com api-gateway-external http None
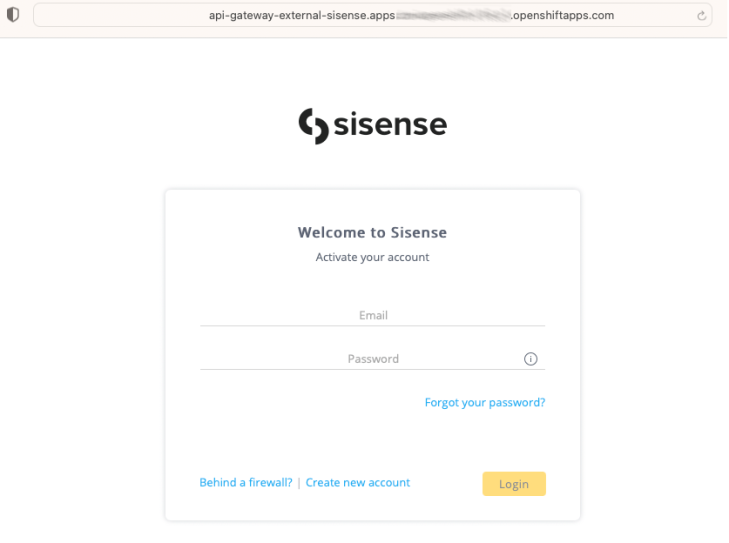
# Now you can login to sisense via the "HOST/PORT" address you see above.
# In this example: api-gateway-external-sisense.apps.doviopenshift.k1t5.p1.openshiftapps.com
-
Enter your Sisense address, and run the activation.
Post-Installation Configuration
Only if you actually ran the oc expose command (or oc create route), then, as mentioned above, you will get a new DNS hostname as the address to your Sisense app.
In that case, you must run the following small set of commands in order for some Sisense features work correctly with the new hostname:
# In the ConfigMap 'global-configuration', set variable "SYSTEM_ALIAS" with the new address
oc patch cm global-configuration \
  --type='json' \
  -p='[{"op": "replace", "path": "/data/SYSTEM_ALIAS", "value":"http(s)://<your-hostname.com>"}]'

# Restart relevant deployments
oc rollout restart deploy analyticalengine api-gateway configuration usage pivot2-be quest

# If already activated your environment, then restart also these deployments
oc rollout restart deploy galaxy identity

# Wait till all pods are in "Running" state
oc get pods | grep -E 'analyticalengine|api-gateway|configuration|usage|pivot2-be|quest'

# Again - if already activated, then check also the other pods
oc get pods | grep -E 'galaxy|identity'