Connecting to Snowflake
Last updated: June 10, 2026
| Tier | Deployment |
|
|
|
Sisense enables easy and quick access to databases, tables, and views contained within Snowflake, empowering businesses to visualize their data for enhanced insights and informed decision-making.
Major points of integration and utilization of Snowflake within Sisense include:
-
Creating Data Models: Users can create data models based on Snowflake data sources, which support both Live (see Introducing Live Models) and ElastiCubes (see Introducing ElastiCubes) types.
-
Leveraging Snowflake as a Destination: Snowflake can be utilized as a storage alternative to ElastiCubes, allowing for the Build to Destination feature (see Build to Destination).
Creating New Connection
Use the Connection Management feature to build a data model. This can be accessed either from the new data model wizard or from the centralized connection view in the data tab. For more information, see Data Source Connection Management.
Supported Authentication Options
Username and Password (Legacy)
The username and password authentication method will be deprecated by Snowflake as part of the transition away from single-factor authentication by November 2025. For more information, see Snowflake Will Block Single-Factor Password Authentication by November 2025.
Key-Pair Authentication
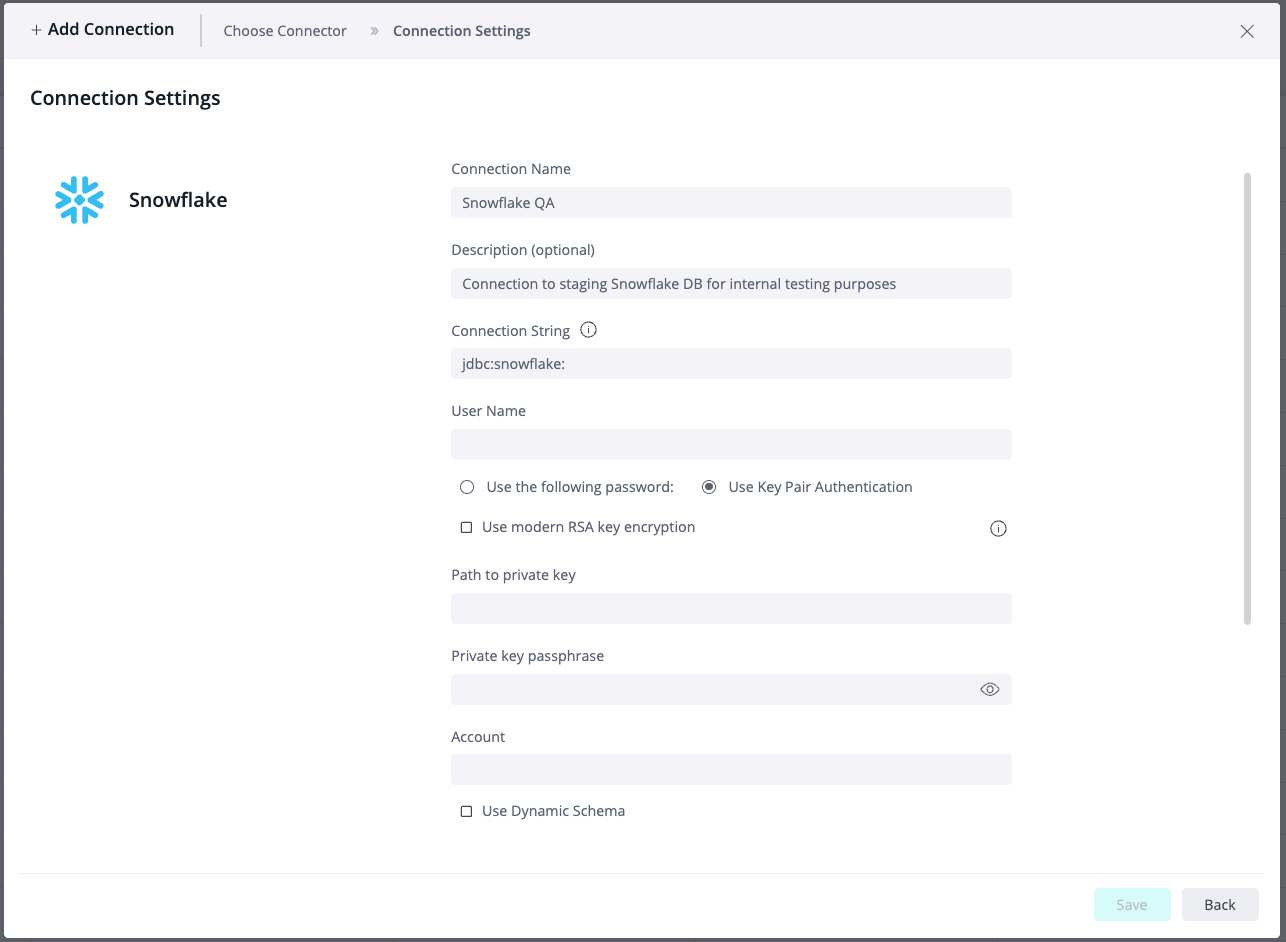
Fields of the New Connection Wizard
-
Connection String: Defines the JDBC URL for Snowflake
The format starts with
jdbc:snowflake:and typically includes host and warehouse details. For example,jdbc:snowflake://my-account.snowflakecomputing.com/?warehouse=DEMO_WH&db=mydb. For further information, see Public Snowflake Connector Documentation.Note:
"warehouse" must be included in the connection string; "db" is optional.
-
User Name: The Snowflake user name associated with the public key used for authentication
Enter the Snowflake user that corresponds to the public key registered for key pair authentication. This user must have the necessary roles and privileges to connect, query schemas, and interact with target database objects. The user name is still required for connection configuration, even when authenticating via a private key.
-
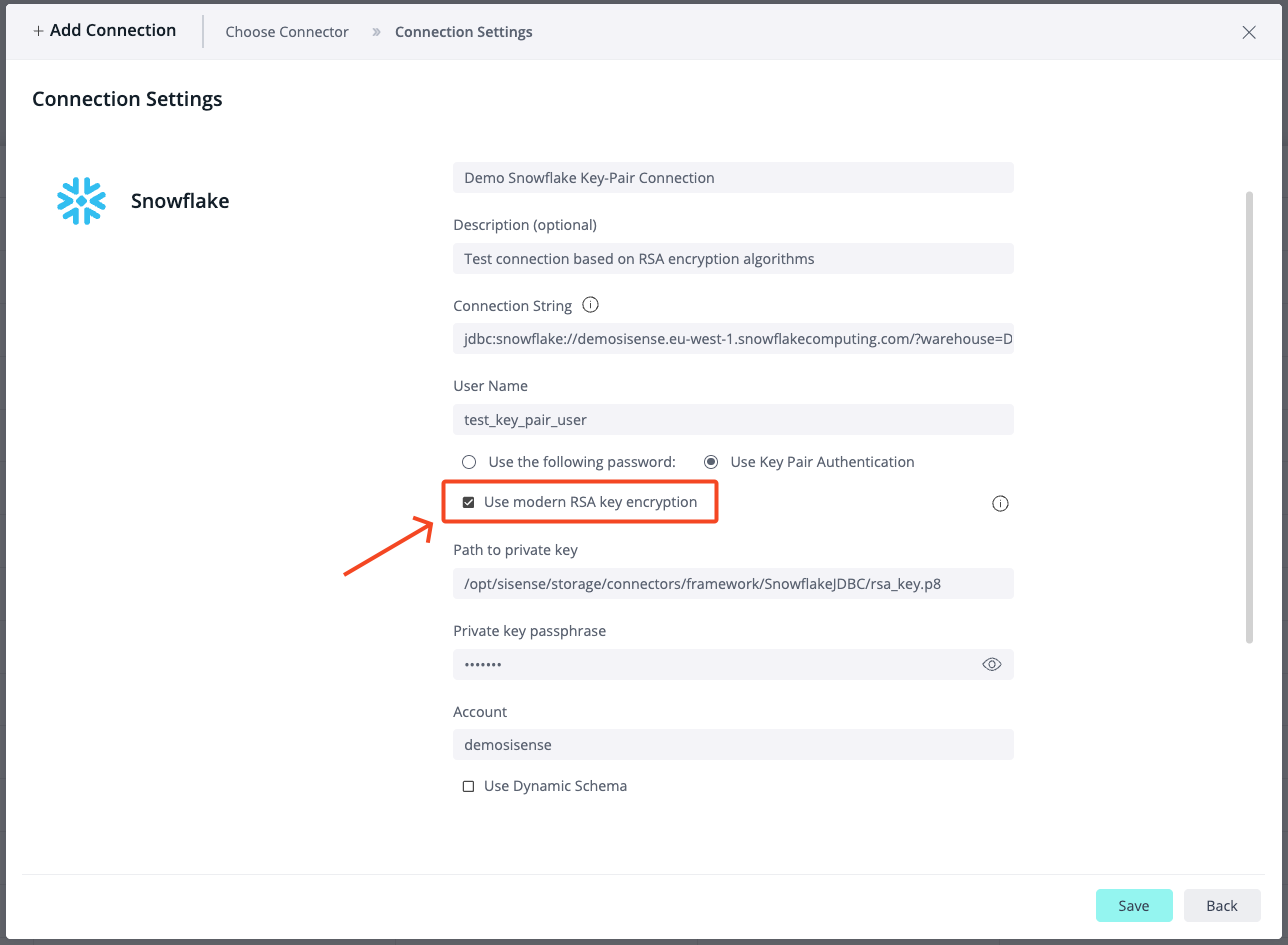
Utilize Modern RSA Key Encryption: Determine whether to employ legacy or modern encryption algorithms, in accordance with the official Snowflake documentation. For further information, refer to Supported Encryption Algorithms.
-
Path to Private key: Path to the private key file (.pem) on the Sisense server
This private key must match the public key registered with your Snowflake user account. For example: if the generated key.p8 is uploaded to the following Snowflake folder: Admin > App Configuration > File Management > connectors > framework > SnowflakeJDBC - the path will be: /opt/sisense/storage/connectors/framework/SnowflakeJDBC/key.p8
Note:
To enable the File Management feature, see Uploading Files to Customize Your Linux Deployment.
-
Private key passphrase: Optional field for the passphrase that protects the private key file
Snowflake recommends using a passphrase that complies with PCI DSS standards to protect the locally generated private key. Leave blank if your private key is unencrypted. If encrypted, enter the correct passphrase to allow decryption during authentication.
-
Account: The full Snowflake account identifier
The unique name of your Snowflake account within your organization. It should correspond to <account_locator>.
-
Use Dynamic Schema (Optional checkbox)
When selected, this option enables the specification of the Dynamic Schema parameter, which allows for schema selection at runtime based on user-defined parameters. This functionality enables a single Live model to serve multiple users or groups with personalized schema access. Ensure that all schemas maintain an identical structure, including table and column names, data types, and relationships. For detailed configuration steps, refer to the Managing Live Dynamic Connections documentation.
-
Additional Parameters (Optional)
This optional field allows you to append custom key-value pairs to the JDBC connection string. Use this feature to specify Snowflake-specific JDBC driver options (e.g., role=ANALYST, warehouse=MY_WH). Separate multiple parameters with a semicolon. These values will override any conflicting values in the connection string.
Example:
warehouse=MY_WH;Timeout=60;.
For more details, see Snowflake Connection Parameters.
-
Default Database
This option specifies the default database to connect to when the session starts. If left blank, Snowflake may default to the database defined in the user profile.
Note:
Specifying a default database does not restrict access to other databases; access should be managed through user permissions in Snowflake.
-
Schema
This option specifies the default schema within the selected database. This is the schema that Sisense will reference when listing available tables and generating queries. It must match the schema structure if Dynamic Schema is used.
When using Dynamic Schema, ensure that all schemas have identical structures, including table and column names, data types, and relationships.
Supported Encryption Algorithms
-
PBE-MD5-DES
-
PBE-SHA1-RC2-64
-
PBE-SHA1-RC4-128
-
PBE-SHA1-RC4-40
-
PBE-SHA1-3DES
-
PBE-SHA1-2DES
-
PBE-SHA1-RC2-128
-
PBE-SHA1-RC2-40
To generate a key, use the following command:
openssl genrsa 2048 | openssl pkcs8 -topk8 -v1 'V1_ALGORITHM' -inform PEM -out rsa_key_1.p8To establish a connection using legacy encryption, ensure the Use modern RSA key encryption checkbox is not selected in the connection.
Note:
Sisense strongly recommends utilizing modern encryption methods to ensure the security of your data source connection. These legacy algorithms will be deprecated in the future.
Modern RSA PKCS#8 Encryption Methods (available since L2025.2)
This authentication method mandates a minimum RSA key pair size of 2048 bits, as specified in the official Snowflake documentation. For further details, see Key-Pair Authentication and Key-Pair Rotation.
Sisense supports the following PKCS#8 encryption algorithms that are compatible with OpenSSL:
-
PBES2 with PBKDF2 and DES-EDE3-CBC (-v2 des3 in OpenSSL)
-
PBES2 with PBKDF2 and AES-128-CBC, AES-192-CBC, AES-256-CBC (-v2 aes128, aes192, aes256)
-
PBE with MD5 and DES-CBC (-v1 des)
-
PBE with SHA1 and RC4, RC2, or DES-EDE3
The following is an example command to generate the key:
openssl genrsa 2048 | openssl pkcs8 -topk8 -v2 des3 -inform PEM -out rsa_key.p8While Sisense recommends using an encrypted private key for enhanced security, Sisense supports both encrypted and unencrypted keys.
To establish a connection that complies with Snowflake's official requirements, ensure that you select the Use modern RSA key encryption checkbox in the connection wizard.
Creating a Key Pair for SERVICE User Authentication
-
Identify the target user. When creating a new user for an app, use the following naming convention: svc_app_name.
-
Generate a key pair on the local machine.
# Generate a private key
openssl genrsa 2048 | openssl pkcs8 -topk8 -v2 des3 -inform PEM -out ~/.ssh/rsa_snowflake_key.p8
# Extract the public key
openssl rsa -in ~/.ssh/rsa_snowflake_key.p8 -pubout -out ~/.ssh/rsa_snowflake_key.pub
# View the public key
cat ~/.ssh/rsa_snowflake_key.pub
For more information, refer to Key-Pair Authentication and Key-Pair Rotation.
-
Create a SERVICE user in Snowflake with a public key:
CREATE USER svc_app_name
 TYPE = SERVICE
 COMMENT = 'Service user for App'
RSA_PUBLIC_KEY='MIGfMA0G......';-
To add a public key to an existing user, run the following query:
ALTER USER svc_app_name SET TYPE=SERVICE;
ALTER USER svc_app_name SET RSA_PUBLIC_KEY='MIGfMA0G.....';
Note:
Replace the RSA string with the content of rsa_snowflake_key.pub, excluding the
-----BEGIN PUBLIC KEY-----
and
-----END PUBLIC KEY-----
lines.
-
Create a new, or edit an existing, managed connection to use the key-pair.
Follow Data Source Connection Management and Key Pair Authentication to create new connection.
Converting an Existing User to SERVICE Type
To convert an existing user from regular to SERVICE type:
-
Run the following command:
ALTER USER svc_app_name SET USER_TYPE = 'SERVICE';Important:
This change removes the requirement for password and MFA.
Before proceeding, ensure the user's key pair is set up.
-
To verify the change, run the following command:
SHOW USERS LIKE 'svc_app_name';SERVICE should appear in the USER_TYPE column.
Snowflake’s Deprecation of Single Factor Authentication (Nov 2025)
Snowflake has announced its intention to fully deprecate single-factor authentication options (specifically the standard login/password method used for Sisense connectivity). The exact timelines and milestones for this deprecation are managed by Snowflake and may change over time. For the most up-to-date information, please refer directly to Snowflake’s announcements and documentation: Planning for the deprecation of single-factor password sign-ins.
Note:
Sisense will not enforce any deprecation of single-factor authentication on our side before Snowflake fully disables it on their side. However, we strongly recommend monitoring Snowflake’s guidance and planning your migration to supported authentication methods in accordance with their timelines.
As part of this transition, a new policy is being implemented that mandates Multi-Factor Authentication (MFA) for all human users logging in with passwords. For SERVICE users that require non-human access, the authentication method should be switched to key-pair.
A SERVICE user is a Snowflake user account designated for use by scheduled jobs, automated scripts, or external tools (such as Sisense), rather than by interactive end users.
Key Characteristics:
-
Not subject to MFA requirements
-
Intended for non-human (automated) use, such as establishing connections between Sisense data assets and Snowflake DB
-
Typically authenticates via key pair authentication or OAuth tokens, rather than passwords
-
Adheres to strict permission scoping to ensure least-privilege access
Affected Areas
From a technical standpoint, any component within Sisense that establishes or utilizes a connection to Snowflake via login and password will be impacted. These include:
-
Data models, both Live and EC
-
Notebooks
-
Build to Destination (B2D)
-
Custom code or any other functionalities that rely on an existing connection to the Snowflake database or create a direct one
Migration Path
Note:
A prerequisite for successful migration is upgrading to the version that includes Connection Management, support of user parameters with key-pair, and support for encryption algorithms as per Snowflake requirements as of Sisense version L2025.2. Without Connection Management, connections are not atomic entities that can be updated in a centralized manner, but are part of each dataset in the data model.
Therefore, Sisense strongly recommends upgrading to this version, which includes built-in tools designed to facilitate a smooth migration process.
Data Models
-
Upgrade to version L2025.2 or later.
-
Generate a new public/private key pair.
-
Associate the public key with the user's Snowflake profile.
-
Configure the client to use the private key.
-
Verify that the new connection is functioning correctly and can be utilized with existing assets.
-
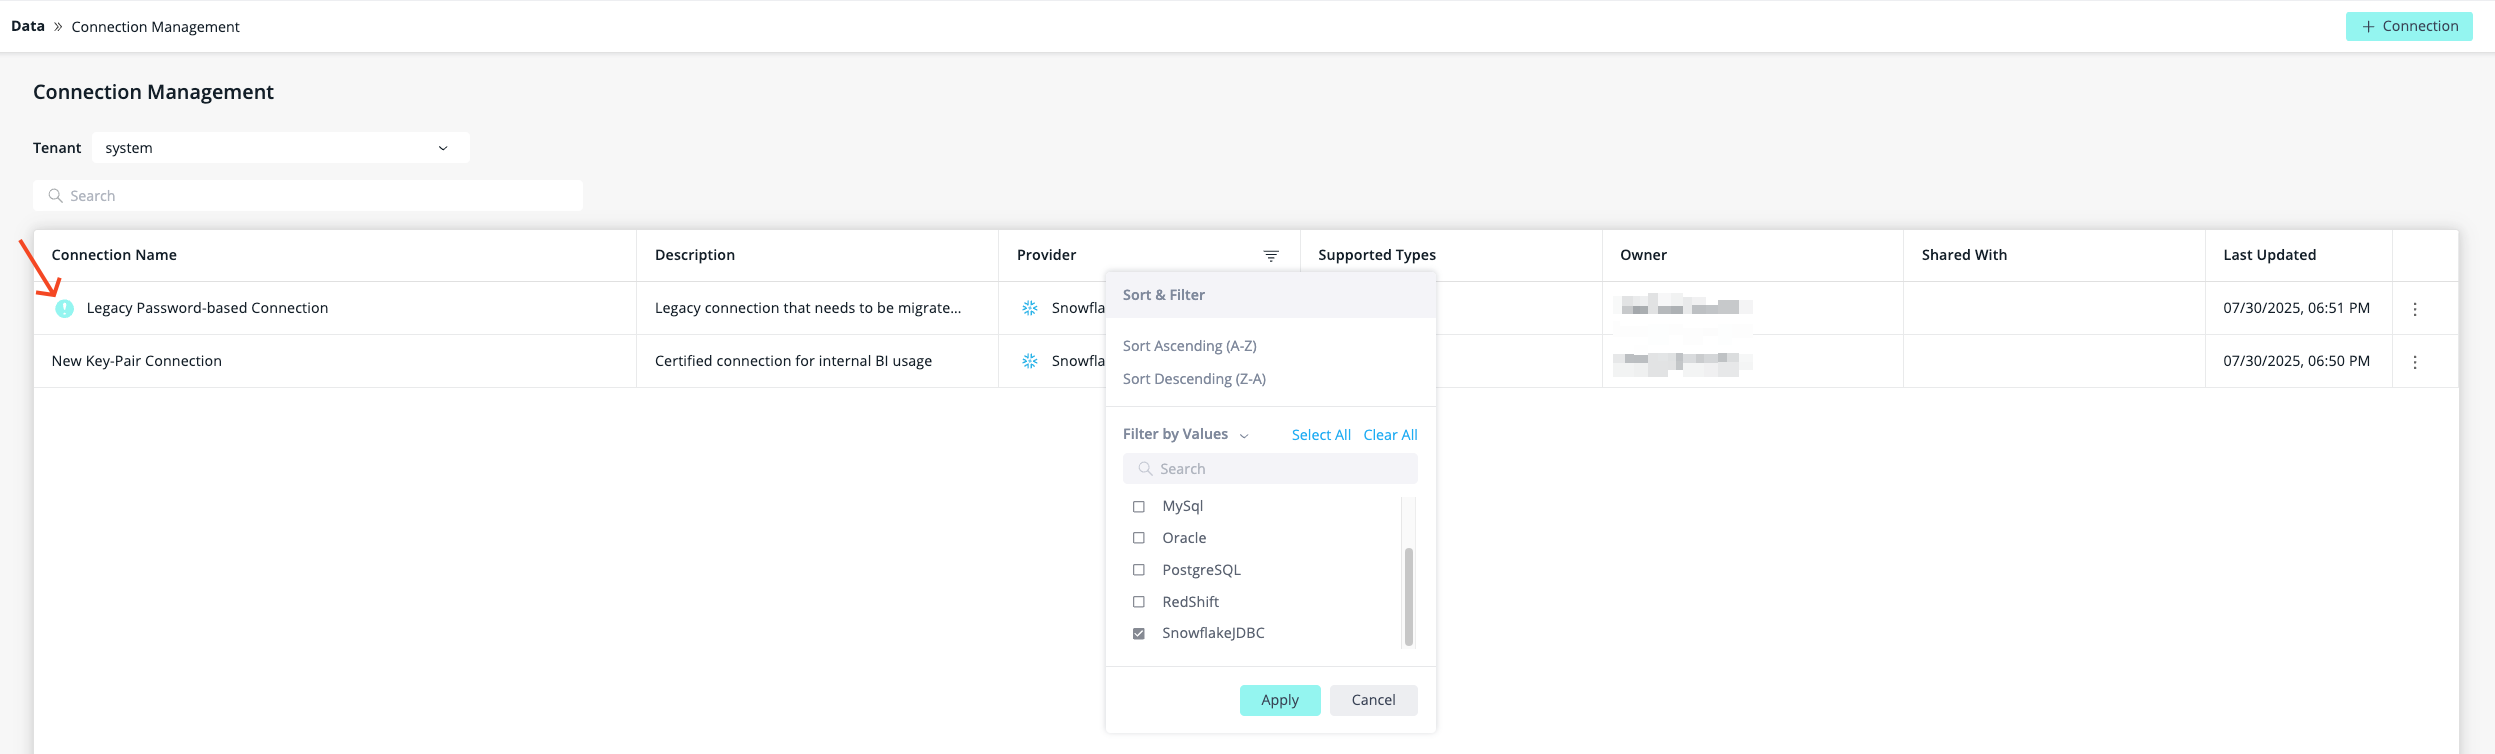
Locate the connections that need to be changed in the centralized list of managed connections at
/app/data/connectionManagement. For more information, see Data Source Connection Management. -
Filter connections by Provider > Snowflake and look for connections with an exclamation mark.
Note:
A connection can only be edited by the data designer who owns it or has 'Edit' permission for that connection, or by a user with a role higher than data admin.
All Snowflake connections indicated with an exclamation mark require migration.
If there are existing data sets based on a legacy connection, an exclamation mark will appear. When hovering over the exclamation mark, the following tool tip appears: "Snowflake deprecates single-factor authentication. Update connection to key pair authentication."
-
Edit the connection:
-
Click Edit on the selected connection. For more information, see Data Source Connection Management.
-
Change the authentication method from 'Use the following password:' to 'Use Key Pair Authentication'.
-
If you configured the key-pair according to Snowflake requirements, ensure the Use modern RSA key encryption checkbox is selected.
-
Click Save. The system will also test the connection using the new credentials.
-
-
Verify that assets dependent on this connection are functioning as expected. See Data Source Connection Management.
-
Once all connections are migrated, disable the Snowflake user that was used for username/password authentication to ensure that all connections are migrated successfully.
If you have duplicate connections, you can utilize the Delete > Replace the Connections option to organize connections and minimize the number of connections that need editing. For more information, see Data Source Connection Management.
Important:
The Connection Management system is designed so that any modifications made to a connection will immediately affect all dependent assets linked to the connection_oid. The delete and replace option will trigger a recursive update of the connection_oid across all associated assets. This process can be resource-intensive and poses risks, especially when dealing with a large number of dependencies. Therefore, it is strongly recommended to EDIT existing connections by replacing the username/password with a key pair.
Build to Destination (B2D)
B2D involves establishing dedicated VIEWER and WRITER connections to the Snowflake Data Warehouse. For detailed guidance, refer to Configuring B2D. These connections will also require transitioning from a password-based authentication method to a key-pair authentication method.
Beginning with L2025.4, Sisense supports creating B2D connections to Snowflake using the key-pair authentication method. The 2.0/b2d-connection endpoints have updated documentation, including placeholders with sample payloads to help provide an intuitive understanding of their usage.
As there is no GUI for the B2D, all changes must be made via the API.
Below is a sample payload:
{
  "name": "Snowflake B2D Viewer",
  "provider": "SnowflakeJDBC",
  "parameters": {
    "role": "VIEWER",
    "Database": "SALES_DATA",
    "privateKey": "/opt/sisense/storage/data/key.p8",
    "account": "<account_identifier>",
    "passphrase": "yourPassphrase",
    "useKeyPairAuth": true,
    "connectionString": "jdbc:snowflake://<account_identifier>.snowflakecomputing.com/?warehouse=<warehouse>",
    "useModernRSA": true,
    "userName": "sisense_b2d_viewer_user"
  },
  "description": "Connection with viewer permissions for accessing Snowflake Data Warehouse via Build to Destination (B2D)",
  "permissions": "viewer"
}
Note:
Change the role and permissions parameters to WRITER or VIEWER depending on the B2D connection you are creating.
Limitations
- The timestamp_ltz data type is not supported. Use timestamp_tz instead.