Troubleshooting Emails
Sisense users can receive a variety of automated emails from Sisense , which fall into two categories:
- System Emails: These emails include activation emails, password recovery emails, and updates of published dashboards.
- Email Reports: These emails include dashboard reports in PDF or PNG format that are sent manually or according to a defined schedule.
If you are not receiving emails, follow these steps to troubleshoot the problem:
Step 1 – Verify that Emails are Configured Correctly
You might not receive Sisense emails due to one of four possible configuration issues.
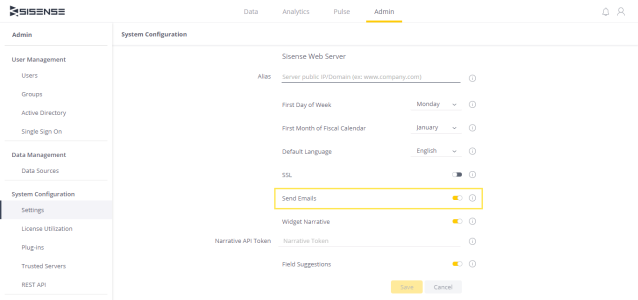
- Send Emails is deactivated: (All email types) Make sure that Sisense emails are enabled. From the Admin tab, click System Configuration.

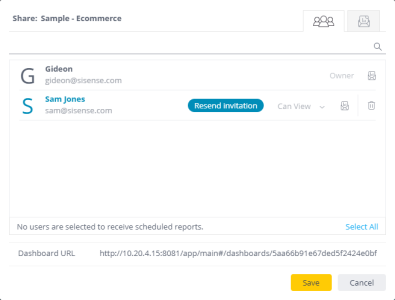
- The recipient is not in the “shared” list (Email reports only): You can verify which users the email report will be shared with by checking the
 icon associated with their name. If the
  icon is not highlighted, the user won't receive an email report. You can select the user by clicking the icon.
If you are sharing your reports with a group, verify that all the members are included. An Administrator can check the list of users in a group from the Admin page by Selecting Admin > Groups > Edit.
- Data Security settings prevent email reports from being sent: Verify with your Sisense Administrator that the user you want to share the report with has access rights to the dashboard’s ElastiCube.
- Build was unsuccessful: (Email reports only) If you send a report following each build, verify that dashboard’s ElastiCube was built successfully.
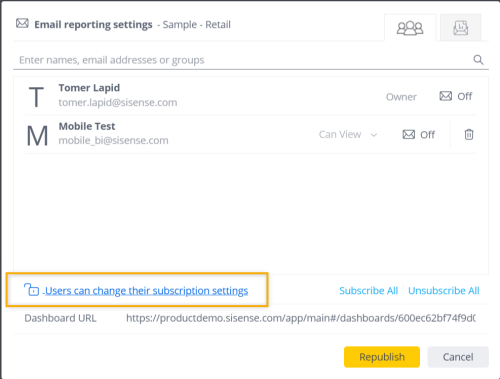
- Email scheduling for the user is locked on the dashboard: You can configure the email report settings to allow individual users to unsubscribe from scheduled email reports on a given dashboard. Check that you have not accidentally unlocked end-user report management on the relevant dashboard.

Step 2 – Send a Test Email
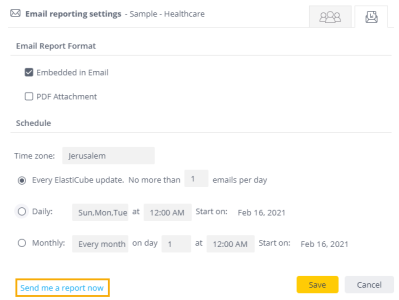
If you don't receive any emails from Sisense , email reports or system emails, you can verify if you can receive emails from Sisense by sending a report to yourself. To do so, click the  icon of a dashboard and in the bottom-left corner of the window, click Send me a report now to test the email’s functionality. If you receive an email, but do not receive your scheduled reports, see Creating PDF Reports.

Step 3 – Export the Dashboard to PDF
This step is relevant for email reports. If your issue is related to system emails, goto Step 5.
If you don't receive email reports, there might be a conflict with your add-ons. Export your dashboard to PDF to verify if email reports are being sent. If they aren't you can determine the source of the problem.
- Check Add-ons: You can check if your add-ons are interfering with your email reports by disabling your add-ons. If the email succeeds, this indicates that one of your add-ons is interfering with your emails and needs to be corrected. To disable your add-ons, from the Admin tab, click Add-ons and toggle all or individual add-ons OFF.
- Check long-running requests: If you have a networking layer that can terminate long-running requests (a Load Balancer, Reverse Proxy, etc.), verify that the request timeout is set to 300 seconds. Otherwise, the request could be canceled by the networking layer before it is finished.
Step 4 – Verify System Load
This step is relevant for email reports. If your issue is related to system emails, goto Step 5.
Verify that the system is not overloading by sending too many reports at the same time. For example, if your email reports are all scheduled for 5:00pm, this may overload the email server. You can verify if this is causing problems by more evenly distributing scheduled emails throughout the day.
Step 5 – Verify Port Bindings
For Sisense on Windows: Verify that your Port bindings are configured properly by using an HTTP port that is not used by other websites on your IIS.
If you have a DNS configured make sure you have the required certificate for it.
Step 6 – Custom Email Server
This step is relevant for all email types.
By default, Sisense uses Mandrill for emailing services. Verify that you can reach mandrill.com from the Sisense server. If you can’t, this might indicate a network security restriction. If your network security restrictions prevent you from communicating with Mandrill email services, you can implement your own custom email server, see Custom Email Servers. In any case, Sisense recommends that you use your own Mandrill account or your own SMTP server.
Step 7 – Check Rebranded Email Settings
This step is relevant for all email types.
If you have changed the default Sisense configuration, for example, when rebranding Sisense, run the following requests through REST API admin page
- GET /branding
- GET /settings/system
Verify that the ‘senderEmail’ is configured correctly and not listed as ‘string’ or another erroneous sender. This can happen when someone uses POST /branding and does not enter a valid email address or leaves the value as ‘string’.
If you are whitelabeling Sisense and rebranding your emails and you experience email problems, review the following steps as described here.
Step 8 – Verify Spam Protection
This step is relevant for all email types.
Make sure that emails sent from Sisense are whitelisted and not filtered by any spam protection. If you do not have access to your company’s Spam folder or Sisense emails may be filtered before arriving to your inbox, consult with your company’s IT administrator to verify that Sisense emails are not filtered by your company’s spam filters.
Contacting Technical Support
If none of the above resolved the issue, contact Sisense Technical Support. When contacting Sisense Technical Support, provide the following information to reduce the amount of time it takes to resolve your issue:
- Time: When the issue occurred.
- Logs: When encountering an error while trying to send email reports, Sisense maintains error logs that you can review or send to Sisense Technical Support. The logs are located at:
...ProgramData\Sisense\application-logs\galaxy
...ProgramData\Sisense\application-logs\reporting-service
...ProgramData\Sisense\application-logs\exporting-service
- Steps Taken: List each of the steps you have taken to resolve the issue yourself.
.r.