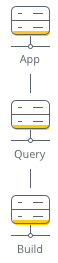
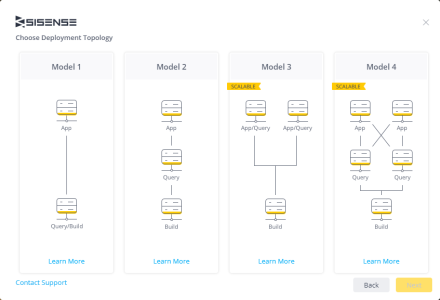
Model 2: 1 Application Node, 1 Query Node, 1 Build Node
Previous
Model 2 Architecture, Services, Ports
In this model, your application, query, and build node are located on separate servers. The benefit of Model 2 over a single node is that by separating each node, your data can be secured on a different node than your application node. In addition, you can utilize your hardware to support different tasks; one node for queries, one node for builds, and one node for supporting the Sisense application.
The disadvantage of Model 1 compared to other models is that high availability is not supported and workloads for the application and query nodes cannot be scaled. If your query node fails, the Sisense application will not be usable as the data models cannot be queried.
Limitations
- Maximum of four concurrent builds on one build node
- Maximum of 40 ElastiCubes per query node
- No component replication
| Components | High Availability | Load Distribution |
|---|---|---|
|
App Node |
No |
No |
|
Query Node |
No |
No |
|
Build Node |
No |
No |
|
Application Database |
No |
No |
Services Mapping
Sisense utilizes multiple communication ports. Some of the ports are used for communication between Sisense modules, and others are used for communication with remote locations.
The table below describes the ports used for communication between the Sisense modules that need to be opened in a firewall for this architecture.
Note:
"N/A" means the ports are not relevant (internal process).
| Service Type | Service | Ports | Build | Query | Application | Directions |
|---|---|---|---|---|---|---|
| Infra | Sisense.Oxygen | 31112 |
Yes |
Yes |
Yes |
Inbound |
| Sisense.Orchestrator | 445, 137-139 |
Yes |
Inbound | |||
|
Infra - Core |
Sisense.Broker |
5672, 15672, 25672, 4369 |
|
Yes |
Yes | Inbound |
| Sisense.Discovery | 2181, 2888, 3888 | Yes | Yes | Yes | Inbound | |
| Sisense.Repository | 27018 | Yes | Yes | Yes | Inbound | |
| Infra - Logs | Sisense.Collector | N/A | Yes | Yes | Yes | N/A |
| Sisense.Shipper | 5052 | Yes | Yes | Yes | Outbound | |
| Sisense.HouseKeeper | N/A | Yes | Yes | Yes | N/A | |
| Infra - Connectors | Sisense.CLRConnectorsContainer |
8090, 8098 |
Yes | Yes | Inbound | |
| Sisense.JVMConnectorsContainer |
8095, 9000-9010 |
Yes | Yes | Inbound | ||
| App - ECM | Sisense.ECMServer | 15000-15050 | Yes | Inbound | ||
| Sisense.ECMLogs | N/A | Yes | Inbound | |||
| App - Elasticube | Sisense.ECMS | 811,812 | Yes | Yes |
|
Inbound |
| App | IIS | 14996 | Yes |
|
Inbound | |
| Sisense.Galaxy | 15000-15050 | Yes | Inbound | |||
| Sisense.Gateway | 15000-15050 | Yes | Inbound | |||
| Sisense.Configuration | 15000-15050 | Yes | Yes | Yes | Inbound | |
| Sisense.Identity | 15000-15050 | Yes | Inbound | |||
| Sisense.Jobs | N/A | Yes | N/A | |||
| Sisense.Plugins | 15000-15050 | Yes |
|
Inbound | ||
| Sisense.SPE | 15000-15050 |
Yes |
|
Inbound | ||
| Sisense.StorageManager | 15000-15050 | Yes | Inbound | |||
| Sisense.Usage | N/A | Yes |
|
Inbound | ||
| Sisense.Pivot2 | 15000-15050 | Yes |
|
Inbound | ||
| Sisense.QueryProxy | N/A | Yes | Inbound |
Deploying Model 2
Note:
If you are expanding a single-node deployment to a multi-node deployment, see Expanding Single-Node Deployments to Multi-Node Deployments.
After you have installed the Multi-Node Deployment Wizard, you can log in with your Sisense credentials and begin configuring your nodes to implement a Model 2 deployment. In the Multi-Node Deployment Wizard, you define which servers act as build/query nodes and application nodes. The Deployment Wizard then configures the nodes for you.
In addition, you can define advanced settings for determining where to host the Sisense infrastructure, which includes the following components:
- Sisense Application Database: The application database contains metadata for ElastiCubes, dashboards, and users. You must have an odd number of machines to host the application database as Sisense combines them into a replica set. The goal of a replica set is to ensure that each application database has the same metadata about ElastiCubes, dashboards, and filters. If one database fails on one server, the next available database can replace it.
- Sisense Message Broker: The message broker is responsible for communicating events across Sisense components. As the message broker is not part of a replica set you can have it located on an even number of machines.
- Sisense Configuration Database: The Sisense configuration database is responsible for storing your configuration data. This ensures that your Sisense configuration is up-to-date across your entire configuration. You must have an odd number of machines to host the configuration database as Sisense combines them into a replica set. The goal of a replica set is to ensure that each configuration database has the same data. If one database fails on one server, the next available database can replace it.
To deploy Model 2:
- After Installing the Multi-Node Deployment Wizard, in your High Availability Configuration directory, run SisenseHAWizard.exe . If you are setting up your deployment behind a firewall, see Offline Multi-Node Deployments.
- Enter your Sisense login credentials and click Sign In.

-
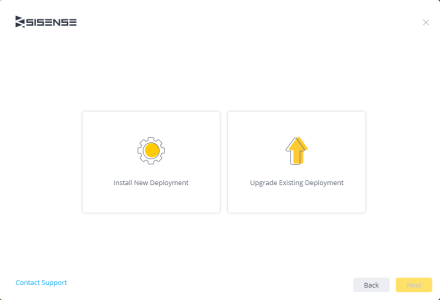
If you are installing a multi-node deployment, select Install New Deployment, and click Next. If you are modifying an existing deployment, select Upgrade Existing Deployment and click Next. If you are upgrading, see Upgrading Multi-Node Deployments.
-
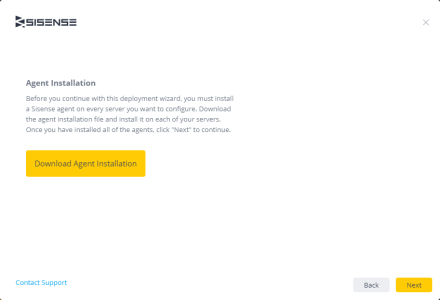
Click Download Agent Installation to install the Sisense Agent. This agent must be installed on all the Sisense servers that are part of your deployment. It allows Sisense to communicate with each of the other machines in your deployment. To install the agent, right-click on the file and select Run with PowerShell. Click Next.
-
Select the version of Sisense you are using. You can view your version of the Sisense Server by clicking
 in the top right corner of Sisense.
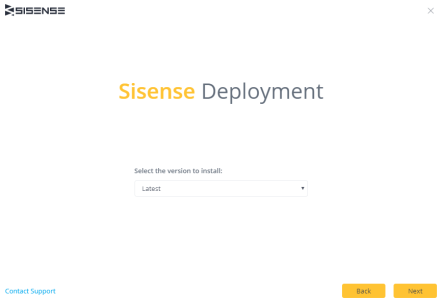
-
Select Model 2 and click Next.
-
In the Multi-Node Deployment Wizard, enter your Windows server credentials. These credentials will be used to connect to each of the servers in your environment, so the user name and password should be the same for each server and the user must have Admin privileges.
Note:
The password should not contain any special characters.
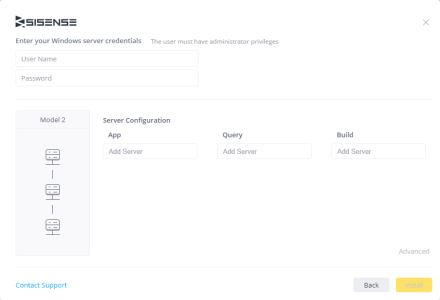
- In App, enter the IP address of your application server.
- In Query, enter the IP address of your query server.
- In Build, enter the IP address of your build server.
-
(Optional) Click Advanced to configure the support the Sisense infrastructure.
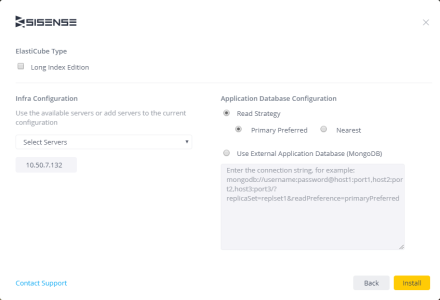
- Select Long Index Edition to install the Long Index version of Sisense. Long Index determines how Sisense transforms your data when loading it in to an ElastiCube. For more information, see Long Index.
- In the Infra Configuration area, select additional servers to define where Sisense hosts additional copies of the Sisense Message Broker, Sisense configuration database, and Sisense application database.
- In the Application Database Configuration area, select Read Strategy to define the read preferences of each member of your application database's replica set. The default is primaryPreferred, which means that Sisense reads are sent to the primary, but if it is unavailable, the reads come from secondary members instead. If your application databases are geographically spread out, you may want to select Nearest where reads are performed on the nearest available node, disregarding if it is a primary or secondary member. The nearest node is determined by sending pings to all members and measuring the response time.
OR - Select Use External Application Database if you host your Sisense application database externally on a separate machine. In the Connection String area, create a replica set for supporting your application database. This ensures that each application database has the same metadata about ElastiCubes, dashboards, and filters. Modify the value of Connection String to:
mongodb://AppUser:we6jBUYGoOrh0K6l+XpTmA==@localhost:27018,XX.XX.XX.XX:27018,XX.XX.XX.XX:27018/?replicaSet=[replicasetname]&readPreference=primaryPreferred[/replicasetname]
replacing ‘@localhost:27018/’ with the IP addresses of each of your nodes in the replica set separated by a comma and replacing [replicasetname] with the name of your replica set.
- Click Install. Sisense will automatically complete the setup of your Multi-Node environment. Close the Deployment Wizard once the setup is complete. After you have created your environment, the next step is to Distributing ElastiCube Builds to Query Nodes.
Next Steps
.r.