Configuring Sisense for Single Sign On
Note :
For Single Sign On instructions for Windows, see Introduction to SSO .
You can configure Sisense to authenticate users with Single Sign On (SSO). Sisense supports the JWT Token, SAML 2.0, and the OpenID Connect protocols.
Select a protocol below to learn more about it.
The sections Logging Users Out and Setting User Attributes and Groups for All Types of SSO Connections apply to all three protocols.
SSO via the JWT Token
JWT is a token that represents your users credentials. Sisense uses the jti parameter (see below), which adds a unique ID to the token that prevents the token from being used more than once, preventing replay attacks.
Note :
See the Developers Community for a tutorial that shows how to implement SSO via JWT.
SSO via the JWT Token Authentication Flow
The following is a diagram of the SSO authentication flow from your site or application to Sisense .
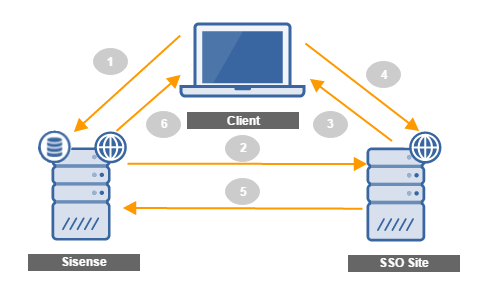
- A user requests a resource from Sisense , typically a dashboard.
- Sisense recognizes that no authenticated cookie is present. If you have enabled SSO in Sisense , the SSO handler redirects the user to your Remote Login URL defined in Sisense .
- The user is challenged to authenticate their account.
- Your Remote Login application authenticates your user and generates a JWT (JSON Web Token).
- You redirect the user back to Sisense with the encoded JWT in a query string. Sisense sets a cookie that authenticates the user’s session until they end it or until you log them out via the Sisense REST API. For more information see Logging Users Out .
- Sisense provides the authenticated user with the request resource.
Use Case
A common scenario that illustrates SSO is when an unauthenticated user navigates to your site in which Sisense is embedded via an iFrame. Sisense redirects this user to your SSO script. Your script authenticates the user through your login process and builds a JWT request with all the relevant credentials wrapped together. You then redirect the customer back to Sisense with the JWT payload. Sisense then decodes the user details from the JWT payload and grants the user a session.
Configuring SSO via the JWT Token in Sisense
Important :
Configuring SSO requires technical expertise and should only be conducted by an Administrator or developer with SSO experience.
There are three main steps to configuring SSO in Sisense :
-
Enable SSO in Sisense : An Administrator can enable SSO in Sisense and define the relevant Login and Logout URLs.
-
Create a JWT : After you authenticate a user, you generate a JWT with the user’s credentials to Sisense , so Sisense knows that this user is allowed to access resources from Sisense through your site.
-
Log Users Out : A user can access Sisense as long as a session is maintained. To end a session, the user’s cookie that Sisense provides must be deleted. To delete this cookie, you can use the Sisense REST API.
Enabling SSO via the JWT Token in Sisense
For Sisense to recognize that your users should be authenticated through SSO, you must enable SSO in Sisense .
To access and set up SSO via JWT:
-
In Sisense , click the Admin tab.
-
In the menu, click Single Sign On.
-
Select JWT.
-
Fill in the following SSO configuration fields:
- Remote Login URL : This is the URL that Sisense will invoke to attempt remote authentication. In that endpoint, the participating application user authentication script is triggered and the JWT payload is generated.
- Remote Logout URL : This is the URL that users will be redirected to after they log out from Sisense (that is, the participating application’s home page).
- Shared Secret : The Shared Key is a JWT encryption public key used to encrypt the JWT payload. It's generated once the SSO configuration is saved. Include this key in the JWT payload after authenticating the user on your side when redirecting the user back to Sisense .

- Enter the required information in the User Attributes and Groups sections.
-
Click Save.
Creating a JWT
Create a script that builds a JWT request which contains the user data.
The table below describes the attributes your JWT should contain.
| Attribute | Mandatory? | Description |
|---|---|---|
| typ | Yes |
Define the type of token with the attribute typ. You should also specify HS256 as the JWT algorithm in the header of your JWT payload.
|
| iat | Yes |
Issued at the time the token was generated. This is used to ensure that a given token gets used shortly after it's generated. The value must be the number of seconds since UNIX epoch. Sisense allows up to five minutes clock skew. Note: The date must be an integer and not a float. |
| sub | Yes | Email of the user being signed in, used to uniquely identify the user in Sisense. Users who don’t exist in Sisenseare handled according to the configurations set under User Attributes and Groups. |
| jti | Yes* | A unique string added to the token used to prevent replay attacks, by making sure the token is used only once. |
- You can set this attribute as optional in the Sisense REST API v1.0 through the POST settings/SSO endpoint.
return_to URL
After users successfully authenticate, Sisense returns them to a URL defined as the return_to URL.
For example: https://yourcompany.sisense.com/dashboards/
To define the return_to URL in Sisense , contact your Sisense Customer Service Manager or Sisense Support .
Troubleshooting SSO in iFrames on Internet Explorer and Safari
If you embedded Sisense in an iFrame and implemented SSO, in some cases when using Internet Explorer or Safari, you might see the following error: "An error occurred while trying to authenticate you using Single-Sign-On. Please ask your administrator for assistance."
This error is caused by Explorer and Safari blocking third-party cookies by default, rendering the JWT invalid. You can solve this by changing the default configuration of the browser.
Internet Explorer:
Open Internet Options > Privacy > Advanced, and change Third-party cookies to Accept.
Safari:
Follow the instructions here: https://clearcode.cc/blog/browsers-first-third-party-cookies/ .
SSO via SAML 2.0
The Sisense SAML authentication process is based on the SAML 2.0 protocol, and is explained below.
Phase 1
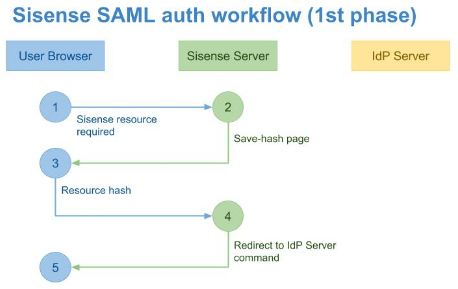
The first phase of this process begins when a user requests a resource from Sisense via their browser (1). The browser generates a resource request to the Sisense server. The server processes this request (2), and for unauthenticated users, returns a special save-hash page to save the requested hash data.
After the browser loads the save-hash page from the Sisense server, it runs a script, which loads the requested resource hash from the URL and sends it to the Sisense Server (3).
At the end of this phase, the Sisense Server converts the requested resource URL and sends it to the browser as a part of the redirect to IdP Server command (4).
Phase 2
The second phase of the authentication process starts after the browser retrieves the redirect command from the Sisense Server, and sends the authentication request to the IdP Server (1) as described in the diagram below.

The base URL for this request is taken from the Remote Login URL field in the Single Sign On section of the Admin tab in Sisense .
The requested resource address is passed to this request as a RelayState parameter. All other data is provided as a SAMLRequest parameter.
The next step of this phase depends on the user authentication state and the IdP implementation.
If the current user isn’t logged in as an IdP user, the IdP server redirects the browser to your Login page (2), where the user enters their IdP credentials. After logging in, the IdP Server sends the browser the Auto-Sign-In page with encoded data about the currently logged-in user (4).
Note :
Two-factor authentication for Sisense is supported for SSO providers that support it.
After this document is loaded in the user’s browser, it runs a script which creates the POST-query to the Sisense Server API, and passes the SAML response to this query (1). The third phase of the authentication process begins.
Phase 3
The Sisense Server handles the POST-query (2), decrypts it with the certificate specified in the Public X.509 Certificate field defined in the Single Sign On section of the Admin page. The Sisense Server uses the decrypted User ID as a key to locate the Sisense user in the internal database.
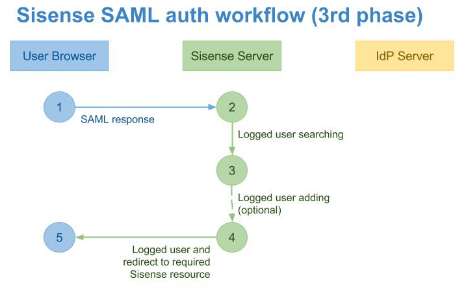
If a user isn't found in the system, Sisense creates a new user (3).
Associating SSO Users with Sisense Groups
When Sisense creates a new user, Sisense analyzes the “memberOf” field to locate one or more groups related to the logged-in user.
If the “memberOf” field is empty, the user is handled according to the configuration set under Groups . If the “memberOf” field contains one or more groups, and the groups were previously defined in Sisense , the newly created user’s Role is taken from the group’s default role. When multiple Sisense groups are found, the user is assigned the role with the maximum privileges.
Note :
Sisense limits the default role that can be assigned to Viewer, Designer, or Data Designer. No higher default group roles can be assigned.
After a user is created in the system, an Administrator can modify the user role, if needed.
Below, is an example of an SAML XML where the “Test” group is specified:
<saml:Attribute
  NameFormat="urn:oasis:names:tc:SAML:2.0:attrname-format:basic
  Name="memberOf">
  <saml:AttributeValue
    xmlns:xsi="http://www.w3.org/2001/XMLSchema-instance"
    xsi:type="xs:string">
    Test
  </saml:AttributeValue>
</saml:Attribute>
After the user is located or created, a new session is initialized, and the Sisense Server redirects the user browser to the requested resource (4).
Enabling SSO via SAML in Sisense
After you have configured your SAML server, sign in to Sisense as an Administrator and follow the instructions, below.
To enable SAML in Sisense :
-
In Sisense , click the Admin tab.
-
Select Single Sign On and then SAML 2.0.
-
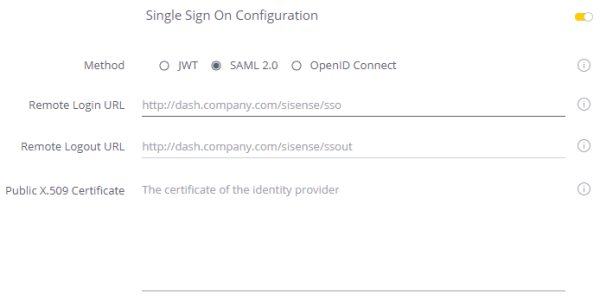
Fill in the following configuration details:
- Remote Login URL : The SAML Login endpoint. Sisense redirects the user to this field when they sign in. This value should be provided by the IdP Service.
- Remote Logout URL : The SAML Logout endpoint. Sisense redirects the user to this field when they sign out. This value should be provided by the IdP Service.
- Public X.509 Certificate : Your public key for your SAML configuration. This value should be provided by the IdP Service.
-
Enter the required information in the User Attributes and Groups sections.
-
Click Save.
Sisense Default Role Set-Up
When an authenticated user isn't found in the Sisense database, a new account is created. The user role is specified based on the user group/groups default role. To define a group’s role, see Managing User Groups .
Related Topics
For instructions on setting up Sisense with some third-party providers, see:
Setting Up SSO SAML 2.0 with Okta
Setting Up SSO SAML 2.0 with OneLogin
Setting Up SSO SAML 2.0 with Auth0
Setting Up SSO SAML 2.0 With Salesforce
Setting Up SSO SAML 2.0 With ADFS
Enabling SSO via OpenID Connect in Sisense
You can configure Sisense to support OpenID Connect for single sign on. OpenID Connect (OIDC) is an authentication protocol, based on the OAuth 2.0 family of specifications. In the OpenID Connect authentication flow, Sisense , the Replying Party (RP), interacts with your OpenID Connect provider (OP) to authenticate your user. Sisense relies on this authentication to provide your users access to Sisense .
How OpenID Connect Works
Sisense enables you to authenticate your users with the following authorization code flow:

-
Authentication Redirect : A user attempts to access your dashboard.
-
Authentication : Sisense recognizes that the user isn't signed in, and that you have enabled OpenID Connect in your Admin settings. Sisense redirects the user to the provider's Authorization URL that you also define in the Admin settings in Sisense .
-
Redirect to RP : The user authenticates through the OpenID provider’s site and is redirected back to Sisense with an authorization code.
-
Redirect to Token URL : Sisense responds with a request to the Token URL with the Client ID and Client Secret, all of which you define in the Admin settings. Your OpenID provider responds with an ID token, access token, and refresh token.
-
Redirect to User Info URL : Sisense uses the access token to retrieve additional information from the UserInfo URL. Once the OpenID provider responds, Sisense locates the user and signs them in. If they don't exist, Sisense creates a new user.
Configuring Your OpenID Provider
Before you can use SSO with OpenID in Sisense , you must have an account with an OpenID provider. Once you have configured your OpenID provider, in Sisense , you must provide the following details in the OpenID settings in the Admin page:
- Client ID : This is the identifier that the IdP assigned to your application.
- Client Secret : This is a token that is used by Sisense to verify the authenticity of the response from your OpenID provider.
- Issuer : This is the server identifier. Typically, this is the base URL with the HTTPS scheme. For example, https://sisense.com.
- Authorization URL : This is the URL at the provider's site that Sisense redirects your user when they try to authenticate.
Configuring OpenID in Sisense
After you have obtained the necessary details from your OpenID provider, you need to configure OpenID SSO in Sisense , and then enable it.
To configure OpenID in Sisense :
-
In Sisense , click the Admin tab.
-
In the left menu, click Single Sign On .
-
Select OpenID Connect .
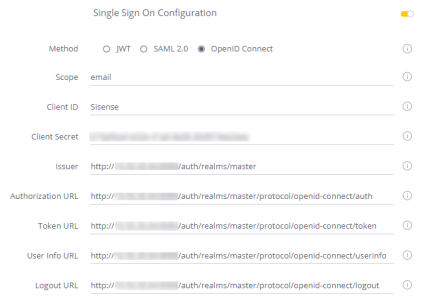
4. In the OpenID configuration settings, enter the following details:
- Scope : Enter the scope. The scope is a comma-separated list of identifiers used to specify what privileges should be granted to the user. ‘openid’ is a required scope that is automatically appended by Sisense . However, you can append additional comma-separated values as needed. Typical values include name and family_name.
- Client ID : The Client ID, provided to you by your provider.
- Client Secret : Your Client Secret provided to you by your provider.
- Issuer : Your server identifier. Typically, this is the base URL with the HTTPS scheme. For example, https://sisense.com.
- Authentication URL : The URL to the login page of your OpenID provider where Sisense redirects the user when they try to access a dashboard.
- Token URL : URL that returns access tokens, ID tokens, and refresh tokens. For example: https://[base-server-url]/token.
- User Info : The URL that returns information about the currently signed-in user. For example: https://[base-server-url]/userinfo.
- Logout URL : The URL where users are redirected to when they log out of Sisense .
- Enter the required information in the User Attributes and Groups sections.
- Click Save.
Logging Users Out
When a user is logged into Sisense using SSO authentication flow, a separate Sisense session is created. Anyone using that browser can access this Sisense session. Users will remain logged in until the session ends or until the user manually logs out of Sisense .
The lifetime of the Sisense session depends on the User Sessions configured in the Sisense application. For SSO via JWT, if the ‘exp’ parameter is passed in the JWT token, it overrides the default Session Management in Sisense for the user’s new session.
Note:
The Sisense session is separate from the session of the SSO provider when SSO is used in Sisense embedding. You’ll need to revoke both sessions when the user logs out from the application that embeds Sisense .
To manually log a user out, access version 0.9 of the REST API. Through the Auth method, you can issue a GET request to log out the current user.

When the user logs out of the embedding application, you’ll also need to log the user out of Sisense . To do so, you can extend the logic of the logout action of your parent application by sending the cross-origin REST API request to Sisense . The relevant endpoint is GET API v0.9 ${Sisense_URL}/api/auth/logout . You must also do both of the following:
-
Send a logout request with the {
'xhrFields': {'withCredentails': true}}parameter (see here for more information). -
In the Sisense CORS settings, whitelist the website that initiates the logout (see here for more information).
Setting User Attributes and Groups for All Types of SSO Connections
Setting User Attributes and Groups are optional SSO configurations for JWT, SAML 2.0, and OpenID Connect. If you or your SSO provider don’t use standard configurations, it might be necessary to configure these fields to override default mappings. If you use default configurations, you don’t need to configure these fields.
User Attributes
Sisense uses standard claims (key-value pairs) to identify users. You can override these claims, if you need to. The following table describes the standard claims used by Sisense :
| First Name | Last Name | Groups | ||
|---|---|---|---|---|
| JWT | firstName | lastName | sub | groups |
| SAML 2.0 |
User.FirstName user.firstname |
User.LastName user.lastname |
User.Email user.email |
memberOf |
| OpenID Connect | give_name | family_name | groups |
If you want to override these defaults, enter the names of each of the claims from your provider.
Allow Creating New Users
Toggle on Allow Creation of New Users via SSO to allow your SSO configuration to create new users and modify existing user permissions:

.r.