Getting Started with Notebooks
This article details the functionality that data designers use to manage the process of working with Notebooks.
Enabling Notebooks
To enable the Notebooks feature in Sisense:
- Go to Admin > Feature Management, and toggle on the Notebooks button. All
users, including Viewers, will see the tab, but the content in the tab differs based on user type.

- To access Notebooks, click the Notebooks tab. It may take a few minutes for the Notebooks service to load when enabled for the first time. The browser automatically refreshes once the service is ready.
Creating a Notebook
When you create a Notebook, it displays in view mode and is not yet editable.
Watch this video about creating notebooks:
To create a Notebook:
- To access Notebooks, click the Notebooks tab.
- In Notebooks, either:
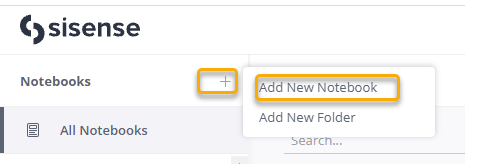
- At the top of the Notebook Browser, click + and select Add New Notebook.

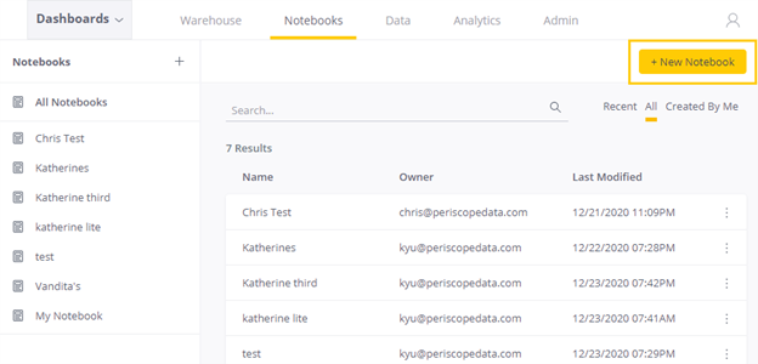
- Or, click + New Notebook.

- At the top of the Notebook Browser, click + and select Add New Notebook.
- Enter a name for your Notebook and click Save.
- Select a Live connector and enter the connection details. For more information about connecting to your data source, see Connecting Notebooks to a Data Source.
- Click Next.
Opening a Notebook
When you open Notebooks, a list of your existing Notebooks is displayed. The list includes the name of the Notebook,
the Notebook owner, and the date the Notebook was last modified.
You can search for Notebooks by their name or by their owner's name.
Filter the list by:
- Recently accessed Notebooks
- All Notebooks
- Notebooks that you created

To open a Notebook, select a Notebook from the list or select one from the Notebook Browser.
Sharing a Notebook
You can share a Notebook with anyone who has a Sisense account in your deployment. Viewers and Designers only have view access to all notebooks. Data Designers can be given view or design access to a notebook that is shared with them. Admins and Data Admins can see all notebooks even if they are not shared with them explicitly.
Watch this video about sharing notebooks:
To share a Notebook:
- Select the notebook you want to share, click the action button and select Share.
_619x454.png)
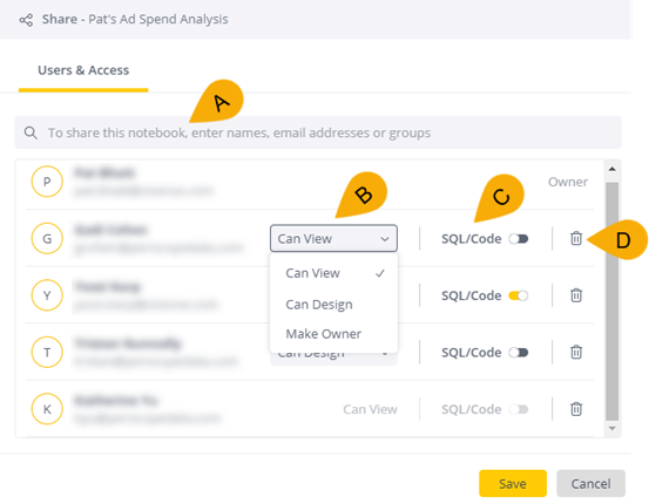
- Add users or groups to the Notebook share list:

- A. Search for users or groups to share the Notebook with.
- B. Select the permissions for this user.
- C. User can edit the SQL/code in the Notebook:
- Viewers and Designers will have the SQL/code toggle disabled by default, and the Can View/Can Design dropdown greyed out
- Admins and Data Admins can see the SQL/Code toggle even if it is toggled off for their user.
- D. Remove the user or group from the shared list.
- Click Save.
Permissions
Actions within the notebooks are dependent on user permissions:
- All user types can access the Notebook tab
- Only Admins, Data Admins, and Data Designers can create new Notebooks
- Only Owners, Data Admins, and Admins can change the Notebook owner or delete a notebook
Your Sisense role and the Notebook share permissions determine what you can do in a specific Notebook:
- Sisense Admins and Data Admins can perform all actions on a Notebook, regardless of the Notebook share permissions.
- Data Designers with Owner permissions can perform all actions on the Notebook.
- Data Designers with Edit permissions can perform all actions on the Notebook, but cannot change the Notebook owner or delete the Notebook.
- All user types with View permissions can only view the Notebook and cannot make any changes to it.
Organizing Notebooks into Folders
You can create folders for organizing notebooks:
- Folders can be nested up to 3 times.
- You can only add notebooks that you own into the folders that you own.
- Shared folders have a shared icon on the folder icon.
- A folder cannot be shared but a folder will have the shared icon if a notebook within that folder has been shared with the user.
- For Admins and Data Admins, the shared icon is on folders and notebooks that they do not own themselves. Since Admins and Data Admins can see all folders and all notebooks, the shared icon indicates which items they do not own and are owned by others even if those have not been shared with them explicitly.
To create a folder:
- At the top of the Notebook Browser, click + and select Add New Folder.
.png)
Or click the action menu and select New Folder. - Enter a name for the folder. There is a limit of 100 characters for the name.
- To add nested folders up to 3 levels, repeat the action in each folder you create.