Working with Git Integration Projects
Last updated: June 11, 2026
| Tier | Deployment |
|
|
|
This section covers:
- Project Page Overview
- Working with Uncommitted Changes
- Working with Existing Commits
- Working with Branches
- Interacting with the Remote Repository
- Navigating History
The major interface of interaction with the local project repositories is implemented via a rich, standard Git GUI as part of the Sisense application.
Watch this video for a demo of creating a new Git integration project and using it for asset version control:
Project Page Overview
The project page is opened by clicking on an available project in the project list.
Each project has the following sections:

[ 1 ] Navigation breadcrumbs
- Allows user to return from a specific project to the list of user's available projects by clicking [ Projects ]
- Being in the Manage Assets page and clicking on the project name will take the user back to the project page.
[ 2 ] Branches list
- Displays the branch of the project that is currently checked out. Clicking on the branch name makes it possible to see the list of all of the branches in the project, search within this list, and checkout to another one.
[ 3 ] Git Graph
- Visualization of all branches in the project.
[ 4 ] Git History
- Shows all of the commits from all of the branches in the current project.
[ 5 ] Changed files list
- Show list of changed files in the working directory (uncommitted changes) or in the specific commit.
[ 6] Changed file diff
- Show diff of what was changed in the specific file selected in the changed files list.
[ 7 ] Commit info
- Show the metadata of the commit
[ 8 ] Functional panel
- [ + Commit ] - For quick transfer to the new commit mode
- [ Push ] - To push commits from the local project to the remote repository
- [ Pull ] - To pull changes from the remote repository to the local project
- [ Refresh ] - To fetch new changes in the tracked assets on the Sisense server + changes from the remote, if the project is connected to a remote repository
[ 9 ] Additional context menu of the commit button:
- Enables to revert or checkout to the specific commit
[ 10 ] Manage Assets page:
- Navigates to the page with the list of assets assigned to the project
Resizing sections
It is possible to resize the Git History [ 4 ], the Changed files list [ 5 ], and the Changed file diff [ 6 ] blocks by dragging and dropping according to the needs of your current actions in the project.
Working with Uncommitted Changes
Once a Sisense asset is added to a project, it is converted to a set of child files in JSON format as described in Asset Translation and Management.
Starting from the moment a Sisense asset is added to a project it is stored in 2 places:
- Application - In the Sisense application database (DB)
- Git project - In the project's file system (repository) folder (FS)
When updates bring in differences between the Sisense application (DB) and Git project (FS) versions of an asset, they are reflected in the 'Uncommitted changes' section of the project.

Getting the Latest Changes
To view the most recent changes between the Sisense application (DB) and project (FS) states of the assets - click on the [ Refresh ] button in the functional panel [ 8 ]. This will run the sync operation. New changes will only be loaded for those assets that exist in the current checked out branch.
The sync operation is included by default in the browser's reload flow.
Note:
When a project is connected to the remote, [ Refresh ] invokes the git fetch operation in addition to the sync with the Sisense application (DB), and requires the user to enter their credentials to the remote.
Renamed Assets Changes
The name of the asset is part of the Git-tracked file. (For more information, see the Naming Convention section in Asset Translation and Management.) For example:dashboards/65363add391852002a17a203 Sample Healthcare/widgets/65363add391852002a17a204 TOTAL PATIENTS ADMITTED/widget.json.
When an asset is renamed in the application, this leads to a recursive renaming of the folders. This renaming operation is done with the use of the git mv command, (see Git - git-mv Doc).
In the UI, assets that include renaming changes are highlighted in bold. This helps to make clear the old versus the new name of the asset.

Note:
Renaming files directly in the server’s file system will not be processed by the system - only changing names in the application UI, or pulling commits that include renaming, will be accepted by the system.
Discarding Changes
Use the discard option to reset (undo) changes that were not committed yet:
- Discard All - Resets all of the uncommitted changes in the project
- Discard Selected - Resets uncommitted changes for the selected changed files

Note:
Make sure that it is OK for the asset's changes to be discarded, as there is no possibility to undo this operation.
Committing Changes
The commit operation enables "recording" changes to the Sisense project (local repository). In other words - it makes a snapshot of the selected changed files at some particular moment in time. See Git - git-commit Documentation for more information.
In the Sisense implementation files are auto staged, so there is no need to run the git add command in the commit flow in order to add files to the staged area.
To make a commit:
- Review the changes and select changed files you want to commit
- Enter a commit message
- Click [ Commit Selected ] or use the hotkey:
- Mac: Command + Enter
- Windows: Control + Enter

A commit is always created in the branch which is currently checked-out in the project. In the screenshot above it is 'release/Q4'.
Once a commit is created it will be visible at the top of the Git history list. The HEAD of the branch will be automatically moved to the latest commit created.

Working with Existing Commits
Checkout to the Commit
Checkout to a specific commit from the history enables going back to a specific state of the tracked assets from some moment of time. In other words, checkout makes a certain state (commit) your current working state in the application.
In order to checkout to the commit, select a commit in the git history -> click the 3 dots menu -> and click on [ Checkout ].
Checkout is forbidden when there are uncommitted changes so commit or discard them first.

If the checkout commit includes an asset that existed at that checked out commit (HEAD), but which is absent in the latest commit of the branch (head), (in other words, the asset existed in the past):
- The asset will be re-created
- The user performing the checkout operation will become the owner of this asset.
Detached HEAD State
Checking out to a specific commit moves you to the 'detached HEAD' state, which requires additional confirmation. See Git - git-checkout Documentation for more information.

When the current branch is in a detached HEAD state this is reflected in the Current Branch title and in the Current Branch column of the Projects list:

If you want to get out of a detached HEAD state - select any desired branch from the branches drop-down list.
Bringing in new changes in tracked assets for project in detached HEAD state
If new changes are brought in the tracked assets while a project is in the detached HEAD state, the user must perform one of these actions:
- Discard the uncommitted changes
- Create a new branch and commit uncommitted changes
Until they take one of these actions, the Commit, Revert, Push, and Pull options will be blocked and the following message will be displayed:
'You are in detached HEAD state. Discard the changes or create a new branch and commit them first'

Reverting a Commit
Git revert enables a user to 'undo' changes introduced by the commits. (See Git - git-revert Documentation for more information.)
In order to revert a commit select a commit in the Git history, click the 3 dots menu, and click the [Revert] option.

Revert automatically creates a new commit without the necessity to confirm this operation.

If the reverted commit includes:
- Asset that was deleted in the Sisense application - The asset will be re-created and the user performing the revert operation will become the owner of this asset
- Asset that was added to the project/created with pull from the remote - The asset will become untracked and deleted from the list of project's assets. But it will not be deleted from the Sisense application (DB).
Working with Branches
Initially each project is created with a single default branch, which is specified in the first step of the new project wizard -> Default Branch Name. (See Managing Git Integration Projects - Creating a New Project.)
Create New Branch
In order to create a new branch from your current state of the working directory, click [ + Branch ] in the top-right functional panel of the project. The new project name must be unique.
Clicking 'Checkout branch' will automatically checkout the project to this new branch.

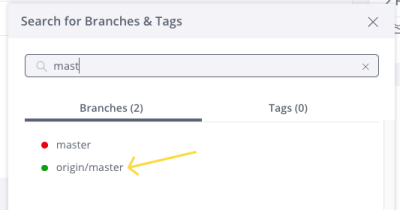
Search Branches
By clicking on the name of the current branch (for example, 'master') the list of all existing branches on the project is shown. It is possible to search within the list of available branches by entering a search query in the corresponding 'Search' field.
Remote branches have names that start with 'origin/..'

Checkout to Another Branch
In order to checkout to another branch simply select the branch from the list and click on it. In a nutshell, a branch in Git is a pointer to a specific commit, (see Git - Branches in a Nutshell).
Checkout to a branch is similar to checking out to a commit:
- Scope and state of the tracked assets are changed depending on the checked out branch
- If the tracked asset was changed, then uncommitted changes in the project will be displayed as soon as the current branch of the project is switched to the one that includes this asset
- If the checked-out branch includes an asset that existed at that checked out branch - the asset will be re-created, and the user performing the checkout operation will become the owner of this asset.
Note:
You cannot check out a different branch when there are uncommitted changes in the local working copy. You must commit or discard the changes before switching branches.
Remote vs Local Branches
Originally all of the changes in Git are done locally with ability for further synchronization with corresponding remote upstream branches in Gitlab, Github, Azure, etc., (see Git - Remote Branches).
In the list of the branches of the Sisense project we show:
- All branches created locally
- Remote branches (that start with 'origin/..' ) that do not have local copy yet
When checking out a remote branch, a local copy will be created automatically, and that local branch will be checked out. The remote branch will no longer appear in the drop down.
Merging
Merging branches is not yet supported in the Sisense Projects admin panel. You will need to set up a remote repository to merge branches:
- Start by pushing the commits you would like to merge to the remote. Then perform either a direct merge or a Merge Request / Pull Request on the remote repository.
- Now you can check out the target branch (into which the changes were merged) and perform a pull action in Sisense to update the local repository with the merged changes.
Interacting with the Remote Repository
The ability for the user to interact with the remote repository requires each project contributor to provide their credentials to the remote. See Managing Git Integration Projects - Connecting to a Remote for more information.
If user credentials are missing when executing one of the remote related operations, the following modal dialog will be displayed:

Fetch
The git fetch command allows you to check what changes are available on the remote repository before integrating them with your local repository. (See Git - git-fetch Documentation for more information.) In other words, fetching is what you do when you want to see what everybody else has been working on.
The Fetch operation can be executed by clicking [ Refresh ] in the top-right functional panel of the project. This button gets both the differences between the local states of the assets (DB vs FS) and from the remote. See Non-tracked assets for more information.
Pull
The git pull command is essentially a combination of the git fetch and git merge commands. It is used to incorporate changes available on the remote branch into your local branch of the Sisense project.
The 'Remote branch to pull' field in the Pull modal dialog enables the user to specify from which remote branch the changes should be pulled. Currently, in Sisense, the pull is always done into the currently checked out branch of the project, which is the default branch specified in the pull modal dialog.
>
Pull is forbidden if there are uncommitted changes in the working directory of your project.
Once the pull is executed, you are able to see new commits in the updated history list and corresponding changes in the owners copies of the assets in the Sisense application itself.
Note:
When an owner's copy is updated, it is still necessary to republish/rebuild assets in order for the changes to be applied for the end consumers.
Importing Changes and Assets Transformation
As pull brings files and updates into the project, (see Asset Translation and Management) they are transformed into newly generated Sisense assets (dashboards and data models), or updates to assets that already exist in the Sisense application (DB).
Creation flow for new assets
When a pull brings in a completely new asset:
The owner of an asset is excluded from the list of tracked properties when the asset is added to the project. Therefore, when a pull operation creates a new asset, its ownership is assigned to the user performing the pull according to their role permissions:
-
Data Designers (or higher roles) will own all new assets they pull, including both data models and dashboards.
-
For Dashboard Designers, ownership is assigned based on their permissions:
-
New dashboards are owned by the Dashboard Designer.
-
New data models are owned by the System Administrator.
-
Note:
-
If the imported (pulled) data model includes datasets without a single table, those datasets will not be imported and will be marked as deleted in the uncommitted changes.
-
Sisense does not allow multiple data models with the same title. When pulling a model from Git, if a model with the same name already exists, a copy will be created with “+ (Git Copy)” and a counter appended to the name (e.g.,
Sample Healthcare + (Git Copy) (1)).
Update flow for existing assets
When an asset is already tracked as part of a Sisense project, any changes brought in using pull will simply update the existing asset by merging the new changes from the remote with the converted representation of the asset in the project folder (repository).
If the pull brings in updates to a data model that already exists and already has connections, there is no need to update it as is required in the create flow. The existing connection parameters will continue to be used.
Handling Invalid Files During a Pull
When you pull commits from a remote Git repository, Sisense uses its native import APIs to convert the JSON-formatted files into functional assets, such as .smodel data models or .dash dashboards. This conversion process takes place after the pull operation is complete.
If a pulled commit contains files that cannot be converted into a valid asset (for example, a dashboard is missing its required dashboard.json or layout.json file), Sisense automatically reverts these changes. Typically, an "Import validation error" message is displayed to the user, and the invalid files will then appear in the Uncommitted Changes section of the Git panel.
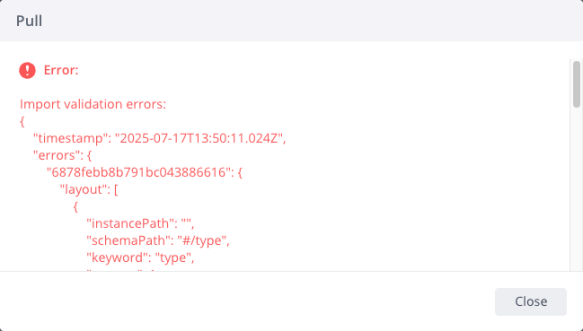
This automatic revert will occur every time you pull as long as the invalid files exist in the remote repository. To resolve the issue, you must correct the files in the remote repository and then pull the changes again.

Assets already tracked by other projects
When a pull brings in new assets or changes to existing assets that are part of another project, the list of assets should be adjusted first, because each asset can only be assigned to a single project.

When a pull brings in assets that already exist in the Sisense application deployment, but the owner of them does not have access to the project, then the project is automatically shared with the owner of the assets, pending Admin approval.

The Admin should review each of these pending requests and approve access. Until then, the automatically shared projects will not be accessible to the user, (even though the project includes their assets).

Note:
When the state of a new untracked asset on the remote is different from the one in the application, (after a pull) the state from the remote is saved into the file system and the difference from the Sisense application (DB) version is reflected in the uncommitted changes. The user can commit those changes or discard them.
Make sure to double check that such uncommitted changes can be discarded. There is no way to undo this operation. Discarding uncommitted changes might cause the loss of the asset changes that the user had in the application before the pull.
Handling data sources connections in Git Integration
Starting with Sisense version L2024.3 and newer, Connection Management becomes the unified and standard solution for managing data source connections for all customers. This changes the way data source connections are processed in Git Integration.
While sensitive data, such as connection credentials, remains untracked for security reasons, the connection itself becomes an atomic entity with its own OID (Object Identifier), which remains static and does not change when promoting between environments, similar to how data models and dashboards are handled.
The following properties of the connection are tracked in Git:
{
"description": "connection description",
"name": "connection name",
"oid": "unique identifier",
"provider": "data source provider",
"supportedModelTypes": "supported asset types"
}
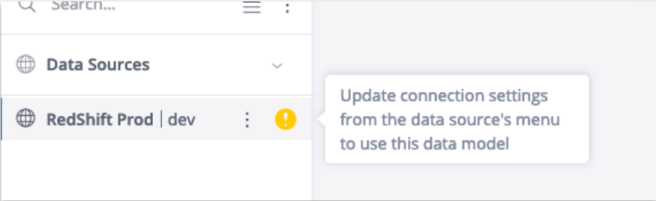
When pulling commits that include a data model from a remote repository, such as GitHub or Azure, an empty connection is generated unless a connection with the same OID already exists in the instance. Data models with empty managed connections display a "Disconnected" status in the list of data models.

To use a Git-imported data model, you must first update the credentials of the imported managed connection. To do this: navigate to the data model page, group the tables by data sources, and select Connection Settings > Edit Connection.
Once updated, the connection details are stored in the database and only need to be updated once during the initial import of the new data model.
Environment-Specific Connection Details
Since the connection OID is static across environments, the connection credentials should be updated with consideration of the environment where the data model will be used. For example:
-
Dev Server:
-
Data Model: Sample E-Commerce
-
Connection OID: 123
-
User: Developer
-
Password: xxxxxx
-
-
Stage Server:
-
Data Model: Sample E-Commerce
-
Connection OID: 123
-
User: QA
-
Password: xxxxxx
-
-
Prod Server:
-
Data Model: Sample E-Commerce
-
Connection OID: 123
-
User: Admin
-
Password: xxxxxx
-
This ensures that the same data model uses the same connection OID across environments, while pointing to the appropriate database for each specific environment.
Note:
To prevent merge conflicts and simplify the flow, for Git-imported data models, the option to switch connections is disabled. You can only update the imported connection. Once the connection is updated, all other options, including switching connections, are available as in regular data models.
Actions Upon Migration to Connections Management
As part of the upgrade to Sisense version L2024.3 or newer, the migration of old connections to managed connections occurs. When working with Git projects, the following actions should be taken into consideration:
-
Commit the Converted Connections: After migration, each converted connection is assigned a new OID, which appears in the Uncommitted section of your Git project. It is important to commit these changes rather than discard them, ensuring proper tracking of the converted connections and maintaining the consistency of the data models.
-
Handling Merge Conflicts Across Environments: Since migration occurs independently in each environment (e.g., Dev, Stage, Prod), the same data model may have different managed connection OIDs across environments. This will likely result in a merge conflict when pulling changes from one environment to another. You must resolve this conflict one time by selecting the connection that should be used with the data model across all environments.
Push
The git push command enables you to 'upload' content in the local project to the centralized remote repository for collaborative review or utilization by other users on other Sisense deployments.

Push Local Branch modal dialog
The Remote branch name field enables you to specify to which branch on the remote the changes from your local project's branch should be uploaded. By default it is the same branch as the current branch of the project. If the branch does not already exist on the remote it will be created.
The Force Push option (which uses the --force option for git push) enables you to forcefully override the commit history on the remote with your own local commit history. Normally, without this option, Git only allows you to push your changes if your local branch is up to date and already has the latest commits from its remote copy.
Note:
This is a rather dangerous option because it's very easy to overwrite (and thereby lose) the commits from your colleagues.
Also, even if no one else has pushed anything to the remote repository in the meantime, your colleagues still might be working based on the old commit history. So, when your "force push" changes this history, that means their work is not in line with the new commit history.
See How to Git Push Force | Solutions to Git Problems for more information.
Handling Divergent Branches with Unrelated History
When pulling from the remote you may receive the error fatal: refusing to merge unrelated histories. This is native Git (not Sisense) behavior that commonly occurs when attempting to merge unrelated repositories or unrelated branches.
For example, this error may appear when:
-
Creating a new repository and trying to merge an existing repository - If you create a new repository and then try to merge another repository that has unrelated commit history, Git will throw this error. The two repositories have no common ancestry, so Git cannot automatically determine how the merge should be performed.
-
Merging branches with no shared history - If you have two branches in the same repository that were created independently and have no common commits, attempting to merge them will result in this Git error.


Example of the unrelated history problem and how to avoid it
Take, for example, the following situation:
-
You have a remote repository which already has some commits.
-
You create a brand new Git project in Sisense, add some assets, and commit them.
Interacting with the remote repository (see Modifying Existing Project Properties) in such a Sisense project will lead to the following error:

The easiest ways to avoid this situation:
-
When setting the remote repository for the Sisense project (with the commit history you want to preserve), make sure that the remote repository has no history (commits). In other words, the remote repository must be blank.
-
When creating a new project and connecting it to the remote (with the commit history you want to preserve), make sure to pull first before making any updates in the new project. This way the Sisense project will extend the history of the remote, instead of creating unrelated branches.
Handling the unrelated histories error
If you already receiving the fatal: refusing to merge unrelated histories error, you can do either of the following:
-
Delete the local project, re-create the local project, and then pull (from the relevant remote repository) before making any updates in your local project.
-
Change the Remote URL (see Modifying Existing Project Properties) of your project to a blank remote repository, so that there are no conflicts in the history.
The best approach will depend on where your essential data is found - in the Sisense local project, or in the remote repository.
Resolving Merge Conflicts
Currently, there is no dedicated flow for resolving merge conflicts directly in the Sisense project. If a pull operation results in conflict it will be aborted. The project contributor will have to resolve the conflict on the remote first, and then execute the pull again.
The only exceptions to this are conflicts that are caused solely by renaming the assets and new file paths which are generated accordingly, (see Naming Convention in Asset Translation and Management) . In such cases, the conflicts will be automatically resolved by applying the path corresponding to the new asset name. In all other cases, merge conflicts need to be resolved on the remote.
Navigating History
Like many other Git clients, the Sisense Git UI includes labels in the commit history/graph to help you identify the most important commits in the graph.
Git history shows all of the commits from all of the branches in the project ordered by date. The new commits are at the top and old ones are at the bottom. The git graph provides a visualization of the branches in the project which helps users to understand in which branch particular commit is included.
Each branch has a separate color in the tree. The colors are assigned to branches when the page loads or refreshes. This means that the same branch may have a different color if the graph has changed, (for example, when a new branch is added).
The branch that has the latest commit is located on the left side of the graph, meaning that the most recently updated branch will be first from the left and the branch with the oldest commits will be on the right side.
Each commit in the list has the following data:
- Commit message
- First and last name of the commit author
- Date and time when the commit was done. If the commit was made today, only the time is displayed.
- Labels (if applicable):
- Tag if it is assigned to the commit
- Branch name if the commit is the latest commit of the branch
- Labels have the same color as the branch in the graph

Navigating to Branches and Tags
Besides scrolling through the Git commit graph, you can also quickly jump to the latest commits of any known branch, as well as to any commit that has a tag assigned to it.
Note:
Navigating to a commit using this method will only display the commit information, and will not check out that commit or branch.
- Click the Search icon to open the navigation menu:

- Select to display branches or tags. You can also narrow down the displayed results via the search text box:
- Once you have located the desired branch or tag, click it to navigate to the appropriate commit in the Git history/graph view:

Navigation Indicators
There are special indicators to help you understand your current location in the project.
Indicators for the currently checked out commit:
- Commit message is highlighted in bold
- Extra circle around the commit dot
- Background of the commit in the list is gray
- Left border of the commit area in the list has a dark bold line
Indicators for the currently viewed (navigated) commit:
- Background of the commit in the list is gray
- Left border of the commit area in the list has a dark bold line
- When navigating to a commit there is an an animation which briefly changes the background to a peach color
