Rebranding Emails
Last updated: June 28, 2026
| Tier | Deployment |
|
|
Sisense automated emails are sent to users according to predefined scenarios. When a predefined scenario such as a build alert is triggered, an automated email is sent to the relevant Sisense users.
You can customize these emails to match your company's branding.
The process for white labeling your emails is to create your own custom emails, overwrite the current Sisense emails, and then configure Sisense to use your custom branding through the Configuration Manager or REST API.
Sisense Automated Emails
You can white label the following automatic emails:
| Template Folder | Trigger Event |
|---|---|
| build_alert | Sent each time a build alert is triggered |
|
dashboard_errors_reports |
Sent when a dashboard report fails |
|
dashboard_errors_reports_bulk_fail |
Sent when a large amount of email reports fail |
|
dashboard_errors_report_new_exporting |
Send when exporting a new dashboard fails |
|
dashboard_reports |
Sent to the recipient of a shared dashboard when you share a dashboard |
|
empty_dashboard_report |
Sent to an Administrator when an empty dashboard report is sent |
|
kpi_alert |
Sent each time a KPI alert is triggered |
|
new_user_invitation |
Sent to a new user invited to Sisense |
|
password_recovery |
Sent to a user who requested a new password |
|
send_otp |
Sent to a user who requested a one-time password for two-factor authentication (2FA) |
|
share_elastiCube |
Sent to the recipient of a shared ElastiCube |
|
share_with |
Sent to the recipient of a shared dashboard |
|
test_email |
Sends a test email, triggered from the "Send a test email" at the top-right corner of the Admin > Email Settings window |
|
transfer_ownership |
Sent to a user who received ownership of a dashboard from another owner |
|
user_created |
Sent to a user when a user is created |
|
user_created_ad |
Sent when a user is created in Sisense after being added from Active Directory |
For each automated email, Sisense provides an email template in the format in LESS and EJS formats, located at:
/opt/sisense/storage/branding/{your brand}/emails
OR
In the /emails directory of the File Manager:
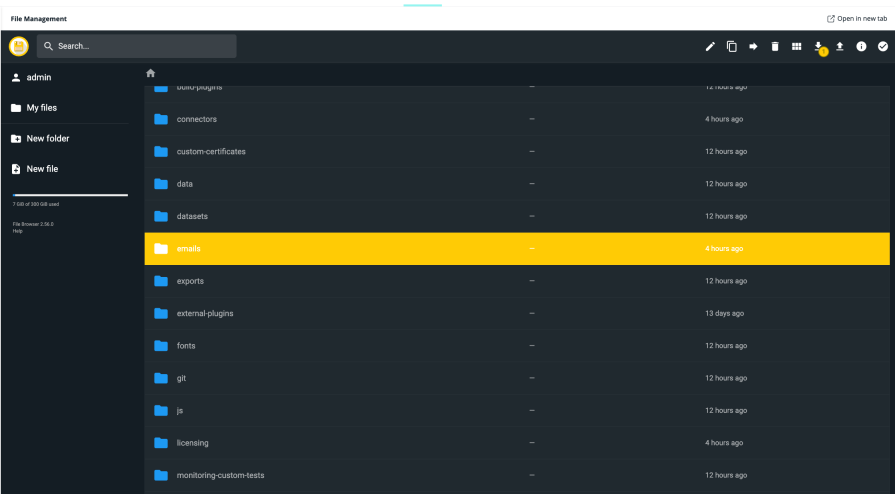
For information about accessing the File Manager, see Uploading Files to Customize Your Linux Deployment.
LESS Files (styling)
All templates contain the style.less file that refers to a stylesheet that defines the branding used in Sisense's automated emails, located at:
/opt/sisense/storage/emails
Or in the /emails directory of the file manager
By replacing the content of the styles.less file with your own CSS, you can redefine the branding used in all of the email templates to your custom branding.
EJS Files (Content)
Each template folder contains an HTML.ejs file, which contains HTML and JavaScript that describe the content of the email. The EJS file has three sections:
Section 1 - Header
<% include ../header %>
Defined in header.ejs - controls the title and logo image. Located at /opt/sisense/storage/emails or /emails in the File Manager.
Section 2 - Body
Contains the email content with two types of dynamic elements:
-
Tokens - Sisense variables (e.g.
<%= newOwnerUserName %>,<%= ownder %>) -
Strings - Predefined i18n objects (e.g.
i18nContent.hi) that cannot be modified but can be removed/replaced
Section 3 - Footer
<% include ../footer %>
Defined in footer.ejs - controls copyright text and footer images. Located at /opt/sisense/storage/emails or /emails in the File Manager.
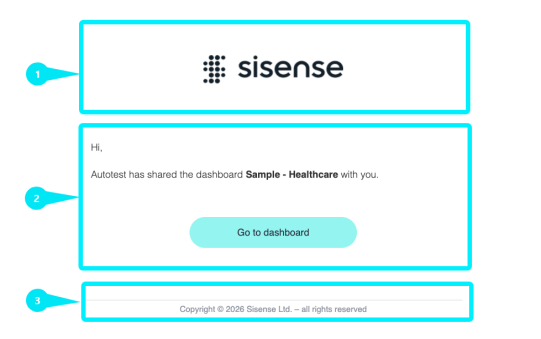
Each EJS file has three sections, a header, body, and footer; each of which describes various areas in the email your users receive.
Section 1 is the Header section defined in the EJS file as <% include ../header %>.
The header.ejs file defines the title and image used in the header section of each email template. You can modify the header by replacing the header.ejs file or by replacing the <% include ../header %> tag from each template with your own HTML and JavaScript.
Section 2 is the Body section, which contains the content displayed in the email your users receive. There are two types of content displayed in automated emails: tokens and strings. Tokens refer to Sisense variables, such as the Sisense username or dashboard owner's name. For example, the <%= newOwnerUserName %> token displays the new owner of a dashboard's Sisense username in the automated email.
<tr>
 <td>
 <div class="contentText">
 <p class="userText" style="margin: 0;"><%= i18nContent.hi %> <%= newOwnerUserName %>,</p>
 <p class="generalInfo" style="margin: 0;"><%- i18nContent.generalInfo %></p>
 </div>
 </td>
 </tr>
When you replace the HTML.ejs file with your own files, you can still use the Sisense tokens. For more information about tokens you can add to your automated emails, see the following section, Applying Sisense Tokens.
In addition, each template contains an object such as i18nContent.hi that displays strings predefined by Sisense. These strings cannot be modified. However, you can remove and replace the object with your own content.
Section 3 contains the footer. The footer, <% include ../footer %> , is a reference to a footer.ejs file located at:
/opt/sisense/storage/emails
OR
/emails in the File Manager.
The footer.ejs file defines the copyright text and image used in the footer section of each email template. You can modify the footer by replacing the footer.ejs file with or replace the <% include ../footer %> tag from each template with your own HTML and JavaScript.
Images displayed in the Header and Footer are stored in the following location:
/opt/sisense/storage/emails/images
OR
/emails/images/ in the File Manager.
You can replace these with your own images by maintaining the same file names used. However, it is recommended to replace the content of the Header and Footer sections together with your own content.
Applying Sisense Tokens
Most Sisense automated emails include tokens that you can apply to your automated emails. When the email is sent, Sisense populates the token with the relevant value. For example, the <%= owner %> token represents the owner of the dashboard.
Each template has tokens defined by Sisense for each automated email that you can apply listed below. Tokens from one automated email cannot be applied to another. Avoid adding tokens that do not exist out-of-the-box in the template because it may break the email functionality.
| Template | Available Tokens | |
|---|---|---|
build_alert
|
None | Sent when a build alert is triggered |
Dashboard_errors_report
|
<%= errors[i].error %>, <%= errors[i].widgetFailed %>, <%= errors[i].widgetCount %>
|
Sent when a dashboard email report fails |
dashboard_errors_report_bulk_fail
|
|
Sent when a dashboard email report sent to a large number of users fails |
dashboard_report
|
<%= url %>, <%= images[i] %> |
An automated email that contains a dashboard report sent to users. |
empty_dashboard_report
|
None | An automated email that contains an empty dashboard report sent to users |
kpi_alert
|
<%= measure %>, <%= value %>, <%= message %> |
Sent to shared users when a KPI alert is triggered |
|
|
|
Sent to a new user that you have invited to join * The folder for this template contains a file called HTML-ORG.ejs. This file is for older versions of Sisense and is maintained for backward compatibiliy. |
|
|
None |
Sent when a user requests their password from the Forgot Password page |
|
|
|
Sent to a new recipient of a dashboard when the dashboard is shared with them |
|
|
None |
|
|
|
|
Sent to the new owner of a dashboard when ownership is transferred |
|
|
None |
Sent to the recipients of new Sisense accounts |
|
|
|
Sent when a user is created in Sisense after being added from Active Directory |
Configuring Sisense Automated Emails
In addition to modifying the automated emails, there are a few changes you must make to your Sisense configuration to white label your Sisense emails, for example the name of the sender or the subject name. There are two ways you can modify the Sisense automated email configuration: through the UI in the Sisense Configuration Manager, or programmatically through the Sisense REST API. Both methods are described below.
Configuration Manager
To modify the Sisense automated email configuration:
- Open the Sisense Configuration Manager. You can access it by opening the Admin tab, and then selecting App Configuration.
- In the App Configuration Manager, open the White Labeling tab.
- In the Email section, enter the following details:
- Created User Subject: Enter the text to be displayed as the Subject Line in emails sent to new users.
- New User Invite Subject: Enter the text to be displayed as the Subject Line in invitations sent to new users.
- Password Recovery Subject: Enter the text to be displayed as the Subject Line in Password Recovery emails.
- Sender Email: Enter the name that is displayed as the Sender in Sisense automated emails.
- Sender Name: Enter the name that is displayed as the Sender in Sisense automated emails.
- Share With Existing User Subject: Enter the name that is displayed as the Sender in Sisense automated emails.
- Share With New User Subject: Enter the name that is displayed as the Sender in Sisense automated emails.
- Templates Directory: Enter the name that is displayed as the Sender in Sisense automated emails.
- Transfer Ownership: Enter the name that is displayed as the Sender in Sisense automated emails.
- Email Logo : Upload the file to use for your email logo.
- Click Save.
REST API
After you have prepared your new automated emails, through the /branding endpoint of the REST API, you can configure Sisense to send the customized automated emails when the relevant event is triggered.
To modify the Sisense automated email configuration through the REST API:
- Copy the contents of the directory:
/opt/sisense/storage/emails - Paste all the folders into the following directory:
/opt/sisense/storage/branding/<yourbrand>/emails
OR
Upload all the folders to your Sisense Server through the File Manager. See Uploading Files to Customize Your Linux Deployment for more information.Note:
You will modify the templates in this folder and configure Sisense to send them instead of the original Sisense automated emails.
- For each template you want to modify, change the contents of html.ejs files and styles.less as described in the section above, Sisense Automated Emails.
- On the left-hand menu, access the Sisense REST API.
- In the API Documentation, select version 0.9 on the top-right of the screen.
- Click Post/branding to access the relevant API settings, and then click Try It Out.
- In version 0.9 of the REST API, click POST /branding.
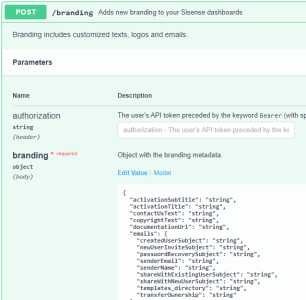
- In the 'email' object, define the following information:
Note:
If you have already rebranded your Sisense, copy the current settings through the GET /branding endpoint and paste them into the POST /branding endpoint, modifying or adding the 'emails' object. If you only modify the 'emails' object, the remaining objects and keys will revert to their default Sisense settings and will overwrite any current settings.
| Key | Description |
| senderEmail | The email address from which the automated email is to be sent. When you define the senderEmail value, you must verify your domain in Sisense's Mandrill email service. Click here for more information. |
| senderName |
Note: To change the name to be displayed as the Sender in the automated email, go to a different endpoint: POST/settings/system, and change the 'senderName' setting there. You can leave the current endpoint POST /branding as-is, without making any changes to it. |
| templates_directory | The directory location of your template folders. Sisense accepts /branding/<yourbrand>/emails as a custom location for automated email templates. This directory is located on your Sisense server at /opt/sisense/storage/branding/<yourbrand>/emailsNote: The templates directory must include the full path. For example:
|
| passwordRecoverySubject | The subject line of the password recovery email. |
| newUserInviteSubject | The subject line of the new user email. |
| createdUserSubject | The subject line of the new user invite email. |
| shareWithNewUserSubject | The subject line of the shared dashboard with a new user email. |
| shareWithExistingUserSubject | The subject line of the shared dashboard email. |
| transferOwnership | The subject line of the dashboard transfer ownership email. |
For example:
"emails": {

 "senderEmail": "sys-admin@company.com",

 "senderName": -----, (change this in POST/settings/system endpoint )

 "templates_directory": "/branding/<yourbrand>/emails",

 "passwordRecoverySubject": "Recover Password",

 "newUserInviteSubject": "new User Account Activation",

 "shareWithNewUserSubject": "A Dashboard has been shared with you:",

 "shareWithExistingUserSubject": "A Dashboard has been shared with you:"

 },
9. Click Run. The next time an automated email is sent, your templates are sent instead of Sisense's predefined emails.