Managing User Groups
Last updated: June 10, 2026
| Tier | Deployment |
|
|
|
Create user groups so that you can assign the same permissions to multiple people at once. For example, when building and sharing dashboards, instead of selecting individual users, select a user group. This way you can share a dashboard with all the members of that user group at once.
Accessing User Group Management
You can add, edit, and delete user groups, and assign users to them.
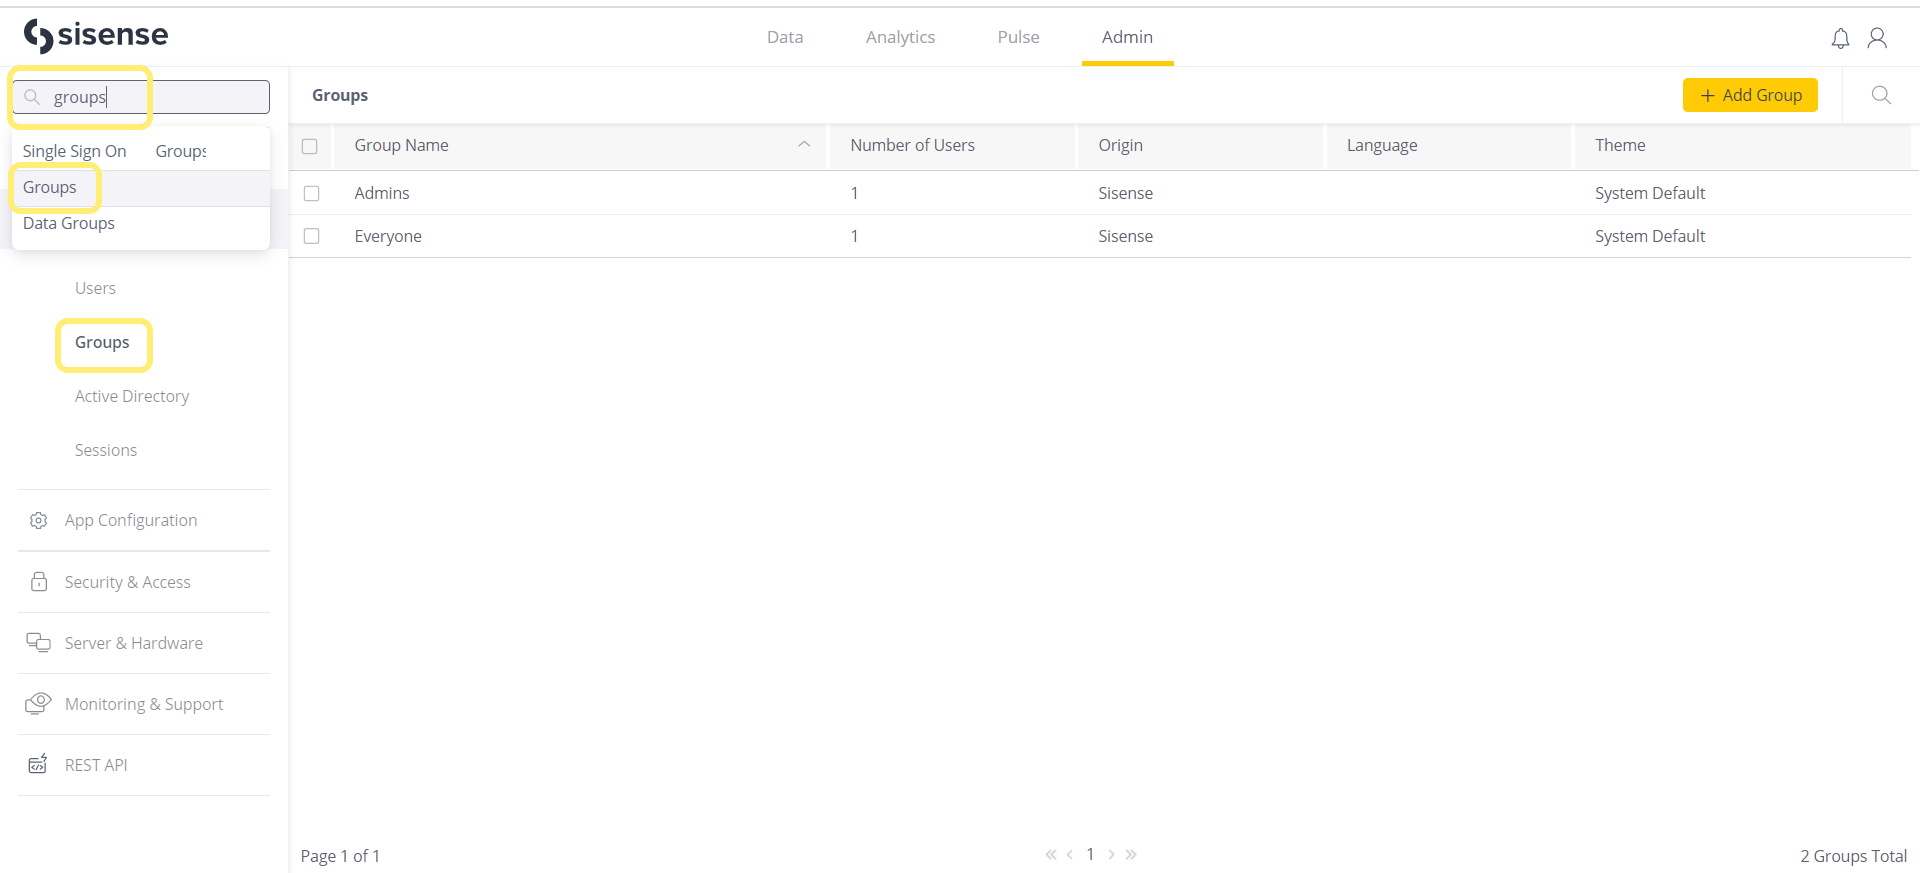
To access the user group settings, click the Admin tab and click Groups in the
menu.
- A list of the previously defined user groups is displayed
- The Origin column displays Sisense or Active Directory to indicate whether the user group was defined in Sisense or if it was imported from Active Directory
- If no user groups are defined, the following message is displayed: No Groups Found
Creating a New User Group
The following describes how to create a new user group and add users to it.
For a description of how to add a user group from Active Directory, see Integrating Active Directory.
Note:
- When users are added in Active Directory to a previously imported Active Directory user group, those users are automatically added to the corresponding Sisense user group.
- Additional users cannot be added to a user group that was imported from Active Directory.
-
Click the Admin tab and search for Groups, which is located under the User Management section.
-
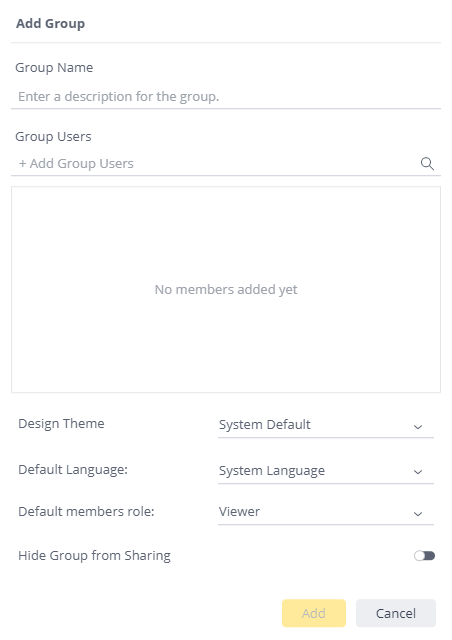
Click Add Group.
-
In the Group Name field, enter the name for this user group.
-
In the Group Users field, select the users who will belong to this group. To add a user, start entering the user's name. An auto-complete list shows existing Sisense users. Select a name to add it to the group.
Note:
You can leave the group empty and add members to it later.
- (Optional) Select Design Theme for the group.
- (Optional) Select a Default Language. The Default Language for a group is the language set by an Administrator for that server. For example, if your server supports groups located in different countries, you can set the language for each group.
- (Optional) Select the Default members role. If you have implemented SSO Using SAML 2.0, every group member is assigned this role when they log in for the first time. If you haven't implemented SSO over SAML, or if you create users manually, when you add a new user to an existing user group, the user receives the role you assigned to them when you created that user.
- (Optional) Enable or disable the Hide Group from Sharing setting. If enabled, the group does not display in any list for sharing.
- (Optional) The Session Inactivity Timeout options are displayed only if you have selected Session Inactivity for
your session management. You can use the system default for a group or manually set how many minutes must pass
before the group's users are logged out.
Note:
If the user belongs to multiple groups, the highest timeout settings are applied to that user.
For more information about these settings, see Managing User Sessions. - Click Add.
Adding Users to an Existing User Group
Note:
It is possible, although not recommended, to assign the same user to up to 800 user groups. However, when assigning users to large numbers of user groups it may be necessary to increase the RMQ message size.
Note that changes to the RMQ message size are reset and must be re-applied after each Sisense upgrade.
To add users to an existing user group:
- Click the Admin tab and search for Users, which is located under the User Management section.
- Select the users you want to add to the user group.
Note:
You cannot nest user groups, so you can only select users, not user groups.
- Click + Add to Group.
- In the Group Users field, enter additional user names to add more users. An auto-complete list shows existing Sisense users. Select a user to add to the group.
- Click Add.
Adding Users to an Existing User Group
The following procedure describes how to add one or more users to an existing user group.
To add multiple users to a user group:
- Click the Admin tab and search for Users, which is located under the User Management section.
- Select a user and click
 to edit their profile.
- Click + Add to Group.
- Select a group to add the user to, or create a new group by entering the new group's name.
- Click Add. The groups that the user is a member of appear in the Groups section of their user profile.
- Click Save.
Editing an Existing User Group
To edit an existing user group:
- Click the Admin tab and search for Groups, which is located under the User Management section.
- Click
 on the right of the user
group's entry in the list.
on the right of the user
group's entry in the list. - Modify the group as necessary.
Note:
To remove a user from the Group, next to the user's name, click
 .
. - Click Save.
Deleting a User Group
When a user group that was entered in Sisense is deleted, its users aren't deleted. They remain active users in Sisense.
When a user group that was imported from Active Directory is deleted, a prompt is displayed asking whether you want to also delete all the users in this user group from Sisense.
To delete an existing user group:
- Click the Admin tab and search for Groups, which is located under the User Management section.
- Click
 to the right of the user
group's entry in the list.
to the right of the user
group's entry in the list. - In the confirmation screen, click Delete.