Installing Sisense on a Multi-Node Cluster with EFS as the Shared Storage
Last updated: June 10, 2026
| Tier | Deployment |
|
|
You can deploy Sisense and Kubernetes (RKE2) on a multi-node EC2 instance with AWS EFS as the shared storage.
Prerequisites
Architecture
-
Amazon EKS
-
Amazon EC2
-
Elastic File System (EFS)
Requirements
-
Minimum of 3 nodes in the same region and same VPC
-
8 cores
-
32 GB RAM
-
Amazon Linux AMI 2023 OS (Amazon Linux 2023 AMI (HVM), SSD Volume)
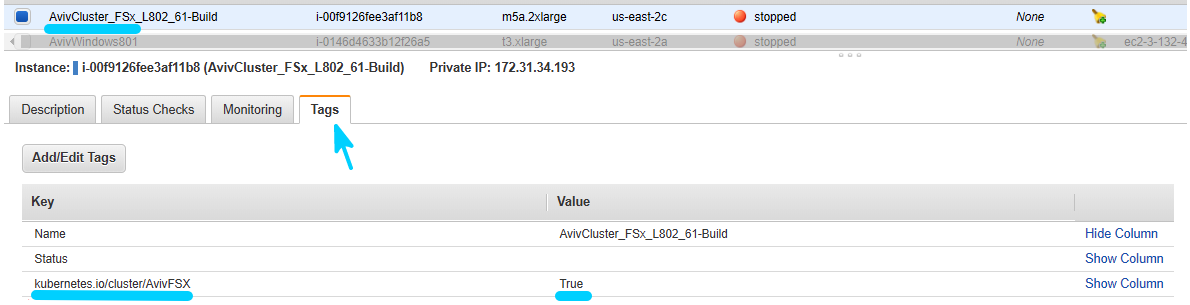
Tag EC2 instances with kubernetes.io/cluster/$cluster_name (replace cluster_name with a unique value) key and value true.
Note:
If you did not provide the tags during the instance creation, and you receive an error "Failed to update tags", right-click the instance > Instance Settings > Allow Tags in Instance Metadata > clear the checkbox.
Creating an IAM Role
Before installation, you must create an IAM role. In the following example the name is EFS_ROLE_FOR_EC2.
The role must contain the following 2 IAM policies:
-
AmazonEFSCSIDriverPolicy
-
AmazonEBSCSIDriverPolicy
Alternatively, you can create a custom policy with the following permissions:
{
"Version": "2012-10-17",
"Statement": [
{
"Sid": "AllowDescribe",
"Effect": "Allow",
"Action": [
"elasticfilesystem:DescribeAccessPoints",
"elasticfilesystem:DescribeFileSystems",
"elasticfilesystem:DescribeMountTargets",
"ec2:DescribeAvailabilityZones"
],
"Resource": "*"
},
{
"Sid": "AllowCreateAccessPoint",
"Effect": "Allow",
"Action": [
"elasticfilesystem:CreateAccessPoint"
],
"Resource": "*",
"Condition": {
"Null": {
"aws:RequestTag/efs.csi.aws.com/cluster": "false"
},
"ForAllValues:StringEquals": {
"aws:TagKeys": "efs.csi.aws.com/cluster"
}
}
},
{
"Sid": "AllowTagNewAccessPoints",
"Effect": "Allow",
"Action": [
"elasticfilesystem:TagResource"
],
"Resource": "*",
"Condition": {
"StringEquals": {
"elasticfilesystem:CreateAction": "CreateAccessPoint"
},
"Null": {
"aws:RequestTag/efs.csi.aws.com/cluster": "false"
},
"ForAllValues:StringEquals": {
"aws:TagKeys": "efs.csi.aws.com/cluster"
}
}
},
{
"Sid": "AllowDeleteAccessPoint",
"Effect": "Allow",
"Action": "elasticfilesystem:DeleteAccessPoint",
"Resource": "*",
"Condition": {
"Null": {
"aws:ResourceTag/efs.csi.aws.com/cluster": "false"
}
}
},
{
"Effect": "Allow",
"Action": [
"ec2:DescribeAvailabilityZones",
"ec2:DescribeInstances",
"ec2:DescribeInstanceTypes",
"ec2:DescribeSnapshots",
"ec2:DescribeTags",
"ec2:DescribeVolumes",
"ec2:DescribeVolumesModifications",
"ec2:DescribeVolumeStatus"
],
"Resource": "*"
},
{
"Effect": "Allow",
"Action": [
"ec2:CreateSnapshot",
"ec2:ModifyVolume"
],
"Resource": "arn:aws:ec2:*:*:volume/*"
},
{
"Effect": "Allow",
"Action": [
"ec2:CopyVolumes"
],
"Resource": [
"arn:aws:ec2:*:*:volume/vol-*"
]
},
{
"Effect": "Allow",
"Action": [
"ec2:AttachVolume",
"ec2:DetachVolume"
],
"Resource": [
"arn:aws:ec2:*:*:volume/*",
"arn:aws:ec2:*:*:instance/*"
]
},
{
"Effect": "Allow",
"Action": [
"ec2:CreateVolume",
"ec2:EnableFastSnapshotRestores"
],
"Resource": "arn:aws:ec2:*:*:snapshot/*"
},
{
"Effect": "Allow",
"Action": [
"ec2:CreateTags"
],
"Resource": [
"arn:aws:ec2:*:*:volume/*",
"arn:aws:ec2:*:*:snapshot/*"
],
"Condition": {
"StringEquals": {
"ec2:CreateAction": [
"CreateVolume",
"CreateSnapshot",
"CopyVolumes"
]
}
}
},
{
"Effect": "Allow",
"Action": [
"ec2:DeleteTags"
],
"Resource": [
"arn:aws:ec2:*:*:volume/*",
"arn:aws:ec2:*:*:snapshot/*"
]
},
{
"Effect": "Allow",
"Action": [
"ec2:CreateVolume",
"ec2:CopyVolumes"
],
"Resource": "arn:aws:ec2:*:*:volume/*",
"Condition": {
"StringLike": {
"aws:RequestTag/ebs.csi.aws.com/cluster": "true"
}
}
},
{
"Effect": "Allow",
"Action": [
"ec2:CreateVolume",
"ec2:CopyVolumes"
],
"Resource": "arn:aws:ec2:*:*:volume/*",
"Condition": {
"StringLike": {
"aws:RequestTag/CSIVolumeName": "*"
}
}
},
{
"Effect": "Allow",
"Action": [
"ec2:DeleteVolume"
],
"Resource": "arn:aws:ec2:*:*:volume/*",
"Condition": {
"StringLike": {
"ec2:ResourceTag/ebs.csi.aws.com/cluster": "true"
}
}
},
{
"Effect": "Allow",
"Action": [
"ec2:DeleteVolume"
],
"Resource": "arn:aws:ec2:*:*:volume/*",
"Condition": {
"StringLike": {
"ec2:ResourceTag/CSIVolumeName": "*"
}
}
},
{
"Effect": "Allow",
"Action": [
"ec2:DeleteVolume"
],
"Resource": "arn:aws:ec2:*:*:volume/*",
"Condition": {
"StringLike": {
"ec2:ResourceTag/kubernetes.io/created-for/pvc/name": "*"
}
}
},
{
"Effect": "Allow",
"Action": [
"ec2:CreateSnapshot"
],
"Resource": "arn:aws:ec2:*:*:snapshot/*",
"Condition": {
"StringLike": {
"aws:RequestTag/CSIVolumeSnapshotName": "*"
}
}
},
{
"Effect": "Allow",
"Action": [
"ec2:CreateSnapshot"
],
"Resource": "arn:aws:ec2:*:*:snapshot/*",
"Condition": {
"StringLike": {
"aws:RequestTag/ebs.csi.aws.com/cluster": "true"
}
}
},
{
"Effect": "Allow",
"Action": [
"ec2:DeleteSnapshot",
"ec2:LockSnapshot"
],
"Resource": "arn:aws:ec2:*:*:snapshot/*",
"Condition": {
"StringLike": {
"ec2:ResourceTag/CSIVolumeSnapshotName": "*"
}
}
},
{
"Effect": "Allow",
"Action": [
"ec2:DeleteSnapshot",
"ec2:LockSnapshot"
],
"Resource": "arn:aws:ec2:*:*:snapshot/*",
"Condition": {
"StringLike": {
"ec2:ResourceTag/ebs.csi.aws.com/cluster": "true"
}
}
}
]
}After this role is created and has been attached with these polices, attach the IAM Role to the EC2 instances:
-
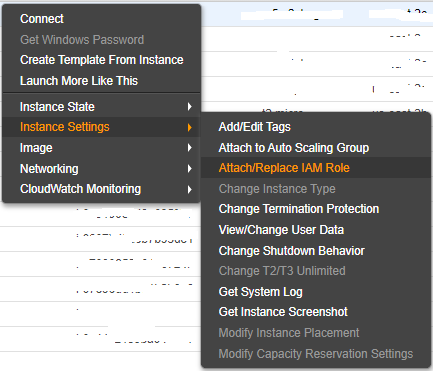
For each of the EC2 instances, click the instance > Instance Settings > Attach/Replace IAM Role.
-
Select the role (EFS_ROLE_FOR_EC2) and click Apply.
-
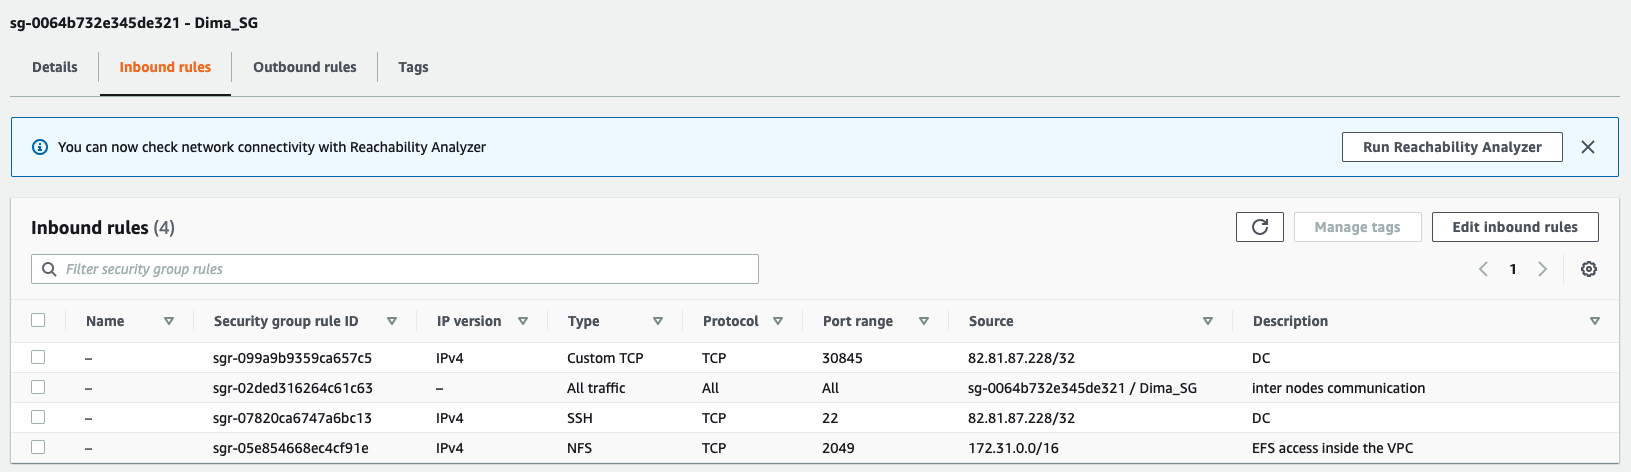
Create a security group for the nodes with an inbound rule opened for port 2049.
-
Verify that the following rules were added to the security group:
-
UI access to Sisense application (if it is port 30845/443/80, or other)
-
Inter-node communication: Allow all traffic for EC2 instances using this security group - add the security group ID and your VPC CIDR(s) to the rule
-
SSH access
-
VPC CIDR access for the EFS port (2049)
Note:
Make sure to attach this security group to all nodes.
-
-
On the newly-created EFS, ensure the following:
-
Choose EFS file system name.
-
Choose the same VPC as the nodes.
-
Choose Availability Regional.
-
-
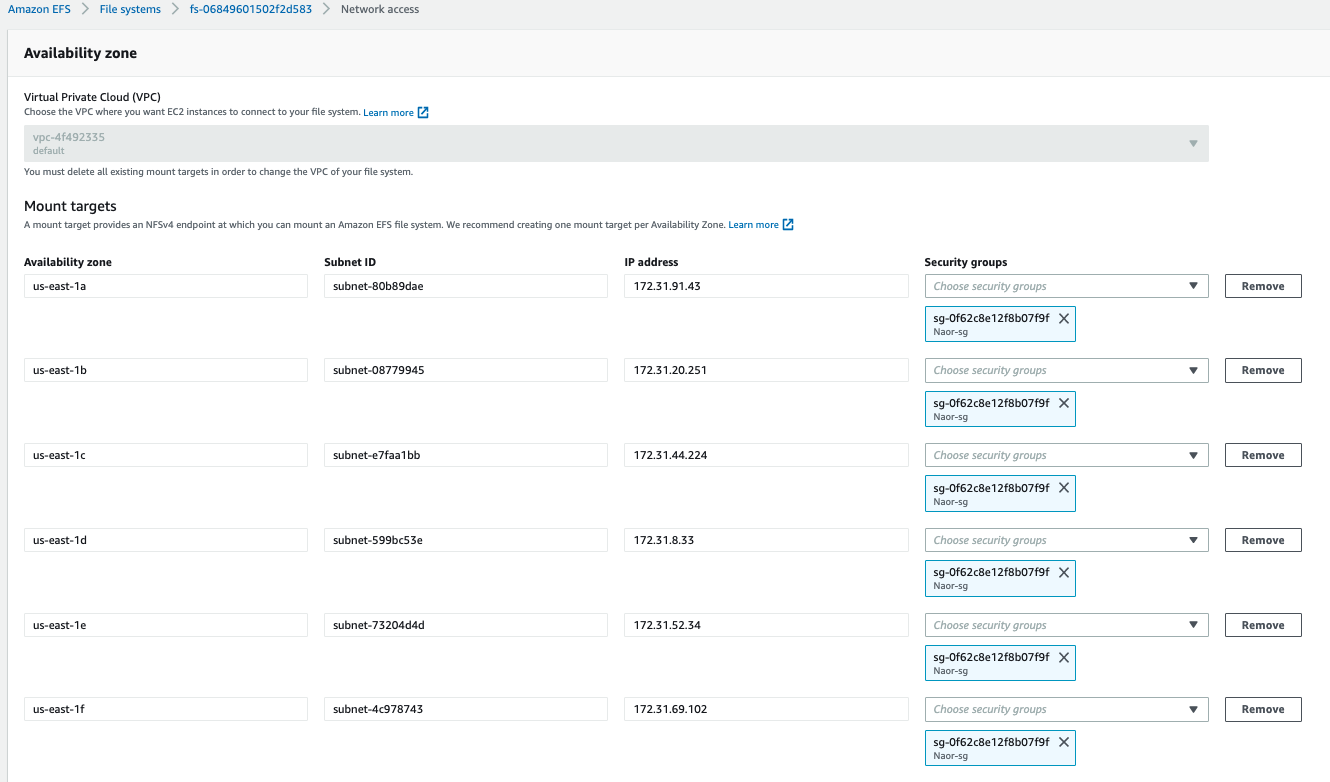
Once the EFS has been created, open Network > Manage and replace all security groups listed with your new security group.
Installing Sisense
-
Download a Sisense version package:
wget $sisense_url -
Extract the Sisense package:
tar zxf $package_name -
Open the Sisense directory:
cd sisense-$sisense_version -
Edit the Sisense configuration file:
vim cluster_config.yaml -
Edit the Sisense configuration file as follows:
-
Ensure node names are AWS private DNS names.
-
Update the internal and external IP addresses.
-
Add the
cloud_providerfield to the configuration file and set the value to aws. -
In the
storage_typefield, enter efs. -
Enter values for
efs_file_system_idandefs_aws_region. -
Configure disk sizes.
Example:
Copy## Replace node name with Private DNS of the EC2
k8s_nodes:
- { node: ip-192-168-30-30.us-east-2.compute.internal, internal_ip: 172.31.46.87, external_ip: 18.220.40.103, disk_volume_device: /dev/sdb, roles: "application, query" }
- { node: ip-192-168-30-31.us-east-2.compute.internal, internal_ip: 172.31.46.88, external_ip: 18.220.40.104, disk_volume_device: /dev/sdb, roles: "application, query" }
- { node: ip-192-168-30-32.us-east-2.compute.internal, internal_ip: 172.31.46.89, external_ip: 18.220.40.105, disk_volume_device: /dev/sdb, roles: "build" }
storage_type: efs
# This is a MUST
cloud_provider: aws
## AWS EFS
# Example
# efs_file_system_id: fs-a1b2c3d4e5
efs_file_system_id: "<efs_file_system_id>"
efs_aws_region: "<efs_aws_region>"
sisense_disk_size: 10
mongodb_disk_size: 3
zookeeper_disk_size: 1 -
-
Run the installation:
./sisense.sh cluster_config.yaml
Once the installation is complete you can activate and log in to your Sisense app.
Sisense intallation process completed successfuly.
The app is accessible on address: http://18.220.40.103:30845

    In order to access Sisense CLI and Completion file, you can execute:
    $ kubectl get cm --namespace sisense add-completion -ojsonpath='{.data.*}' > add_completion-sisense.sh
    $ source add_completion-sisense.sh

Skipping activation

[2026-05-28 12:01:52] Waiting for validator results ...
[2026-05-28 12:01:52] Waiting for validator job validator-1 to complete (timeout: 1200s)...
[2026-05-28 12:01:53] Validator completed.
[2026-05-28 12:01:53] Sisense installation completed.