Creating Dashboard Legacy Filters
Last updated: June 11, 2026
| Tier | Deployment |
|
|
|
IMPORTANT:
-
Starting from Sisense version L2025.2, all deployments will be automatically switched to use the default filters editor. For a limited time, it will still be possible to switch back to the legacy dashboard and widget filters described in this topic below, so that you can verify that the existing filters are not affected and make adjustments if necessary.
With the default filters enabled, existing custom add-ons (that rely on the legacy filter user interface) may stop working:
- Verify that you do not have such add-ons.
- Sisense certified add-ons (supported by Sisense) will not break.
- If the default filters cause add-ons to break, perform a rollback by disabling the feature.
Reverting to the Legacy Filters:
To switch back to the legacy filters from the newer default filters, turn off the following filter options in Feature Management in the Filter section:
-
Date / Time Filters
-
Numeric Filters
-
Textual Filters
Sisense installations prior to release L2023.6 may be using legacy dashboard and widget filters.
This article explains how to create dashboard filters using the different legacy filtering options.
In this section you will learn about:
- Creating a Dashboard Filter
- Creating an Include / Exclude Filter (List Filter)
- Selecting Single Selection or Multi-Selection
- Creating a Text Filter
- Creating a Numeric Value Filter
- Creating a Top / Bottom Ranking Filter
- Creating a Date Filter
- Updating on Every Change
- Wildcards
Creating a Dashboard Filter
To create a dashboard filter:
-
Filter Your Dashboard in the dashboard's right panel (if it's your first filter), or + if you are adding another filter. The Add Filter dialog box is displayed.
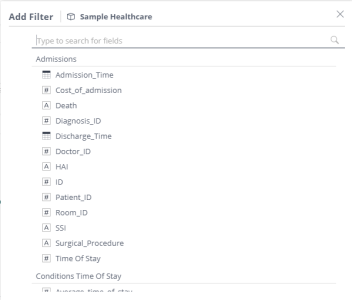
- (Optional) If you have multiple data sources, select the data source that contains the fields you want to filter. Filters applied to fields from one data source do not affect fields from another data source even on the same dashboard.
- Select the field by which to filter.
- Select the type of filter from the pane on the left, such as List, Criteria, Calendar or Ranking. The options provided in this window may vary according to the selected field type (Date, Numeric or Descriptive).
-
Select the required filtering details in the panel on the right to create one of the following types of filters:
- Creating an Include / Exclude Filter
- Creating a Text / Numeric / Date Filter
- Creating a Top / Bottom Ranking Filter
- Creating a Calendar Filter
These are explained in depth below.
-
Click the Star Favorite button to save this filter. You can give your starred filter a unique name by clicking in the text field and editing the given name. This will be useful when you need to quickly add a new filter (with same field type) or update a filter to reflect the unique parameters that you defined in your starred filter.
Note:
Your favorite filters are visible to shared users.
-
Click OK to filter the data in the Dashboard and add this filter to the Filters panel on the right of the Dashboard.
After a filter has been added to the dashboard, it stays displayed on the dashboard's Filters panel. Any changes that you make to the filter are immediately reflected in the dashboard.
Tip:
You can rearrange the filters in the Filters panel by dragging a filter above or below another filter.
For a short video overview of dashboard filters, see below.
Creating an Include / Exclude Filter (List Filter)
This type of filter enables you to define whether selected field values are included or excluded.
To define a List filter:
- Follow steps 1 - 3 of Creating a Dashboard Filter.
-
Select the List option in the left panel.

- Select / clear the field values to be included in / excluded from the Dashboard.
- Click OK to filter the data in the Dashboard and add a List filter to the Filter panel of the Dashboard.
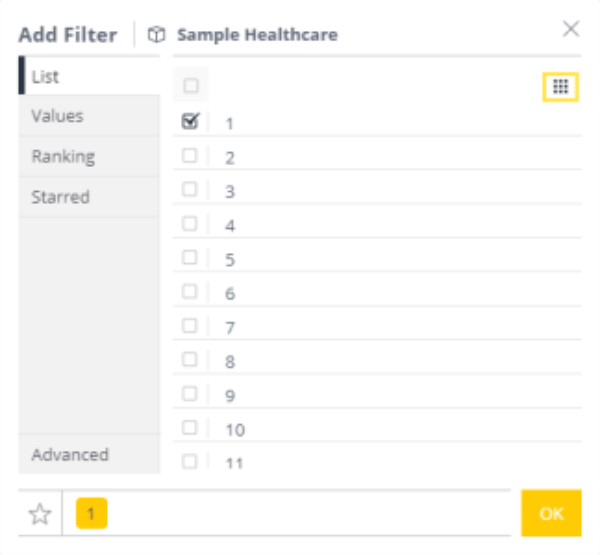
Selecting Single Selection or Multi-Selection
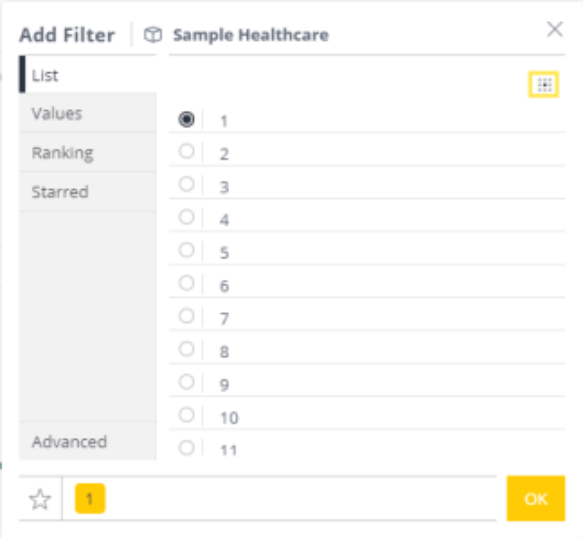
By default, list filters are set to multi-selection. To toggle between single and multi-selection, click the button on the upper right of the list filter.
Multi-Selection:
Single Selection:
Creating a Text Filter
This type of filter enables you to filter according to text matching. Text filters are case insensitive for all data sources by default.
Text filters are case insensitive for all data sources by default. This cannot be changed.
For a short video overview of adding a text filter to your dashboard, see below:
To define a Text filter:
- Select the Text tab.
- Follow steps 1 - 3 of Creating a Dashboard Filter. Select a Textual field.
- Select the operator, for example Starts with or Containing.
- Type in the value by which to filter.
- If you require additional conditions, click + Add condition. Select AND or OR to define how filter operators are combined.
Creating a Numeric Value Filter
This type of filter enables you to limit your dashboards to specific value ranges. For example:
- Keep only sales above 100$.
- Keep only product IDs between 1000020 and 1000030.
For a short video overview about adding a numeric filter to your dashboard, see below:
To define a Numeric filter:
- Select the Values tab.
- Follow steps 1 - 3 of Creating a Dashboard Filter.
- Select the operator, for example Equals or Greater than.
- Type in the value by which to filter.
- If you require additional conditions, click + Add condition. Select AND or OR to define how filter operators are combined.
For a short video overview on adding conditions to filters, see below:
Creating a Top / Bottom Ranking Filter
This type of filter enables you to select whether to include only the top / bottom ranking fields.
To define a Ranking filter:
- Follow steps 1 - 3 of Creating a Dashboard Filter.
- Select the Ranking filter tab.
- Select Top or Bottom and the number of items to include.
- In the By field, select a field by which to rank the fields. A list of the fields that match these definitions is displayed so that you can verify that the results are as you expect.
- Click OK to filter the data in the Dashboard and add a Ranking filter to the Filter panel of the Dashboard.
Creating a Date Filter
There are several types of date filtering options, among them Calendar and Dynamic Time filters.
Note:
Unlike other filters that you define, viewers will be able to change the type of date filter, for example, from Time Frame to Calendar, etc., providing more flexibility for viewing date ranges.
For a short video overview of date filters, see below.
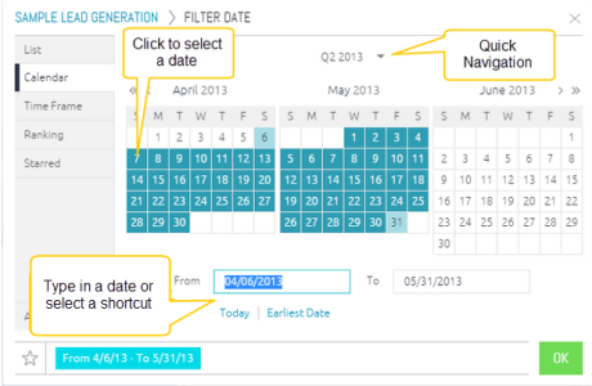
Calendar Filter
This filter enables you to select custom date ranges from a calendar.
To define a Calendar filter:
- Follow steps 1 - 3 of Creating a Dashboard Filter. Select a date field.
- Select the Calendar filter tab.
- Use the quick navigation menu to jump to a point in time.
-
Select a date range using any of the following methods:
- Use the calendar to select a date range to filter by. Use the left calendar to select the starting date of the range, and the right calendar to select the end date.
- Type in the dates.
- Use a shortcut such as Earliest Date or Today.
Note:
Earliest Date and Latest Date refer to the earliest and latest dates with data.
- Click OK to filter the data in the Dashboard and add a date filter to the Filter panel of the Dashboard.
Dynamic Time Filter
This filter enables you to filter dashboards to preset dynamic time frames, such as Last Year, Last 2 Years, 2 Year ago, etc.
To define a dynamic time filter:
- Follow steps 1 - 3 of Creating a Dashboard Filter. (Select a date field)
- Select the Time Frame filter tab.
-
Select the required option.
Note:
For Sisense for Linux, Aggregated Time Level filtering (hour / minute) was supported until L8.2.6 SP3 but was removed temporarily. The lowest granularity for Time Level filtering is by Day.
- Click OK to filter the data in the Dashboard and add a date filter to the Filter panel of the Dashboard.
Advanced Filtering Criteria
If you require advanced filtering options that are not included in the provided settings (for dashboard or widget), you can add or edit filters in the Advanced section.
To add or edit filtering criteria:
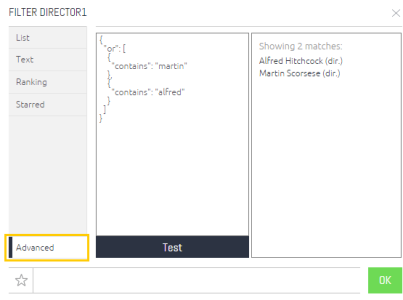
- Click Advanced in the left panel.
- Add or edit filtering criteria. Click Test to see the results of your new / edited filter.
- Click OK to add the filter.
Example 1 - Adding an OR statement
The example below shows an OR statement being used to display multiple names. After clicking Test, the matches are displayed to the right of the script.
Examples using JAQL Queries
Example 2 - Filtering by Measures
This option lets you filter dimensions by measures, returning only the filtered members and associated values.
In this example, all products with a total price equal or greater than 1 million will be returned.
The query:
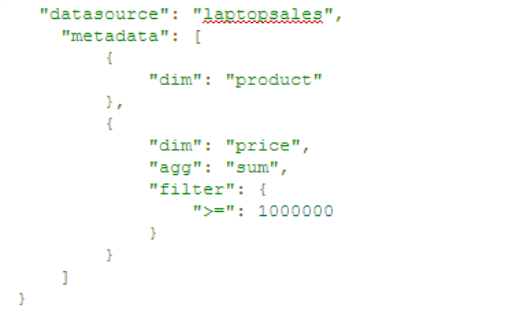
Results include the relevant product names and price, for example:
- Product A, 1000000
- Product B, 1551246
Example 3 - Filtering by Dimension Attributes
This option lets you filter dimensions by filtered attributes of other dimensions, returning only the filtered values.
In this example, all customers that purchased Product A and Product B will be returned.
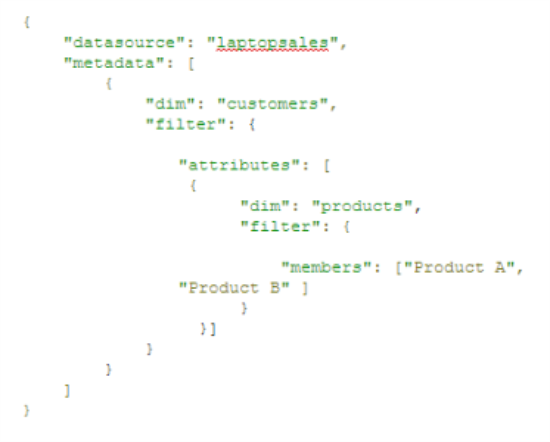
Note:
You can add as many nested filters as needed.
Updating on Every Change
When this option is on, any changes you make to the dashboard filters are updated immediately, and the dashboard is refreshed to reflect the changes.
If you are working with large or complex data sets that result in longer refresh times, then switch off this option. Make all your changes, and click the Update button when you are ready to update your dashboard.
Note:
This option is available for Designers only. Sisense viewers can make changes that will update automatically on very change.
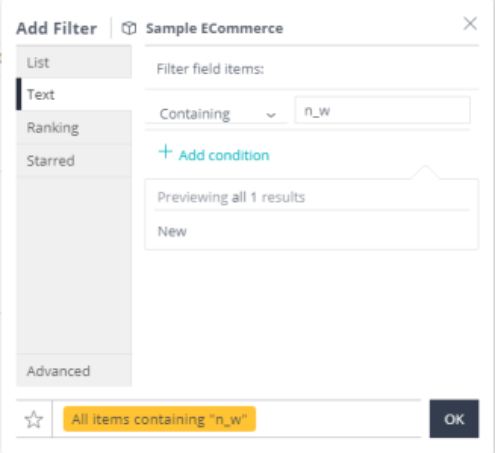
Wildcards
To filter lists or text quickly, you can use wildcards such as '_' or '%', which will be interpreted as literal characters or an empty string.
Sisense supports the following wildcards:
Single Characters
You can enter an underscore '_' as a placeholder for a single unknown character.
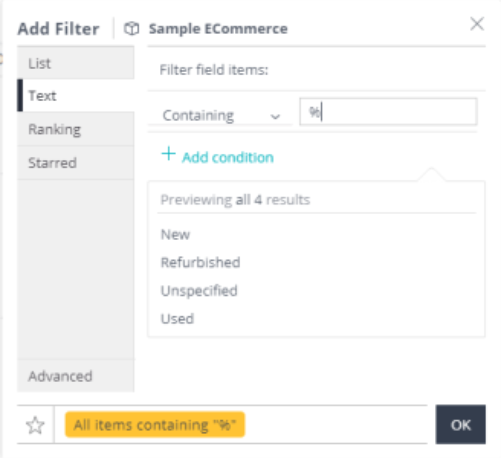
Multiple Characters
You can use a percent % symbol to search for an undefined length of string.
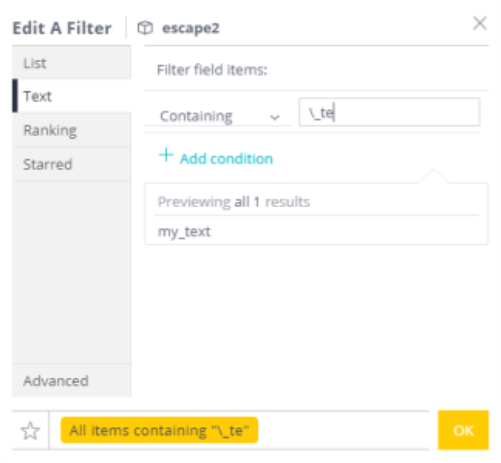
Escape Characters
If you are searching for a string with an underscore or percent symbol, add a backslash () in front of the special character. Backslashes are treated as an escape character by Sisense.
For example, to locate results for the string "_te", use a backslash before the string: