Creating and Editing Filters
Last updated: June 11, 2026
| Tier | Deployment |
|
|
|
This article explains how to create filters using the new user interface.
IMPORTANT:
-
Starting from Sisense version L2025.2, all deployments will be automatically switched to use the default filters editor described in this topic below. For a limited time, it will still be possible to switch back to the legacy dashboard and widget filters, so that you can verify that the existing filters are not affected and make adjustments if necessary.
With the default filters enabled, existing custom add-ons (that rely on the legacy filter user interface) may stop working:
- Verify that you do not have such add-ons.
- Sisense certified add-ons (supported by Sisense) will not break.
- If the default filters cause add-ons to break, perform a rollback by disabling the feature.
Reverting to the Legacy Filters:
To switch back to the legacy filters from the newer default filters, turn off the following filter options in Feature Management in the Filter section:
-
Date / Time Filters
-
Numeric Filters
-
Textual Filters
Filtering options include:
Setting Date Filters
There are various options for setting a date filter for your dashboards. Click on each of the options below to learn how to set date filters.
Use this filter to select a single or multiple specific periods from a closed list. For example: "Year = 2020", "Month = February 2021", "Quarter = Q3 2019 + Q4 2019", etc.
.png)
To set a filter by including specific time periods:
- You can set the list to be single-select. By default, it will be multi-select. See Setting List Filters as Single-Select or Multi-Select.
- Select the period granularity (Year, Month, etc.), and then select the specific periods from the
list (e.g. January 2021, Q4 2020, etc.):
- If Allow multiselect for lists is enabled, you can select all options in the second list or
clear all selections. Otherwise, select a single option.
If you select Include all, it does not matter if "Allow multiselect for lists" is toggled on or off, since no filter is applied. If you toggle it off and save, the system will keep it on without saving. You must choose an option other than “Include all“ to be able to toggle off "Allow multiselect for lists".
- Dates are listed chronologically in descending order. After selection, the selected options move to the top of the list
- Dates available for selection are dates that belong to the dataset. The list is updated dynamically to include new dates added to the dataset
- Weeks are based on the system's "First day of the week" Admin setting. For example, if first day of the week is set to "Monday", then selecting "This week" from the filter will return all data from Monday of the current week (e.g. week 32) till today
- If the Admin setting for Fiscal year is turned on, then Fiscal year is supported and
relevant periods in the list display the fiscal year tag (Years, Quarters, Weeks):
.png)
- Results are retrieved based on the fiscal year: for example, if my fiscal year starts in April, and I select "Q1 2020", then it should retrieve results from April 1 2020 - June 30 2020.
- You cannot exclude any dates in this filter type. Use the Is not option for this. See Setting a Filter to Exclude exact time periods.
- If Allow multiselect for lists is enabled, you can select all options in the second list or
clear all selections. Otherwise, select a single option.
Use this filter to select ANY possible number of defined time periods to get data and answers to any timeframe that's relevant for your needs. For example, I want to be able to select "Last 13 months", "Last 5 days", "Next 3 months" or any other combination. The time period can be in the past, or in the future.
Add to this filter the option to include the current period, if required. For example: "Past 7 days including/excluding TODAY", "Past 2 weeks including/excluding THIS WEEK".)
- In the Filter window, select the third radio button, and from the dropdown list, make your selection
as required.
.png)
- Select the amount and time period you want to include. If you select this, you can only select
the time period.
.png)
- Select Including current to include the current period:
- This includes the current period (This week/month etc.)
- Default setting is OFF
You can filter by 3 types of date ranges:
- If you have specific start and end dates (for example: "Show all flights between March 13 2020 to March 17 2020"), select a start date and an end date from the calendar
- If you know the start date, but do not want to limit the end date (for example, "Show all contracts signed as of Jan 1, 2020"), select a start ("From") date from the calendar, and select the "Latest date" option as the end date.
- When you know the end date, but do not want to limit the start date (for example, "Show all
contracts that were signed anytime up to Dec 31 2020"), select the "Earliest date" option as
the start date ("From"), and select the desired end date from the calendar.
.png)
- Use the Today option as a shortcut to set Today's date. However, note that Today is not a dynamic setting (it enters today's date, but then that date remains selected, and does not change as days go by.
- Dates available for selection are dates that belong to the dataset. The list is updated dynamically to include new dates added to the dataset. Dates for which there is no available data appear grayed out.
Use this filter to exclude a single or multiple specific period/s. For example, "Show me all sales
except for December 2021".

- In the Filter window, select the fifth radio button, select the condition Is Not and then select the period/s from the dropdown lists.
Use this filter to set a date filter that is dependent on a value of a certain measure, to ask questions
such as "Show the Top/Bottom 10 months in terms of Total
Cost".
.png)
- On the fifth radio button in the filter window, select the condition (Top or Bottom).
- Select the number and type of time periods (e.g. 10 months).
- In the Ranked by field, select the measure to be used for ranking (e.g. Total Sales, Number of students, etc.).
Note:
When there are several items with the same value, the top/bottom items (such as "top 5", when item numbers 4, 5, and 6 are identical) are chosen according to the sorting of the dimensions. By default, it is ascending from the left-most dimension to the right-most (in a pivot table).
Use this filter to set a time frame that is relative to a date that may not be Today,
but rather some other date, or a moving date, such as our latest date, to ask questions
such as "show all sales for the last 3 days in which we had sales".
.png)
- In the Filter window, select the fifth radio button and select the condition Is Within.
- Select the time frame; period, before/after, date.
- If you do not want to limit the start date or the end date, select Earliest date or Latest date from the calendar.
Use this filter to select an hour or part of an hour, not on any specific date, to answer questions such
as "How many calls do we get between 2-3 am?" or "How many customers do we have during
the morning hours vs. afternoon hours?".
.png)
Setting Text Filters
Text filters let you filter according to text matching. Text filters are case insensitive for all data sources by default.
There are various options for setting a text filter for your dashboards. Click on each of the options below to learn how to set text filters.
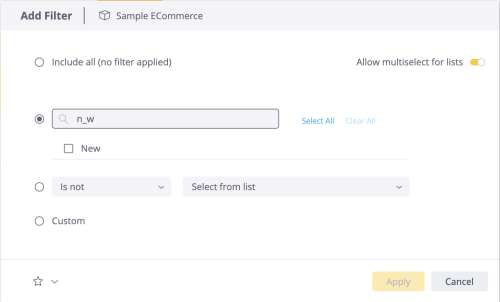
Use this filter to select a specific known value or multiple values to view, for example, "Condition
= New + Refurbished".
.png)
- You can set the list to be a single-select list (the default is multi-select). Your viewers see the list as you have set it. See Setting List Filters as Single-Select or Multi-Select.
- Searching for a value:
- If Allow multiselect for lists is enabled, you can select all options in the second list or clear all selections. Otherwise, select a single option.
- If you select Include all, it does not matter if "Allow multiselect for lists" is toggled on or off, since no filter applied. If you toggle it off and save, the system will keep it on without saving. You must choose an option other than “Include all“ to be able to toggle off "Allow multiselect for lists".
- When the list is filtered by search, Select all applies to the filtered list - only items that appear will be selected.
- Search is not case-sensitive.
- You cannot exclude any values from this list. Use the Is not option for this.
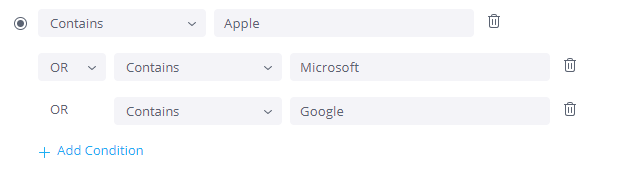
Use this filter to find values by certain textual characteristics. For example: All products starting with "iphone", All products containing "chair".
.png)
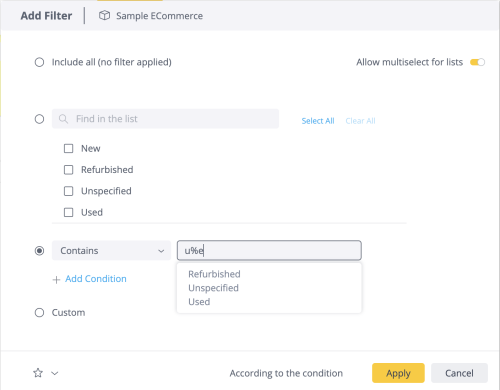
Defining Multiple "AND" or "OR" Conditions for a Text Filter
Most of the condition types in this list ("Contains" through "Is not empty") can be combined using AND or OR logic. Note that only one type of logic, AND or OR, can be used in a specific filter.
This type of filter allows queries to combine multiple conditions that apply together. For example, it
can be used to create a filter for all products that start with (using "Starts with")
"Apple" AND do not contain (using "Does not contain") "iPhone", and so on,
adding as many conditions as required.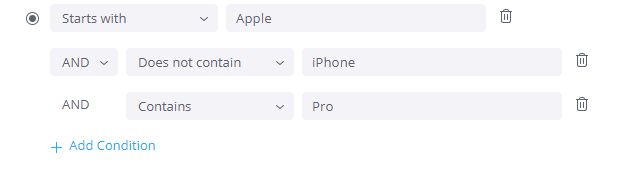
Queries using OR logic are built the same way, again adding as many conditions as required..png)
Use this to filter a textual field, depending on the value of a certain measure, to answer questions such as "Show the Top/Bottom 10 countries in terms of Total sales".
- On the third radio button in the filter window, select the condition (Top or Bottom).
- Select the number of items you want to retrieve from the textual field (e.g. 10 countries).
- In the Ranked by field, select the measure that will be used for ranking (e.g. Total sales).
Note:
When there are several items with the same value, the top/bottom items (such as "top 5", when item numbers 4, 5, and 6 are identical) are chosen according to the sorting of the dimensions. By default, it is ascending from the left-most dimension to the right-most (in a pivot table).
Setting Numeric Filters
Numeric filters let you limit your dashboards to specific value ranges. For example:
- Keep only sales above 100$.
- Keep only product IDs between 1000020 and 1000030.
There are various options for setting a numeric filter for your dashboards. Click on each of the options below to learn how to set numeric filters.
Use this filter to select a specific known value or multiple values from a numeric field: for example:
"Quantity = 1 and 2 and 3".
.png)
- You can set the list to be a single-select list (the default is multi-select). Your viewers will see the list as you had set it. See Setting List Filters as Single-Select or Multi-Select.
- Searching for a value - you can search the list of numeric values to narrow it down. When the list is filtered by search, Select all applies only to the items that appear in the filtered list (items that match the search criteria).
- You cannot exclude any values from this list. Use the Is not option for this. See Set a filter to exclude specific value/s.
Note:
When using "Select from list" / "Find in the list", typing numbers to filter the list may not work for large numbers (more than 6 digits), as the number is converted to scientific notation and the sixth digit is rounded. For example, the number 123456789 would be found as 1.23457e+08. There are two workarounds available:
- Search using "Equals" (instead of "Select from list"), and enter the entire number
- Search using the scientific notation
You can filter numeric values by a range ('between'), for example, "All products whose price is
between 1.99 and 20".
.png)
You can filter numeric values by specific characteristics. For example: "All customers whose age is over 15", "All products whose price is between 1.99 and 20".
.png)
Defining Multiple "AND" or "OR" Conditions for a Numeric Filter
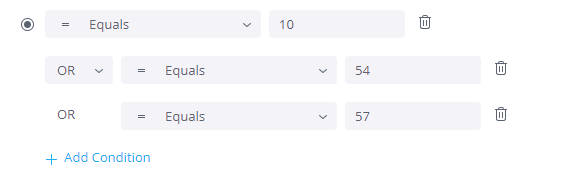
Most of the condition types in this list ("= Equals" through "≥≥ Between") can be combined using AND or OR logic. Note that only one type of logic, AND or OR, can be used in a specific filter.
This type of filter allows queries to combine multiple conditions that apply together. For example, it can be used with OR logic to create a filter for offices according to their specific office numbers, adding as many conditions as required to include all of the desired offices.
Use this to filter a numeric field, depending on the value of a certain measure, to answer questions such as "what were the Top/Bottom 10 versions in terms of Total number of bugs".
- On the fourth radio button in the filter window, select the condition (Top or Bottom)
- Select the number of items you want to retrieve from the numeric field (e.g., 10 ID numbers)
- In the Ranked by field, select the measure that will be used for ranking (e.g., Total number of bugs.).
Note:
When there are several items with the same value, the top/bottom items (such as "top 5", when item numbers 4, 5, and 6 are identical) are chosen according to the sorting of the dimensions. By default, it is ascending from the left-most dimension to the right-most (in a pivot table).
Use this filter to exclude a single or multiple value/s, for example, "Show me all IDs that are not 3144 and 3145".
- In the Filter window, on the fourth radio button, select Is Not and then select the values/s you wish to exclude from the dropdown list.
Customizing the filter query via a code (JSON) editor
You can view and edit the filter query via a code (JSON) editor if you need to create a specific advanced query.
To edit the filter query via a code (JSON) editor:
- Select Custom to access the JSON editor and view the code representation of the filter that is currently set (e.g. previously set in the UI).
- Edit the parameters via the JSON editor.

- Click Test to preview the results that would return based on your query, and make sure they are what you had in mind.
Your viewers cannot access the Custom option and modify the query via the editor. However, they can select any other filter from the regular filters that are offered.
Setting List Filters as Single-Select or Multi-Select
Some date and text filters allow for multi-select from lists of options. You can choose to set the selection method in these lists of values to Single-select to provide a more limited and controlled selection experience for your viewers. This means viewers see the lists as you have set them, with a single option only for selection. By default, list filters are set to multi-select.
Filters for which single/multi-selection apply include:
- Filter by including specific time period/s
- Filter by including specific text value/s
- Filter by including specific numeric value/s
To toggle between single and multi-select:
- Toggle the Allow multiselect for lists on and off.
- If you select Include all, it does not matter if "Allow multiselect for lists" is toggled on or off, since no filter applied. If you toggle it off and save, the system will keep it on without saving. You must choose an option other than “Include all“ to be able to toggle off "Allow multiselect for lists".
Saving a Filter
You can save a filter as a favorite so that you can quickly add a new filter with the same field type, or update the filter with different parameters from the ones defined in the original filter.
To save a filter:
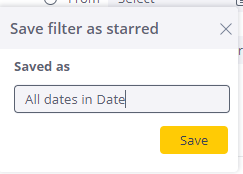
- Click the Star button in the filter window, give the filter a name and click Save. The Star button is marked in black and the filter is added to the list in the drop-down.
- Click the Star button in the filter window, give the filter a name and click Save. The Star button is marked in black and the filter is added to the list in the drop-down.
You can also rename and remove a saved filter.
To remove or rename a filter:
- Click the Star button and select the filter from the drop-down list.
- Once the filter parameters display in the Filter window, click the Star button to remove the filter.
- To rename the filter, select it, make a change to the parameters, and click the Star button to save again.
Wildcards
To filter lists or text quickly, you can use wildcards such as '_' or '%', which will be interpreted as literal characters or an empty string.
Sisense supports the following wildcards:
Single Characters
You can enter an underscore '_' as a placeholder for a single unknown character.
Multiple Characters
You can use a percent % symbol to search for an undefined length of string.
Escape Characters
If you are searching for a string with an underscore or percent symbol, add a backslash () in front of the special character. Backslashes are treated as an escape character by Sisense.
For example, to locate results for the string "_te", use a backslash before the string: \_te
Note:
Due to the fact that Azure Synapse does not support the ESCAPE function, handling of special characters cannot be done and will result in returning all values.
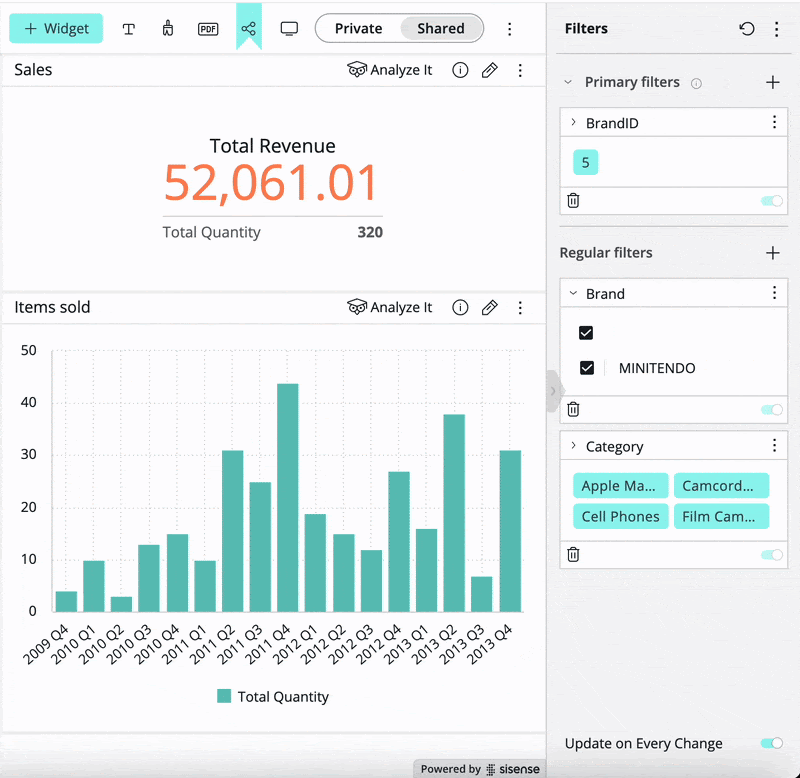
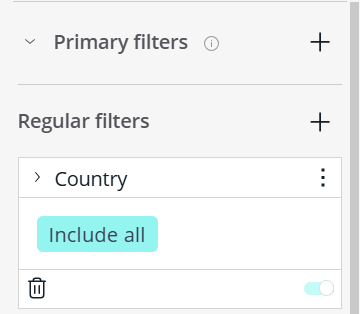
Primary Filters
Dashboard designers can arrange filters in a hierarchical manner, designating specific filters as primary filters that dynamically affect regular filters. Primary filters must be enabled by an Administrator. After a user applies a primary filter, the regular filters dynamically update to present only relevant values.
Note:
Items in a primary filter that are disabled in the filter panel are considered non-selected and the corresponding items will not appear in the regular filters.
To enable primary filters:
-
On the Admin tab, go to the Feature Management page.
-
In the Filters section, toggle Primary Filters.
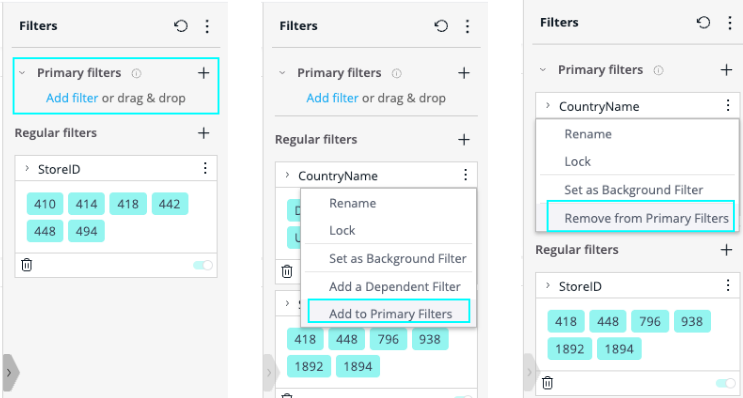
Once the feature is enabled, the Primary filters section appears at the top of the Filters sidebar on the dashboard:
To Set a Filter as Primary:
-
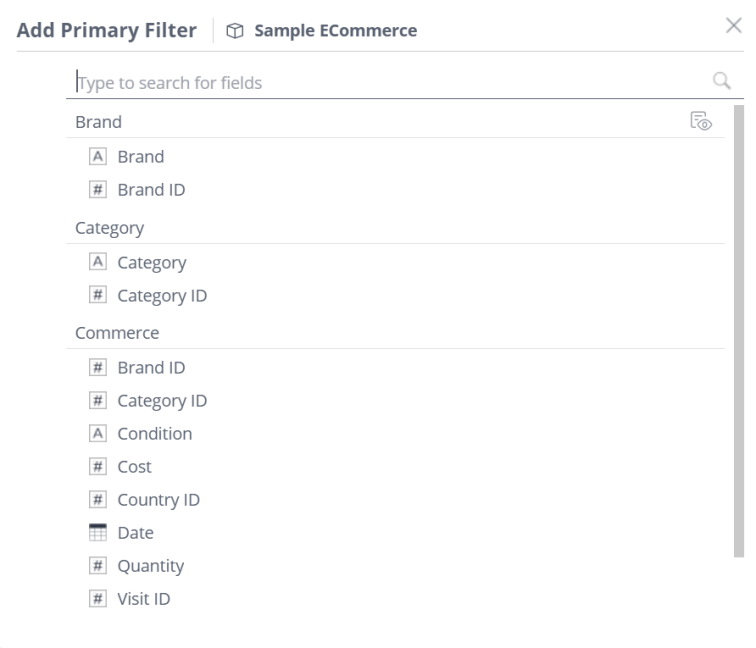
In the Filters sidebar, click the + next to the Primary filters section to display the list of filters:
You can also set the primary filter by selecting an existing filter from the list and designating it as primary.
-
Set the primary filter by selecting an existing filter from the list.
-
Customize the filter behavior. For more information about customizing filters, see the sections above.
Working with Primary Filters
The designer UI provides a clear visual distinction between primary and regular filters:
This distinction is not visible to dashboard viewers; both primary and regular filters appear the same, and the difference is only in how the available values are displayed. All available values are displayed for primary filters, whereas only relevant values are displayed for regular filters.
Users can set multiple primary filters. They do not affect each other, but each of them affects all regular filters.
-
AND/OR filter relationships can be configured between filters at the same level. AND logic is always applied between primary and regular filters.
-
Dependent filters cannot be set as primary filters.
-
Background filters can be set as primary filters.
Note:
Primary filters do not affect displayed values when creating a regular background filter. The regular filter displayed is affected both by the background filter and primary filters selected. If the values selected for the regular background filter (e.g., "Country: USA, Canada, Mexico") conflict with the primary filter (e.g., "Region: Europe"), "no results found" will appear in the "Country" filter tile.
Primary filters can be locked to prevent users from editing their selected values.
Performance and Cost Considerations:
Using primary filters may slow down dashboard rendering for each primary filter update, as it requires running additional queries to determine the relevant items in each regular filter on the dashboard.
The following may increase query complexity and may lead to significant performance degradation:
-
Multiple primary filters (in most cases, having more than 1 primary filter is not recommended)
-
Increasing the number of regular filters
-
Setting OR relationships between primary or regular filters
-
Additional filter complexities such as setting background filters, multi-level cascading filters, and applying custom filtering logic
-
Large datasets
If the dashboard is based on a Live or B2D model, the database vendor may charge for data queries to the CDW. Additional queries associated with primary filters may therefore increase the query cost.
Primary filters can be disabled by an Administrator on the Admin tab > Feature Management page by turning off the Primary Filters toggle.
Limitations:
-
Primary filters are not compatible with the Custom Row Level Security add-on. Queries with primary filters break when custom data security is applied.
-
Primary filters are sometimes not passed correctly in Jump to Dashboard flows.
-
Top/bottom ranking filters applied to measures are evaluated at the same priority level as other measure filters. As a result, when combined with other filters on measures, the returned result set may include fewer or more rows than expected.