Connecting to QuickBooks Online
Last updated: June 10, 2026
| Tier | Deployment |
|
|
|
The Sisense QuickBooks Online connector is a certified connector that allows you to import data from the QuickBooks Online API into Sisense via theSisense generic JDBC connector. The QuickBooks Online connector enables developers to search (Customers, Transactions, Invoices, Sales Receipts, etc.), update items, edit customers, and more, from any Java/J2EE application, and more.
The support for the connector is provided by Sisense and will be assisted by the certification partner's support, if needed. For any support issues or additional functionality requests, contact your Sisense representative or open a request through the Sisense Help Center. For advanced inquiries specific to driver functionality, you can also contact the certification partner's support directly via support@cdata.com.
After you have downloaded the driver, you can connect through a connection string in Sisense . The connection string is used to authenticate users who connect to the QuickBooks Online APIs. Once you have connected to QuickBooks Online, you can import a variety of tables from the QuickBooks Online API.
This page describes how to download the QuickBooks Online driver and deploy it, how to connect to QuickBooks Online with a connection string, provides information about the QuickBooks Online data model, and more.
Note:
For the list of supported connectors, see Data Source Connectors.
Downloading the QuickBooks Online JDBC Driver
You can download the QuickBooks Online JDBC driver here.
For a short video about downloading the driver, see below (the video uses the Box driver as an example).
Note:
- The driver is certified for Sisense v7.2 and above.
- Sisense v7.4 and above: Click the above link to download a ready-to-use driver.
- Sisense prior to v7.4: Click the above link to download a 30-days free-trial of the driver. Contact Sisense for the full license version.
Deploying the QuickBooks Online JDBC Driver
Prerequisite: The install file (setup.jar) is a Java Application that requires Java 6 (J2SE) or above to run.
To install the driver, double-click the setup.jar file and proceed with the instructions in the installation wizard.
Depending on the machine on which you are accessing the Sisense application, install the driver in one of the following locations:
- When Sisense is installed on your local machine, deploy the driver locally.
-
For a non-local installation (when accessing Sisense on a remote Windows server, or accessing the Sisense hosted cloud environment), select one of the below methods:
- Deploy the driver on the Sisense server machine, and then perform all the authentication on the server machine.
-
Deploy the driver on your local machine (or any other machine, as convenient), perform all the authentication on that machine, and then copy the JAR file to the remote server.
For detailed instructions, see Copying a CData JAR File Installed Locally to a Remote Server.
-
If you are on a Linux deployment, deploy the custom JDBC connector on your local machine (or any other machine), perform all the authentication on that machine, and then copy the JAR file to this location:
/opt/sisense/storage/connectors/jdbcdrivers/driver_name_folder. For detailed instructions, see Deploying a Custom Connector.
For a short video of the process, see below (the video uses the Box driver as an example).
JAVA Troubleshooting
If you do not have Java 6 installed, you may download it from here.
If your system is not set up to run Java applications, execute the following command: java -jar setup.jar
Connecting to QuickBooks Online
To access QuickBooks Online REST API from Sisense, you must create the connection string to be used in Sisense.
To create the connection string:
-
On the server, create a writable directory (e.g.
/opt/sisense/storage/tmp), and set the connection string parameterLocation=<yourpath>.Tip:
This can be done in the file management UI or by contacting Sisense Support.
- Open the lib directory for the connector. The default path is:
C:\Program Files\CData\CData JDBC Driver for <Driver Name> 2019\lib. -
Double-click the JAR file in the lib directory.

Alternatively, to open the JAR file from the command line, enter the following command in the command prompt (change the driver name to your driver):
cd C:\Program Files\CData\CData JDBC Driver for <Driver Name> 2019\libPress Enter and then enter the following command (change the driver name to your driver):
"C:\Program Files\Sisense\infra\jre\bin\java.exe" -jar cdata.jdbc.<Driver Name>.jarPress Enter again.
Example:

The Connection String Builder opens.
-
Click in the Value column of the Initiate OAuth property and select GETANDREFRESH.
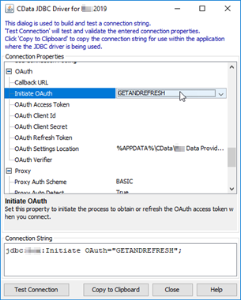
- Click Test Connection.
-
A new browser tab opens for you to log in to your application, in order to grant access. (Each application displays a different window and messages.)
Close the Authorization Successful! message that opens.
- Go back to the Connection String Builder dialog and click OK in the Test Connection Successful message to close it.
- Click Copy to Clipboard to obtain the connection string.
For a short video of the process, see below (the video uses the Box driver as an example).
The driver uses embedded credentials which originate from a OAuth App embedded into the driver. The embedded credentials provide full functionality, so you do not have to create an OAuth App.
Note:
If you want to configure the authentication or limit the scope of the data provided to Sisense, you will need to create your own OAuth App. For details, see here.
You need to follow the above instructions only once, to retrieve the Access and Refresh tokens. Once the tokens have been retrieved, the driver will be refreshing them in the background when they expire, with no further involvement from you.
To help you create a connection string and test the connection, see Connection String Builder for Certified Connectors.
If you have any issues connecting to your data source, see Troubleshooting JDBC Data Connectors.
Switching between Accounts
When you connect to the Quickbooks Online data source, Sisense saves your OAuth values in the file OAuthsettings.txt file located at ...\Users\xxx\AppData\Roaming\CData\Quickbooks Online Data Provider on your Sisense server. To connect to the Quickbooks Online data source with another user on the same machine, you must delete the OAuthsettings.txt file. Sisense will then generate a new file for that user.
Another option to support multiple users is to define the location and file name of an OAuthsettings file for each unique user in your connection string through the OAuthSettingsLocation parameter. When each user connects to the data source, Sisense generates the OAuth file with the file name you specify in the location you define. In the examples below, two users are allowed to access the Quickbooks Online data source, and for each user, Sisense generates a file that contains that user's OAuth values in the location defined in the string.
jdbc:QuickbooksOnline:OAuthSettingsLocation=C:\QuickbooksOnline\auth\john.txt;OAuthClientId=XXXXXXXXXXXXXX; OAuthClientSecret=xxxxxxxxxxxxxxxxxxxxxxxxxxx;InitiateOAuth=GETANDREFRESH;Version=2.8;CallbackURL=http://localhost/; jdbc:QuickbooksOnline:OAuthSettingsLocation=C:\QuickbooksOnline\auth\sally.txt;OAuthClientId=XXXXXXXXXXXXXX; OAuthClientSecret=xxxxxxxxxxxxxxxxxxxxxxxxxxx;;InitiateOAuth=GETANDREFRESH;Version=2.8;Call
In the example above, two OAuth files are created, one for John and one for Sally, in the location C:\QuickbooksOnline\auth.
This is useful when you support many users who each need to access the Quickbooks Online data source.
Adding QuickBooks Online Tables to your ElastiCube
- Open Sisense. (For a non-local installation, open Sisense on the hosted cloud environment.)
- In the Data page, open an ElastiCube or create a new ElastiCube.
-
In the Model Editor, click
 . The Add Data dialog box is displayed.
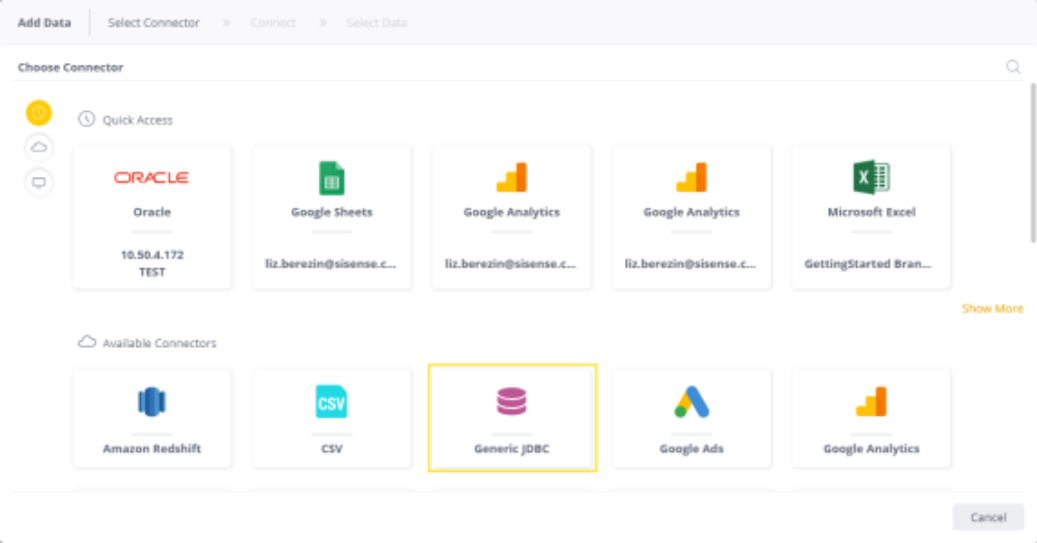
-
Click Generic JDBC to open the JDBC settings.
_1032x539.png)
-
In Connection String, paste the string you obtained above. When you do so, the string is appended with some
_persistproperties.Example:
A sample of the connection string in Sisense:
jdbc:box:InitiateOAuth="GETANDREFRESH";_persist_oauthexpiresin=3199;_persist_token_timestamp=1561893244662;_persist_oauthaccesstoken=mswNfVDVpnBZc3pkQQja7WRHNebbaGZL;_persist_oauthrefreshtoken=ybofHX3Vrd7C8cPhE5ZysVxFiUmkJSiw2htjPL0nKDBgpqjcyGP6Am7KNaDzqhZz; - In JDBC JARs Folder, enter the name of the directory where the QuickBooks Online JAR file is located (see Deploying the QuickBooks Online JDBC Driver).
- In Driver's Class Name, enter the following class
name:
cdata.jdbc.quickbooksonline.QuickBooksOnlineDriver. - Leave the User Name and Password blank.
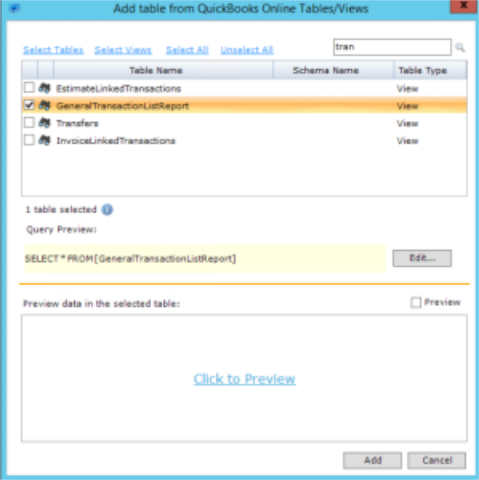
- Click Next. A list of tables in the database are displayed. All tables and views associated with the database will appear in a new window.
- From the Tables list, select the relevant table or view you want to work with. You can click next to the relevant table or click Preview to see a preview of the data inside it.
- (Optional) Click + to customize the data you want to import with SQL. See Importing Data with Custom Queries for more information.
- After you have selected all the relevant tables, click Done. The tables are added to your data model.
For a short video of the process, see below (the video uses the Box driver as an example).
Creating Schema Files for QuickBooks Online Reports
In addition to tables and views, you can also import QuickBooks Online reports into Sisense. To be able to do this, you need to generate .rsd (report template schema definition) files in DbVizualizer (or in any equivalent tool). For detailed instructions on connecting to DbVizualizer and importing Quickbooks Online reports, click here.
DbVizualizer uses stored procedures to execute the reports. You will then need to write a custom SQL to pull the report data.
To generate the .rsd files:
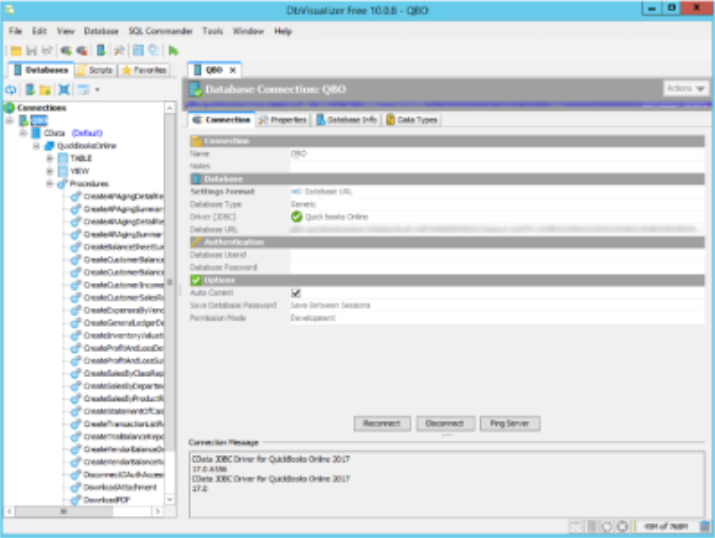
-
Once you are connected to DbViz, access the stored procedures under the QuickBooks Online connector. In the left-hand menu, expand the QuickBooks connector until you see tables, views and procedures, then expand the procedures.
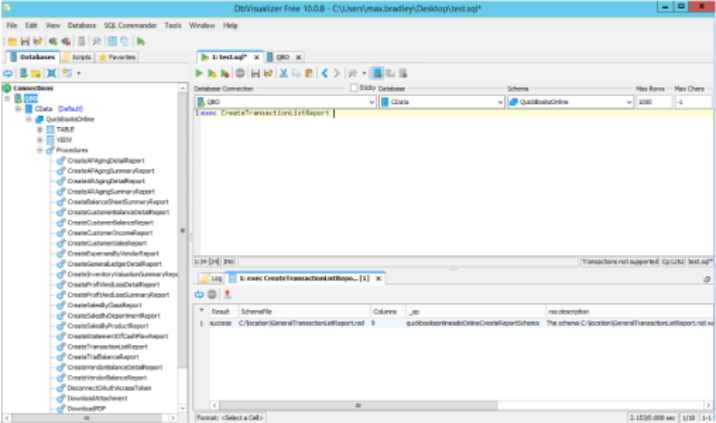
-
Run the procedure that responds to the table you want. Open the SQL tab (SQL Commander > New SQL Commander) and type the syntax
exec <ProcedureName>. Once you run it, it creates an RSD file. This file is added to the folder that you specified in the Location parameter in the connection string.Run each of the stored procedures you need.
- Move all the resulting .rsd files to the lib folder of the connector:
C:\Program Files\Sisense\DataConnectors\JVMContainer\Connectors\QuickBooksOnline\lib. - Restart the JVM service.
-
In Sisense, when the connector appears for QuickBooks, change the connection string to include the final location of the RSD files:
jdbc:quickbooksonline:CompanyId=xxxxxxxxxxxxxx;CallbackURL=http://localhost/;InitiateOAuth=GETANDREFRESH;Timeout=0; Location= C:\Program Files\Sisense\DataConnectors\JVMContainer\Connectors\QuickBooksOnline\lib.
Now when you connect, you will see the reports along with the original tables when adding data:
Example:
Assume that we have a QuickBooks Online report called GL Detail.
This is an example of a stored procedure for the generation of the .rsd file for gldetail table (sample .rsd file):
EXEC CreateGeneralLedgerDetailReport @ReportName='Gldetail', @Columns='tx_date,txn_type,doc_num,name,memo,account_num,debt_amt,credit_amt'
And this is an example of a custom SQL for GLDetail table:
SELECT * FROM GLDetail WHERE StartDate='2018-01-01' AND EndDate='2018-12-31'
QuickBooks Online Connector: Additional Resources
For the full documentation set for the QuickBooks Online connector, click here.
For connection string options, click here.
For information about the QuickBooks Online data model, click here.