Connecting to MailChimp
Last updated: June 10, 2026
| Tier | Deployment |
|
|
|
The Sisense MailChimp connector is a certified connector that allows you to import data from the Intacct API into Sisense via the Sisense generic JDBC connector. The MailChimp connector offers the most natural way to connect to MailChimp to search (Lists, Campaigns, Reports, etc.), update items, edit customers, and more, and provides additional powerful features.
The support for the connector is provided by Sisense and will be assisted by the certification partner's support, if needed. For any support issues or additional functionality requests, contact your Sisense representative or open a request through the Sisense Help Center. For advanced inquiries specific to driver functionality, you can also contact the certification partner's support directly via support@cdata.com.
After you have downloaded and installed the connector, you can connect through a connection string you provide Sisense. The connection string is used to authenticate users who connect to MailChimp's API. To obtain a connection string, you will need to retrieve an API Key from MailChimp or register a MailChimp app. Once you have connected to MailChimp, you can import a variety of tables from the MailChimp API.
This page describes how to download the MailChimp driver and deploy it, how to connect to MailChimp with a connection string, provides information about the MailChimp data model, and more.
Note:
For the list of supported connectors, see Data Source Connectors.
Downloading the MailChimp JDBC Driver
You can download the MailChimp JDBC driver here.
For a short video about downloading the driver, see below (the video uses the Box driver as an example).
Note:
- The driver is certified for Sisense v7.2 and above.
- Sisense v7.4 and above: Click the above link to download a ready-to-use driver.
- Sisense prior to v7.4: Click the above link to download a 30-days free-trial of the driver. Contact Sisense for the full license version.
Deploying the MailChimp JDBC Driver
Prerequisite: The install file (setup.jar) is a Java Application that requires Java 6 (J2SE) or
above to run.
To install the driver, double-click the setup.jar file and proceed with the instructions in the installation
wizard.
Depending on the machine on which you are accessing the Sisense application, install the driver in one of the
following locations:
- When Sisense is installed on your local machine, deploy the driver locally.
-
For a non-local installation (when accessing Sisense on a remote Windows server, or accessing the Sisense hosted cloud environment), select one of the below methods:
- Deploy the driver on the Sisense server machine, and then perform all the authentication on the server machine.
-
Deploy the driver on your local machine (or any other machine, as convenient), perform all the authentication on that machine, and then copy the JAR file to the remote server.
For detailed instructions, see Copying a CData JAR File Installed Locally to a Remote Server.
-
If you are on a Linux deployment, deploy the custom JDBC connector on your local machine (or any other machine), perform all the authentication on that machine, and then copy the JAR file to this location:
/opt/sisense/storage/connectors/jdbcdrivers/driver_name_folder. For detailed instructions, see Deploying a Custom Connector.
For a short video of the process, see below (the video uses the Box driver as an example).
JAVA Troubleshooting
If you do not have Java 6 installed, you may download it from here.
If your system is not set up to run Java applications, execute the following command:
java -jar setup.jar
Connecting to the MailChimp
There are two authentication methods available for connecting to MailChimp, through an API Key or through OAuth.
Both methods expose the same data, the difference is in what information is required by MailChimp to authenticate your account. For the API Key, all you need is a key provided my MailChimp in your account. For Oauth, you need to register an app with MailChimp, and then pass those details to Sisense.
After you have the relevant information from MailChimp, you create a connection string and connect to MailChimp.
The steps below describe how to retrieve the API Key and Oauth credentials that need to be included in the connection string.
Using the API Key to Connect to MailChimp
The APIKey grants full access to your MailChimp account. To obtain the APIKey, log into MailChimp and click Account > Extras > API Keys.
With the API Key, you can connect to MailChimp by passing the key in a connection string.
Using OAuth to Connect to MailChimp
To access MailChimp's REST API from Sisense, you must provide valid Oauth MailChimp credentials. These credentials are provided by MailChimp when you register an application.
OAuth requires the authenticating user to interact with MailChimp using the browser. The driver facilitates this in various ways as described below.
Register Your Application
Follow the steps below to obtain the OAuth client credentials, the OAuthClientId and OAuthClientSecret:
- Log into your MailChimp account and click Account > Extras > API Keys > Register and Manage Your Apps.
- Enter the information you want to be displayed to users when they are prompted to grant permissions to your application. This information includes your app name, company, and website.
- If you are making a desktop application, in the Redirect URI box enter http://127.0.0.1. If you are making a Web application, in the Redirect URI box enter a URL where you would like users to be redirected after they grant permissions to your application.
Adding MailChimp Tables to Your ElastiCube
After you have retrieve your API Key or OAuth credentials from MailChimp, you provide the relevant information in a connection string. Sisense uses connection strings to connect to MailChimp and import data into Sisense. Each connection string contains a authentication parameters that the data source uses to verify your identity and what information you can export to Sisense.
To create the connection string:
-
On the server, create a writable directory (e.g.
/opt/sisense/storage/tmp), and set the connection string parameterLocation=<yourpath>.Tip:
This can be done in the file management UI or by contacting Sisense Support.
- Open the lib directory for the connector. The default path is:
C:\Program Files\CData\CData JDBC Driver for <Driver Name> 2019\lib -
Double-click the JAR file in the lib directory.

Alternatively, to open the JAR file from the command line, enter the following command in the command prompt (change the driver name to your driver):
cd C:\Program Files\CData\CData JDBC Driver for <Driver Name> 2019\libPress Enter and then enter the following command (change the driver name to your driver):
"C:\Program Files\Sisense\infra\jre\bin\java.exe" -jar cdata.jdbc.<Driver Name>.jarPress Enter again.
Example:

The Connection String Builder opens.
-
If connecting through the API key, enter the values for the following connection properties (click in the Value column to enter a value or to modify an existing value):
- InitiateOAuth: Set it to OFF to avoid entering the OAuth Authorization process.
- API Key: Set this to your password.
If connecting throught OAuth, enter the values for the following connection properties:
- InitiateOAuth: Set this to GETANDREFRESH.
- OAuthClientId: Set this to the consumer key in your app settings.
- OAuthClientSecret: Set this to the consumer secret in your app settings.
- CallbackURL: Set this to the callback URL you specified in your app settings.
-
Press Enter to add all the connection properties to the connection string.
Example:
A sample connection string:
jdbc:mailchimp:OAuthClientId=xxxxxxxxx;OAuthClientSecret=xxxxxxxxx;CallbackURL=http://127.0.0.1;InitiateOAuth=GETANDREFRESH; - Go back to the Connection String Builder dialog, and click OK in the Test Connection Successful message to close it.
- Click Test Connection. A new browser tab opens where you need to log in to your application in order to grant access. (Each application will display a different window and messages.)
- Close the Authorization Successful! message that opens.
- Go back to the Connection String Builder dialog, and click OK in the Test Connection Successful message to close it.
- Click Copy to Clipboard to obtain the connection string.
For a short video of the process, see below (the video uses the XML driver as an example):
You are required to complete the above instructions only on first connect, and again when your credentials to the application change.
To help you create a connection string and test the connection, see Connection String Builder for Certified Connectors.
If you have any issues connecting to your data source, see Troubleshooting JDBC Data Connectors.
Adding MailChimp Tables to your ElastiCube
- Open Sisense. (For a non-local installation, open Sisense on the hosted cloud environment.)
- In the Data page, open an ElastiCube or create a new ElastiCube.
-
In the Model Editor, click
 . The Add Data dialog box is displayed.
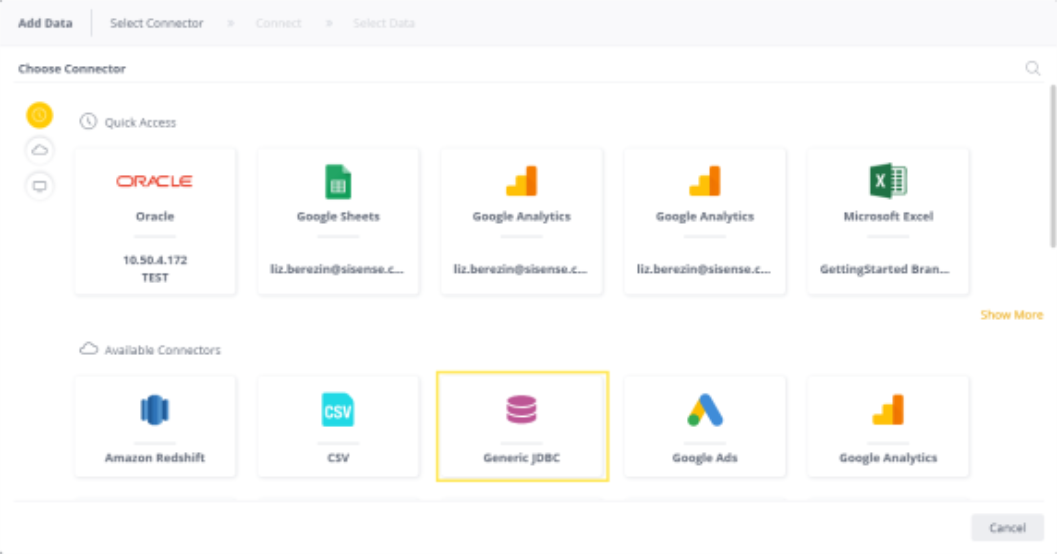
-
Click Generic JDBC to open the JDBC settings.
_1055x551.png)
-
In Connection String, paste the connection string your obtained above.
Note:
If connecting through OAuth, when you paste, the string is appended with some _persist properties.
A sample connection string in Sisense:
jdbc:mailchimp:OAuthClientId=xxxxxxxxx;OAuthClientSecret=xxxxxxxxx;CallbackURL=http://127.0.0.1;InitiateOAuth=GETANDREFRESH; _persist_oauthexpiresin=3199;_persist_token_timestamp=1561893244662;_persist_oauthaccesstoken=mswNfVDVpnBZc3pkQQja7WRHNebbaGZL;_persist_oauthrefreshtoken=ybofHX3Vrd7C8cPhE5ZysVxFiUmkJSiw2htjPL0nKDBgpqjcyGP6Am7KNaDzqhZz; - In JDBC JARs Folder, enter the name of the directory where the MailChimp JAR file is located (see Deploying the MailChimp JDBC Driver).
-
In Driver's Class Name, enter the following class name:
cdata.jdbc.mailchimp.MailChimpDriver. - Leave User Name and Password blank.
- Click Next. A list of tables in the database are displayed. All tables and views associated with the database will appear in a new window.
- From the Tables list, select the relevant table or view you want to work with. You can click next to the relevant table or click Preview to see a preview of the data inside it.
- (Optional) Click + to customize the data you want to import with SQL. For more information, see Importing Data with Custom Queries.
- After you have selected all the relevant tables, click Done. The tables are added to your data model.
For a short video of the process, see below (the video uses the XML driver as an example):
MailChimp Connector: Additional Resources
For the full documentation set for the MailChimp connector, click here.
For connection string options, click here.
For information about the MailChimp data model, click here.