Connecting to Excel
Sisense enables easy and quick access to tables contained within Excel spreadsheets.
There are two options for uploading data:
- The first option is to upload your file to the Sisense Server from your local machine. Once the file is uploaded, the data is imported into the ElastiCube as it was at the time the file was uploaded.
- The second option is to define the location of your files on the Sisense Server. This is the preferred option if
your Excel files frequently change, but remain in the same location on the Sisense Server, as the data is taken from
the Excel files each time the ElastiCube is built.
Note:
If you are on a Linux deployment, place your files into a sub-folder created in:
opt/sisense/storage/
When you import multiple files from a folder and build your ElastiCube, you have the option to combine the data together in a single table. To build multiple tables with separate tables for each file, you must repeat the process for each file you want to import as a table. If you have any questions about data accumulation between builds, please contact Sisense Support.
Use the following guidelines to prepare and verify Excel files before connecting them with the ElastiCube.
Learn more about Sisense's Excel connector.
Structure Your Excel Sheet
All Excel data must be imported into Sisense in a tabular format, to allow for accurate data categorization.
Characteristics of Tabular Data include:
- Each sheet represents a class, for example customers, sales, employees.
- Each column represents a variable, for example revenue, name, address.
- Each row represents a single observation, for example customer X's details.
.png)
Remove Blank Rows and Duplicate Headers
Remove blank rows OR rows after the first column that have duplicate headers. Blank rows may return incorrect calculations and results.
.png)
Blank Rows: Delete rows 4 and 8 if they contain no data.
Additional Headers: Delete row 13 as it has the same titles as the main headers. If this heading represented a different class of data, a new sheet should be created.
Remove All Unstructured Data
Remove all unstructured data from each sheet, such as charts, images or non-data elements. Unstructured data cannot be imported, and may result in other data being obscured.
.png)
Images, Charts and Non-Data Elements: All non-data elements must be removed from the sheet, such as the chart in the image above. All visualization based on Excel data can be created in a dashboard using Sisense.
Rename/Remove Duplicate Column Names
Rename or remove columns with the same name. Ensure all columns have a unique name. Columns with the same name cannot be imported into the ElastiCube.
.png)
Column Names: Rename columns with the same name, and ensure all columns have a unique name. For example, in the above example CompanyName appears twice. Once column should be given a different name such as Secondary CompanyName. In the ElastiCube, you can rename any column as you wish.
Modify Columns for Quicker Analysis
Consolidate columns as much as possible into a single variable. For example, instead of having a column for each
month of the year, it is best to have a single column with all dates. Unconsolidated columns limit the ability to
analyze and segment data.
.png)
Consolidate Columns: Data should be consolidated into a single column for each variable. In the example above instead of having revenue reflected separately as a column for each month, it is best to consolidate the data into a single column for date and another for revenue. This logic should be applied to any other segments such as summary by country, or channel, and so forth.
Additional Methods and Tools for Consolidating (Transposing) Columns
To consolidate or transpose columns in your files, you can use one or both of the following methods:
- Use an Excel macro to transpose data. This is useful when your data is already in Excel or easy to put into Excel.
- Create custom SQL. This method should be used if importing your data into Excel is more difficult, or the amount of data is causing poor performance in Excel. This method requires basic SQL knowledge.
.png)
To learn more about both of the above methods, and to download the macro, see the Data Transpose Guide.
Convert Scientific Formatting to Numeric Formatting
Convert cells with scientific formatting to another number format. Data in scientific format cannot be imported correctly into the ElastiCube.
.png)
Scientific Format: Convert all values in scientific format to another number format such as number, currency, accounting, fraction and so forth.
Create Identical Files when Appending Several Files
When appending data from several Excel files together, the data in the files must have the same column structure and data types, and the sheets you want to append must all have the same name.
For example, the three files below have the same structure and data types, but different sheet names (Jan, Feb, March). Sisense cannot append the data in these files, because it does not recognize the files as identical.
.png)
However, if you rename the sheets so they all have the same name (Sheet1), Sisense recognizes these files as identical, and can successfully append the data in these files.
.png)
Troubleshooting
When importing an Excel spreadsheet with the XLSX format, if you get the error: "Unable to connect to the specified file. Corrupt OpenXML document.", try saving the file as XLS and importing it again. If this works, keep in mind that in an XLS workbook, the row limit is 65,536 (216) and 256 columns (28) which correspond to the column IV. With XLSX workbooks, limits are 1,048,576 rows (220) and 16,384 columns (214).
Note:
For the list of supported connectors, see Data Source Connectors.
Importing Data From Your Excel Files
- In the Data page, open an ElastiCube or create a new ElastiCube.
- In the ElastiCube, click
 ; the
Add Data dialog box is displayed.

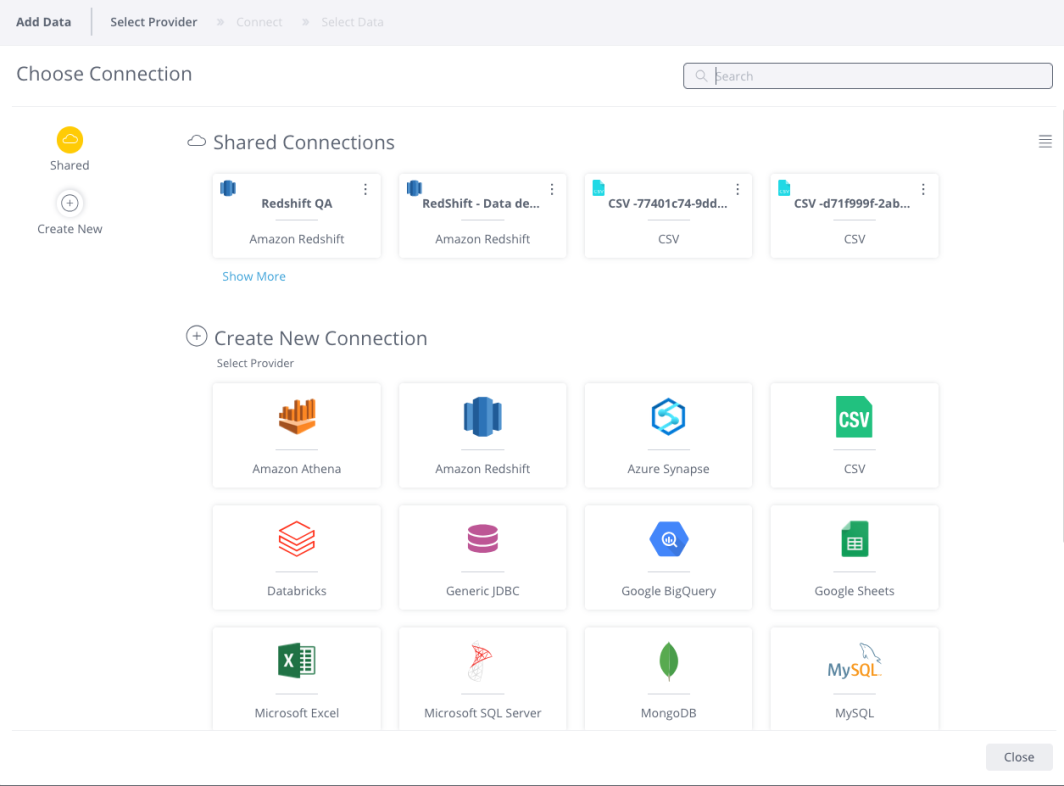
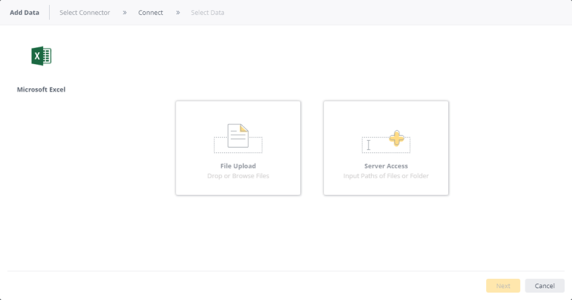
- Choose an available managed connection, or create a new connection, for Microsoft Excel. The Microsoft Excel Connect area is displayed.

-
Select the relevant option for importing your data:
-
File Upload
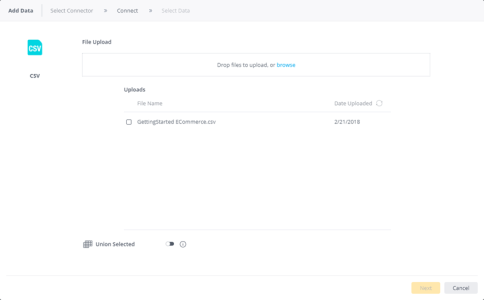
- Select this option to import your data from your CSV file. If the file is updated later, you'll need to upload it again. To upload the file, click Browse and navigate to the file to be uploaded or drag the CSV file to the File Upload area.

The uploaded file is added to the Uploads list. You can delete the file by clicking
and confirming you want to delete the file. - Select the relevant CSV file(s) to be uploaded.
- (Optional) Toggle the Union Selected switch to append several CSV files together when the data is imported into the ElastiCube. The data in the files must have the same column and data types.
- After you have finished uploading the relevant CSV files, select them from the upload list and click Next. Continue to Step 5.
- Select this option to import your data from your CSV file. If the file is updated later, you'll need to upload it again. To upload the file, click Browse and navigate to the file to be uploaded or drag the CSV file to the File Upload area.
-
Server Access
This is a security option that helps you mitigate Local File Inclusion (LFI) attacks. Attackers could attempt to provide the application with a full input file path outside the current working directory. This could allow them to see the contents of other files stored on the computer running Sisense. To prevent this, you can define specific paths and folders for CSV and Excel files on the Sisense server.
- Select this option to define the location of your files on the Sisense Server if your CSV files frequently change, but remain in the same location on the Sisense Server as the data is taken from the CSV files each time the ElastiCube is built.
- Select Input Folder Path and enter the full file path with the file name where your Excel files are located. This displays each Excel file in the folder in the next screen where you select what tables to add to the ElastiCube.
OR
Select Input File Path and enter the full file path with the file name and its extension of your CSV file. For example, C:\Example.csv. This file displays all the tables in the CSV file on the next screen where you select what tables to add to the ElastiCube. - (Optional) Toggle the Union Selected switch to append several Excel files together when the data is imported into the ElastiCube. The data in the files must have the same column and data types.
- After you have finished defining the locations of your CSV files, click Next and continue to Step 5. A list of CSV files in the directory are displayed.
_1081x565.png)
-
- From the Select Table list, click
 to select preview the columns in the Excel file and display the
Settings, which provides more options for customizing your data.
 - In the Settings area, define the following settings:
- Culture: Select the culture for your Excel. This defines settings such as the format of the date and time or delimiter (decimal or comma) used in your Excel file. To change the default culture, see Changing the Default Culture.
- Fields in First Row: Enables you to specify table column names based on the header in the first row of the spreadsheet.
- Static Range: Selecting Static Range option enables you to select a specific range of data in
the sheet. Data needs to be in a table structure, starting at the top left cell of the range, with field names
as the first row. Define two cells, each with a leading $ sign and a colon as a delimiter. For example, $A1:$E10
is a static range A1 to E10.
Note:
Your Excel file must not contain empty rows before the static range.
- After you have selected all the relevant tables, click Done. The tables are added to your schema in Sisense.
Out-of-Memory Issues
When building an ElastiCube with this connector, you might receive an "out of memory" error. To add more memory, see Troubleshooting Performance Issues.
BaseURL and File Uploads
If you have implemented BaseURLs with Nginx, the maximum CSV or Excel file size you can upload is 1.5mb. To upload files larger than 1.5mb, you need to add the following line of code to your ngnix.conf file located on the Sisense Server:
client_max_body_size 220M;
Where <200M> is the size in megabytes that you want to allow.
Note:
The location of the ngnix.conf file depends on where you installed Ngnix.
This line should be added to the server object as shown below:
| Before | After |
|---|---|
| location ~/reporting(/.*)$ {
set $path $1; proxy_pass http://127.0.0.1:8081$path$is_args$args; proxy_http_version 1.1; proxy_set_header Upgrade $http_upgrade; proxy_set_header Connection "upgrade"; proxy_set_header X-Real-IP $remote_addr; proxy_set_header X-Forwarded-For $remote_addr; proxy_set_header Host $host; proxy_connect_timeout 6000; proxy_send_timeout 6000; proxy_read_timeout 6000;send_timeout 6000; } } |
location ~/reporting(/.*)$ {
client_max_body_size 200M; set $path $1; proxy_pass http://127.0.0.1:8081$path$is_args$args; proxy_http_version 1.1; proxy_set_header Upgrade $http_upgrade; proxy_set_header Connection "upgrade"; proxy_set_header X-Real-IP $remote_addr; proxy_set_header X-Forwarded-For $remote_addr; proxy_set_header Host $host; proxy_connect_timeout 6000; proxy_send_timeout 6000; proxy_read_timeout 6000; send_timeout 6000; } } |