Backing up and Restoring Sisense
Last updated: June 29, 2026
| Tier | Deployment |
|
|
You should backup Sisense as part of regular maintenance or before making significant changes to your deployment.
You can restore Sisense using backup files from the previous three quarterly releases. For example, 2026.2 can be restored with backup files from 2026.1, L2025.4, and L2025.3.
Accessing the Sisense CLI
To create a backup file, and to restore it later, you need to access the Sisense CLI that was installed with Sisense.
To access the Sisense CLI: see "Accessing the Sisense CLI" in Using Sisense CLI Commands.
Backing Up Sisense
To back up your Sisense deployment, you create a .tar file that stores an archive of your Sisense state. You can use the .tar file to restore your Sisense information.
To minimize production-level impact and allow compute capacity for the backup operation, Sisense recommends backing up the system:
- During low usage periods and without running any builds
- Before each software update
Downgrade and rollback are not supported. DO NOT attempt to downgrade by running the installer of a previous version on an upgraded system or by using 'helm rollback'. In most cases, these actions can lead to system and data damage.
If you need to undo an upgrade, perform a clean installation of the previous version and restore a Sisense backup in it. The backup must be from no more than three quarterly releases back.
Backup Commands
Sisense supports several system backup commands and sub-commands.
To run each backup command:
- Log in to the Sisense CLI with the SSH protocol and the user account that was used to install Sisense.
- Navigate to the home folder where Sisense was installed.
- Run the relevant backup command.
An assets backup archive is created in the following directory:
/opt/sisense/storage/system_backups/
This directory is accessible in single node deployments. For multi-node, use the management pod to access this directory.
Type si system help to view all available commands:
|
System Command |
Sub-command |
Description |
si system backup
|
|
Use this command to back up the system assets without the ElastiCubes. See Sisense Assets for list of file paths. |
|
|
-include-farm true
|
Use this command to add ElastiCubes to a backup archive. The ElastiCube(s) data folder(s) includes the files in the data folders containing your raw data.The size of these data files can be very large so make sure you have enough space for the files and the available time to complete the backup. |
|
|
-include-extra-paths true
|
If extra folders need to be backed up, paths to folders can be added to the ExtraBackupPaths field in Configuration > Management. Paths should be comma-separated. The default path is: "/opt/sisense/storage/build-plugins |
|
|
-include-extra-paths yes -extra-paths path,path2,path3
|
Use this command to enter the path manually with the command line. |
|
|
-to-s3 true
|
An AWS S3 bucket must be configured to use this backup command, see AWS S3 bucket creation and connection. Be sure that you disable "Block all public access" for the new bucket. After you set up the bucket, see the procedure to configure AWS S3 bucket access. |
|
|
-exclude-paths true -paths-to-exclude "/opt/sisense/storage/connectors,/opt/sisense/storage/datasets"
|
Use this command for excluding paths that are included in the default backup command. See Sisense Assets for list of file paths. Multiple paths must be comma separated and wrapped in quotation marks ("XXX,YYY")
|
si system backup-cancel
|
|
Cancels currently running backup. May return false positive (report success, while backup completes) if issued on last stage of backup process |
si system partial-backup
|
|
Starts a new system backup process according to the asset type |
si system backup-list
|
|
Lists the available backups |
si system backup-delete
|
|
Removes a backup file from the system |
To configure AWS S3 bucket access:
After you setup the AWS S3 bucket, complete the following steps on your virtual machine:
- Run the following command to add the Sisense namespace details:
". add_completion-sisense.sh <username>@sisense.com <password>" -
Use the following CLI commands to set the S3BackupBucket name, access key, and secret key credentials.
si config set -key management.S3BackupBucket -new-value <BucketName>si config set -key management.AWSAccessKey -new-value <AccessKey>si config set -key management.AWSSecretKey -new-value <SecretKey>
Scheduled Backup Commands
Sisense recommends that you run scheduled backups during low-usage periods.
|
System Command |
Sub-command |
Description |
si schedulers backup create
|
|
Use this command to create a scheduled backup plan. All additional backup flags are supported. See Backup Command Example (below). |
|
|
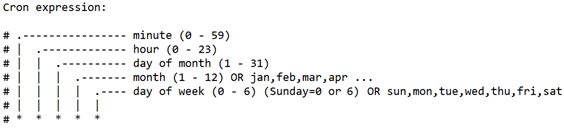
-cron-expression "* * * * *"
|
See cron syntax in the image below. |
|
|
-retention [1-20]
|
Use this command to schedule backup with retention; retention must be between 1 and 20. Mandatory field |
To set a backup schedule for Sisense:
Enter the following command to set a schedule to back up the Sisense system assets:
si schedulers backup create -cron-expression "0 */* * * *" -retention <1-20>
The retention flag number determines the number of backups that are kept in the systm_backups directory. The maximum number for this flag is 20.
Make sure there is enough drive space available for all backup copies that are to be retained.
Scheduled backup example:
si schedulers backup create -cron-expression "0 23 * * 6" -retention 2
A backup starts at 23:00 every Sunday, and the system retains two backup copies.
Backup to External Resources
By default, Sisense stores backups on your shared storage.
You can save backups to external resources by downloading and modifying the Sisense script as described below.
To save a backup to an external source:
wget https://data.sisense.com/linux/scripts/backup.sh chmod a+x backup.sh/bin/bash ~/backup.sh <namespace> <user> <password>
The script saves a backup by default in: targetDir=~/backup/
To schedule a task to save a backup to an external source:
- In Sisense's primary server, create a CronJob to pull your backup tarball from the shared storage.
- Download the following script:
wget https://data.sisense.com/linux/scripts/backup.sh chmod a+x backup.sh - Open your CronJob with the following command:
Crontab -e - Add a line to schedule a new CRON job. The following example is a line that schedules a daily pull at 2AM.
0 2 * * * /bin/bash ~/backup.sh <namespace> <user> <password>
The script saves a backup by default in: targetDir=~/backup/
You can change this value to store additional copies of sources external from your shared storage.
Backup Command Examples
The following backup command examples are provided for your reference:
| What do you want to do? | Command | String |
|---|---|---|
| Create a Sisense backup archive | Enter the following command to create a tarball backup file for the Sisense system assets. | si system backup
|
| Include ElastiCubes in a Sisense backup archive | Enter the following command to create a tarball backup file for the Sisense system assets and ElatiCubes. | si system backup -include- farm true
|
| Add extra folders to the Sisense backup archive | Enter the following command to add extra folders for data that you would like to add to the backup archive, in addition to the standard asset set. Multiple paths must be comma separated. | si system backup -include-extra-paths true -extra-paths "/opt/sisense/storage/data,/opt/sisense/storage/plugins-backup"
|
|
|
Command for backing up farms, and extra paths: | si system backup -include-farm true -include-extra-paths true -extra-paths "/opt/sisense/storage/data,/opt/sisense/storage/plugins-backup"
|
| Schedule a task to save a backup | Command for scheduling a backup to s3 every day at 04:00, with farms and extra paths, and retention of 10 backup copies. | si schedulers create -cron-expression "0 4 * * *" -retention 10 -include-farm true -include-extra-paths true -extra-paths "/opt/sisense/storage/folder1,/opt/sisense/storage/folder2" -to-s3 true
|
| Exclude folders from the Sisense backup archive | Enter the command to back up to s3, excluding connector paths, which excludes assets that are included by default in the backup command, see the Sisense Assets section. Multiple paths must be comma separated. | si system backup -exclude-paths true -paths-to-exclude "/opt/sisense/storage/connectors" -to-s3 true
|
| Backup Sisense to an AWS S3 bucket | To use this AWS S3 backup option you must have: a) Defined an S3 bucket (see AWS S3 bucket creation and connection), and b) Configured Sisense to store and build your ElastiCubes on S3 (see Storing ElastiCubes on S3). If you have configured AWS for Sisense, you can backup Sisense on S3 instead of shared storage. | si system backup -to-s3 true
|
Restoring Sisense
You can recover Sisense and your data if you have created a backup file. It might be necessary to restore this information if you experience problems in your Sisense Linux deployment due to data corruption or a storage failure. Restoring Sisense can also be used for migrating from one environment to another.
To run each restore command:
Log in to the Sisense CLI with the SSH protocol and the user account that was used to install Sisense.
| System Command | Sub-command | Description |
|---|---|---|
si system restore
|
||
si system restore -name sisense_assets_collector_YYYY-MM-DD_HH_mm
|
Use this command to restore from a file. This command will not include extra paths. | |
-include-extra-paths true -name sisense_assets_collectore_yyyy_mm_dd_hh_mm
|
Use this command to restore if extra paths are added during backup and it is necessary to restore those paths. The restore commands are for restoring paths that were included in the backup command and are in the current ExtraBackupPaths field in Configuration>Management. | |
-include-extra-paths true -extra-paths path,path2,path3 -name sisense_assets_collectore_yyyy_mm_dd_hh_mm
|
Use this command to restore paths that were included in the backup command and specified by user in the command line | |
-from-s3 true -name sisense_assets_collectore_yyyy_mm_dd_hh_mm
|
Use this command to restore from S3. The backup file name should be taken from S3. |
Note:
-
When using the"-name" parameter, it will look in the system_backups folder.
-
When copying/pasting the backup file name into the restore command, make sure to delete the tar.gz extension in order for it to run successfully.
Restore Command Example
The following restore examples are provided for your reference:
| What do you want to do? | Command | String |
|---|---|---|
| Restore a Sisense backup | Restore your Sisense backup tarball and then manually restore the SSL certificates and private keys |
Example:
(where |
| Restoring this s3 backup | si system restore -from-s3 true -name sisense_assets_collector_2021-08-23_11_46_27
Note: The restore command with excluded paths is identical to restoring a regular backup. |
|
| Restore a Sisense instance from backups on external resources | Copy the backup file to the shared storage | kubectl -n sisense cp sisense_assets_collector_some_date.tar.gz$(kubectl -n sisense get pods -l app="management" -o custom- columns=":.metadata.name"):/opt/sisense/storage/system_backups//opt/sisense/storage/system_backups/sisense_assets_collector_some_date.tar.gz
|
| Command for restoring backed up farms and extra folders: | si system restore -include-farm true -include-extra-paths true
-extra-paths /opt/sisense/storage/data , /opt/sisense/storage/plugins-backup
-name sisense_assets_collector_2020-07-21_09_19_06
|
Video Explanations
For an overview about Backing Up and Restoring Sisense, watch this video:
To learn more about Backup Options, watch this video:
To learn more about Backup Export Options, watch this video:
To learn more about Restore Strategy, watch this video:
Where to Go From Here
- Due to the size of the backup archive, you might need to expand a PersistentVolume (PV). For more information see Expanding Persistent Volumes.
- Sisense supports a variety of methods to export your data models and dashboards, and then import them if necessary. For more information see Backing up and Importing Sisense Assets.