Sisense BloX Tutorials
The following tutorials describe how to create an interactive dashboard that includes features such as embedded iFrames, action buttons for submitting data, and carousels for comparing products.
Introduction
Installing BloX
Creating Banners
Creating Banners
A banner is a simple image or text box with a background. The difference between a banner and any other text box or image is that the content is applied over the title area of the widget as well, whereas in regular widgets, the content is applied only below the title.
To create a banner widget:
Note:
Don’t forget to click Apply after each step to save your changes.
- In Sisense, create a new widget. Do not select any fields in the widget.
- Click Additional Configurations .
- In the Widget Designer, change the widget type to BloX.
The widget changes to a text widget that says “Welcome to BloX”. - For text banners, modify the values of the Text Block snippet.
OR
For image banners, in the Snippets tab, under Attributes, copy the Hide Widget Title snippet. In the Editor, paste the snippet in the metadata section. Modify the values as needed. - In the Snippets tab, under Attributes, copy the Hide Widget Title snippet and paste it in the metadata section.
- Click Apply to add the banner to the dashboard.
Code sample:
{
 "showCarousel": true,
 "titleStyle": [
   {
     "display": "none"
   }
 ],
 "body": [
   {
     "type": "Container",
     "horizontalAlignment": "center",
     "items": [
        {
                "type": "Image",
                "url": "<your url>",
                "altText": "<your alternative text>",
                "size": "stretch"
        }
     ]
   }
],
Using Columns
Creating Vertically Stacked Elements:
All BloX elements stack vertically and expand to the width of their parent, so if you create multiple elements, each will be placed on top of the other.
If you want to stack elements horizontally on the same row, you can use Column Sets and Columns. Column sets hold a collection of columns. Each column in a set is placed next to the other columns.

To create a BloX widget with vertically stacked columns:
Note:
Don’t forget to click Apply after each step to save your changes.
- In Sisense, create a new widget. Do not select any fields in the widget.
- Click Additional Configurations.
- In the Widget Designer, change the widget type to BloX.
The widget changes to a text widget that says “Welcome to BloX”. - Modify the value of the existing Text Block key to provide some context to your widget. For example, enter a heading for the widget.
- Add the column set for your first row of columns. In the Snippets tab, under Containers, copy the Columns Set snippet. In the Editor, paste the snippet in the body section, below the Text Block. Paste it as many times as you have column sets. Modify the values as needed.
- Add the columns within the column set. In the Snippets tab, under Containers, copy the Column snippet, In the Editor, paste the snippet in the body section, under “column”. Paste it as many times as you have columns. Modify the values as needed.
- Repeat Step 6 for each column set that you created.
- Click Apply to add the widget to the dashboard.
Code Sample:
{
  "showCarousel": true,
  "titleStyle": [
  {
    "display": "none"
  }
  ],
    "body": [
  {
    "type": "Container",
    "verticalContentAlignment": "center",
    "spacing": "extraLarge",
    "items": [
   {
     "type": "ColumnSet",
     "spacing": "extraLarge",
     "horizontalAlignment": "center",
     "columns": [
   {
        "type": "Column",
        "separator": false,
        "width": "50%",
        "horizontalAlignment": "center",
        "backgroundImage": "{panel:Image}",
        "spacing": "none",
        "style": {
                "height": "350px"}
   },
   {
        "type": "Column",
        "separator": false,
        "width": "50%",
        "horizontalAlignment": "center",
        "spacing": "small",
        "items": [
   {
                "type": "Container",
                "items": [
                {
                        "type": "TextBlock",
                        "horizontalAlignment": "left",
                        "text": "{panel:Name}",
                        "size": "large"
                },
   {
                        "type": "TextBlock",
                        "horizontalAlignment": "left",
                        "separator": false,
                        "text": "{panel:Spec1}",
                        "size": "meduim"
                        },
                      ]
                    }
                 ]
               }
             ]
           }
         ]
      }
   ]
}
Designing BloX Widgets
Adding Sparklines and Action Buttons
Creating Sparklines
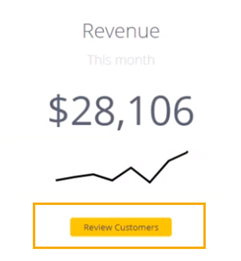
A sparkline is a tiny chart that you can display over your widget to provide a visual representation of data. You can use sparklines to show trends in a series of values, such as seasonal increases or decreases, economic cycles, or to highlight maximum and minimum values.
To create a sparkline:
Note:
Don’t forget to click Apply after each step to save your changes.
- In Sisense, create a new widget. Do not select any fields in the widget.
- Click Additional Configurations.
- In the Widget Designer, change the widget type to BloX.
The widget changes to a text widget that says “Welcome to BloX”. - In the right pane, add the items and categories for which you want to display the sparkline, as you would for any widget. For example, for a sparkline that shows the monthly revenue, add the items ‘months in date’ and values ‘total revenue’.
- Add some fields that would provide context to the sparkline, such as the KPI and the time period you are monitoring. In the Snippets tab, under Components, copy the Text Block snippet. In the Editor, paste the snippet in the body section, under Items. Modify the values as needed.
- Add the current value of your KPI. This will look like a simple numeric indicator. Paste another Text Block snippet in the Editor. In the “text” attribute, copy the name of the KPI you have in Values panel and paste it in the panel class. For example, if your KPI is Total Revenue, do this:
"text": "{panel:Total Revenue}". Modify the other values as needed. - In the Snippets tab, under Components, copy the Sparkline Chart snippet. In the Editor, paste the snippet in the body section. In the “text” attribute, add the class ‘blox-sparkline’. For the sparkline to reference your data, use the variable {spark:}, copy the name of the KPI you have in the Values panel and paste it in the panel class. For example, if your KPI is Total Revenue, do this:
"text": "<span class='BloX-sparkline' type='line' <other classes as needed> >{spark:Total Revenue}</span>" . Modify the other values as needed. - Click Apply to add the sparkline to the dashboard.
Code sample:
{
                                        "style":"",
                                        "script":"",
                                        "title":"",
                                        "showCarousel":true,
                                        "carouselAnimation":{
                                        "delay":0,
                                        "showButtons":false
                                        },
                                        "body":[
                                        {
                                        "type":"Container",
                                        "items":[
                                        {
                                        "type":"TextBlock",
                                        "text":"Revenue",
                                        "size":"medium",
                                        "weight":"light",
                                        "horizontalAlignment":"center"
                                        },
                                        {
                                        "type":"TextBlock",
                                        "text":"",
                                        "size":"extraLarge",
                                        "spacing":"large",
                                        "separator":false,
                                        "horizontalAlignment":"center"
                                        },
                                        {
                                        "type":"TextBlock",
                                        "style":{
                                        "padding-bottom":"10px"
                                        },
                                        "text":"{"text":"<span class='blox-sparkline' type='line' line-color='#000' width='200' height='50' line-width='3' fill-color='' min-point-color='#000000' max-point-color='#000000'>{spark:Total Quantity} </span>",
                "horizontalAlignment":"center"
                    }
                   ]
                  }
                 ],
                "actions":[
                {
                "type":"Action.OpenUrl",
                "title":"Open In Web",
                "url":"https://www.sisense.com/sisense-labs/"
                }] }
Embedding iFrames
Embedding iFrames
You can easily embed an iframe using a video into your dashboard.

To embed an iFrame in a widget:
Note:
Don’t forget to click Apply after each step to save your changes.
- Open a dashboard in Sisense and create a new widget. Do not select any fields to the widgets.
- Click Additional Configurations.
- In the Widget Designer, change the widget type to BloX.
The widget changes to a text widget that says “Welcome to BloX”. - In the Snippets tab, under Components, copy the iFrame snippet. Switch to the Editor and remove the “items” element. Then paste the iFrame snippet in the body section.
- Insert the URL to the iFrame in the src element. If needed, modify the size elements. You can insert an autoplay element as well.
- In the Snippets tab, under Attributes, copy the Hide Widget Title snippet. In the Editor, paste the snippet in the metadata section.
- Click Apply to add the iFrame widget to the dashboard.
Code sample:
{
   "type": "AdaptiveCard",
   "title": "BloX",
   "showCarousel": true,
   "titleStyle": [
    {
        "display": "none"
    }
   ],
   "body": [
    {
        "type": "TextBlock",
        "text": "<iframe src='https://www.youtube.com/embed/vce44dgC0p4?autoplay=false' allowfullscreen= 'allowfullscreen' style='width:100%;height: 500px;'></iframe>"
    }
  ]
}
Adding Carousels
Creating Carousels
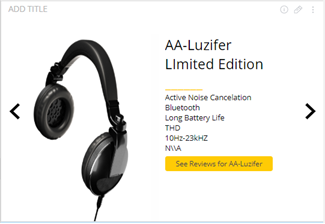
Carousels let you cycle through elements like pictures, text, etc., by using arrows.
To create a carousel:
Note:
Don’t forget to click Apply after each step to save your changes.
- In Sisense, create a new widget. Do not select any fields in the widget.
- Click Additional Configurations.
- In the Widget Designer, change the widget type to BloX.
The widget changes to a text widget that says “Welcome to BloX”. - In the right panel, under Items, add all the database columns that you want to display in the carousel. For example, to create the carousel as in the screenshot above, you would add database columns for the image, the title, and the various specification of the product.
- Modify the existing “showCarousel” element in the metadata section to ‘true’. This element lists multiple items horizontally instead of stacking them, and presents arrows for navigating through the list.
- Add the items you want to list horizontally. These can be Text Block elements, or Column Set elements, as in the screenshot above, where the columns show a picture of a product and some information about this product. For instructions on creating Column Sets, see here .
- In each of the Column elements of the Column Set , add a line that would be dynamically related to the panel on the left. This means that as a user rotates the carousel, the information will change to the next value. For example, in the Column element that represents the image, add a line
"backgroundImage": "{panel:Image}". in the Column element that represents the name of the product, add a line"text": "{panel:Name}".
8. Click Apply to add the carousel to the dashboard.
Code Sample:
{
   "showCarousel": true,
   "titleStyle": [
     {
        "display": "none"
     }
   ],
   "body": [
     {
        "type": "Container",
        "verticalContentAlignment": "center",
        "spacing": "extraLarge",
        "items": [
          {
                "type": "ColumnSet",
                "spacing": "extraLarge",
                "horizontalAlignment": "center",
                "columns": [
                 {
                        "type": "Column",
                        "separator": false,
                        "width": "50%",
                        "horizontalAlignment": "center",
                        "backgroundImage": "{panel:Image}",
                        "spacing": "none",
                        "style": {
                             "height": "350px"
                        }
                        },
                        {
                        "type": "Column",
                        "separator": false,
                        "width": "50%",
                        "horizontalAlignment": "center",
                        "spacing": "small",
                        "items": [
                                {
                                "type": "Container",
                                "items": [
                                {
                                        "type": "TextBlock",
                                        "horizontalAlignment": "left",
                                        "text": "{panel:Name}",
                                        "size": "large"
                                },
                                {
                                        "type": "TextBlock",
                                        "horizontalAlignment": "left",
                                        "separator": false,
                                        "text": "{panel:Spec1}",
                                        "size": "meduim"
                                },
                              ]
                            }
                          ]
                        }
                      ]
                    }
                  ]
                }
             ]
           }
Creating Forms
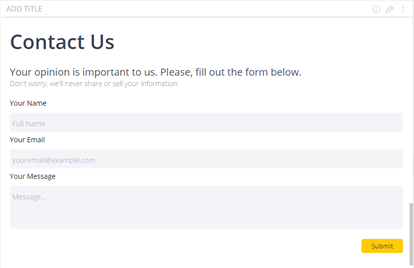
You can create form widgets, through which your users can enter and submit information.
To create a form widget:
Note:
Don’t forget to click Apply after each step to save your changes.
- In Sisense, create a new widget. Do not select any fields in the widget.
- Click Additional Configurations .
- In the Widget Designer, change the widget type to BloX.
The widget changes to a text widget that says “Welcome to BloX”. - Add some fields that provide context to the form, such as form name and a line that explains its purpose. In the Snippets, under Components, copy the Text Block snippet. In the Editor, paste the snippet in the body section, under Items. Modify the values as needed.
- Add as many Text Block snippets as you need for the contextual information you want to add to the form. You may add spacing between the snippets.
- Add the input fields where users will fill in their information. In the Snippets, under Input Fields, copy the Text Input snippet. In the Editor, paste the snippet in the body section, under your Text Block snippets. Modify the values as needed.
- Add the button that users will click to submit their information. In the Actions, under Action Buttons, copy the Button snippet. In the Editor, paste the snippet in the actions section. Modify the values as needed. In the value of the url, enter the url of the destination where the information will be sent, such as a zapier webhook, email address, etc.
- Click Apply to add the form to the dashboard.
Code sample:
{
   "showCarousel": true,
   "body": [
    {
        "type": "Container",
        "items": [
        {
                "type": "TextBlock",
                "text": "Contact Us",
                "weight": "bold",
                "size": "extraLarge",
                "horizontalAlignment": "left"
        },
        {
                "spacing": "large",
                "type": "TextBlock",
                "text": "Your Name",
                "color": "black"
        },
        {
                "type": "Input.Text",
                "id": "data1",
                "placeholder": "Full Name",
                "borderRadius": "4px",
                "borderStyle": "none",
                "backgroundColor": "#F4F4F8",
                "spacing": "large"
        },
     ]
   }
 ],
}
Embedding Social Media Feeds
Embedding Social Media Feeds
You can embed live social media feeds in your BloX widgets.

To embed a social media feed:
Note:
Don’t forget to click Apply after each step to save your changes.
- In Sisense, create a new widget. Do not select any fields in the widget.
- Click Additional Configurations .
- In the Widget Designer, change the widget type to BloX.
The widget changes to a text widget that says “Welcome to BloX”. - You can apply a background image to the feed. This is basically a banner, on top of which you add the feed. For instructions on creating banners, see the Creating Banners section of this document.
- You can also add a heading to your feed. In the Snippets, under Components, copy the Text Block snippet. In the Editor, paste the snippet in the body section. Modify the values as needed.
- Add the feed. Add another Text Block , and add to it an iFrame to your feed. You can get this from your feed provider. Modify the other values as needed.
- Click Apply to add the feed to the dashboard.
Code sample:
{
   "type": "AdaptiveCard",
   "title": "BloX",
   "showCarousel": true,
   "titleStyle": [
     {
         "display": "none"
     }
   ],
   "backgroundImage": "https://s3.amazonaws.com/sisenseblox/Sample+-+SenseBUZZ+/Background+Imags/twitter+bg.png",
   "body": [
     {
        "type": "TextBlock",
        "text": "Twitter",
        "size": "extraLarge",
        "color": "white",
        "horizontalAlignment": "left"
     },
     {
        "type": "TextBlock",
        "class": "iframe",
        "text": "<a class='twitter-timeline' data-width='500' data-height='600' data-theme='light' href='https://twitter.com/Sisense?ref_src=twsrc%5Etfw'>Tweets by Sisense</a> <script async src='https://platform.twitter.com/widgets.js' charset='utf-8'></script>",
        "size": "medium",
        "spacing": "medium",
        "weight": "light",
        "horizontalAlignment": "center"
     }
   ]
}
Using Conditionals
Creating Conditionals
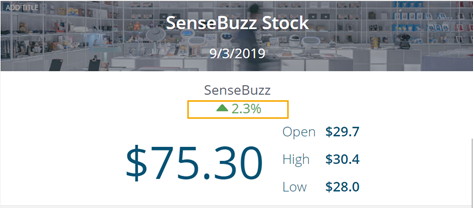
You can customize your widgets’ appearance based on conditions you define. For example, if your data is below a certain threshold, you can display it on a red background or next to a certain image, and when it is above the threshold, on a green background or with a different image.
To apply conditions to a widget:
- In Sisense, open a BloX widget to which you want to apply conditions.
Note:
You can also create a new widget using the Conditional Card template.
- In the body section, add a new element “conditions”.
- In the Snippets tab, under Attributes, copy the Conditional Range snippet. In the Editor, paste this snippet in the body section, within the “conditions” element. The snippet consists of three separate elements, and you can add more, to define the conditions that you have. For example, your first condition applies if your KPI is below 0, your second condition applies if it is within the range of 0.1 to 100, your third condition applies if the range is from 100.1 to 200, etc. In the ‘minRange’ and ‘maxRange’ attributes, indicate the ranges for each condition. In the “image” attribute, indicate the image to accompany each condition, such as a downward-facing arrow for the first condition and an upward-facing arrow for the second condition. In the “color” attribute, indicate the colors in which the values are going to be displayed according to each condition.
- In the Snippets tab, under Attributes, copy the Conditional Formatting Target snippet. In the Editor, paste this snippet in the body section, under “items”. Indicate here the data that triggers the condition. For the snippet to reference your data, copy the name of the KPI you have in the Values panel and paste it in the panel class. For example, if your KPI is Total Revenue, do this:
"text": "{panel:Total Revenue}". Modify the other values as needed. - Click Apply to add the iFrame widget to the dashboard.
Code sample:
{
   "showCarousel": true,
   "titleStyle": [
     {
        "display": "none"
     }
   ],
   "conditions": [
     {
        "minRange": "-Infinity",
        "maxRange": 2,
        "color": "#FA5656",
        "image": "/plugins/BloX/blox-images/StockUpdate/arrow-down.png"
     },
     {
        "minRange": 2,
        "maxRange": "Infinity",
        "color": "#54a254",
        "image": "/plugins/BloX/blox-images/StockUpdate/arrow-up.png"
     }
     ],
   "body": [
     {
     "type": "Container",
     "items": [
        {
                "type": "TextBlock",
                "horizontalAlignment": "center",
                "spacing": "small",
                "size": "medium",
                "text": "SenseBuzz",
                "color": "grey"
        },
        {
                "type": "ColumnSet",
                "style": {
                        "justifyContent": "center"
                },
                "columns": [
                        {
                        "type": "Column",
                        "width": "stretch",
                        "items": [
                                {
                                        "type": "Image",
                                        "class": "conditional_image",
                                        "url": "url"
                                }
                        ]
                },
                {
                        "type": "Column",
                        "width": "stretch",
                        "items": [
                                {
                                        "type": "TextBlock",
                                        "size": "medium",
                                        "class": "condition_data",
                                        "text": "2.3%",
                                        "wrap": true
                                }
                              ]
                            }
                          ]
                        },
                      ]
                    }
                  ]
                }
Using Webhooks
Integrating with other Tools via Webhooks
You can integrate a BloX widget with other third-party tools, such as an online project or task management tool, to foster discussion and collaboration. For example, you can create a BloX form for users to post comments to their AirTable project, team Slack channel, or any other application.
The below example is for Slack.
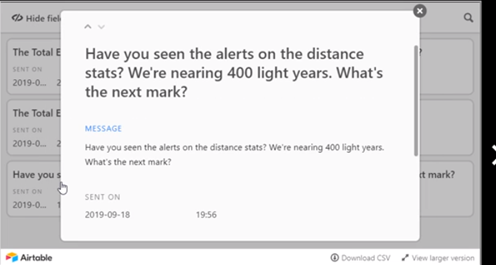
To integrate with Slack:
- Create a form widget for users to enter their comments onto the dashboard. For instructions on creating form widgets, see the Adding Forms section of this document.
- Create an action button (use the Submit action type), upon clicking which the users will be able to post their comments directly from the dashboard to their destination application, such as AirTable project or Slack channel. For instructions on creating action buttons, see the Creating Actions area of this docment.
- Create a webhook in Zapier (for details, click here). Use the Catch Hook type.
- Copy the url you received for the webhook and go back to BloX. Go to BloX and paste this url into the action’s URL attribute.
- Fill in the BloX form and click your action button to submit the request. This behaves as a sample that Zapier uses to set up your zap. Then go back to Zapier and click OK, I did this.
- In Zapier, connect this webhook to the desired Slack channel / private message.
Now, when users enter information in the BloX form and submit it using the action button, this information will be posted to the defined Slack channel / private message.
Code sample:
"actions": [
   {
        "type": "Action.Submit",
        "title": "post",
        "url": "https://hooks.zapier.com/hooks/catch/4011053/jShcs”,
       "title": "Submit",
       "data": {
  }
]
Exporting and Importing BloX Templates
Exporting / Importing BloX Template
You can export your templates and import them later or share them with other Sisense users, so they can add them to their dashboards. Templates are exported as JSON files that include the content under the Editor and Configuration tabs (HTML and CSS).
To export a template:
- Open the Widget Designer for the widget.
- In the toolbar of the right pane, click and select Export Template. The exported template is downloaded as a json file.
To import a template:
- Drag the json file representing the template to the upload area, or navigate to the file, and give it a name. Once its uploaded, you can find with your list of templates.
Saving and Deleting BloX Templates
Saving New Templates and Deleting Templates
After you have created or modified a template, you can save your changes. In some cases, you might want to delete some of your templates.
To save a template:
- Open the Widget Designer for the widget.
- In the toolbar of the right pane, click
 and select how you want to save the template:
- Save Changes : Saves your changes to the current template you are working on.
- Save As New Template : Saves your changes in a new template. If you select this option, you are prompted to enter a name for the template. The template is then added to your list of templates above.
To delete a template:
- Select the template you want to delete.
- In the toolbar of the right pane, click
 and select Delete Template . The template is deleted.
Note:
You can only delete your own templates. The default templates provided with BloX are protected. When you attempt to delete a protected template, you will get the “Unable to delete” message.
Creating Actions
Creating Action Buttons
To make your dashboards truly interactive, you can embed actions into your BloX widgets. Actions can be anything from lightboxes and open URLs to action buttons that can perform a variety of actions when a button is clicked. For example, you can create submit buttons that send emails.
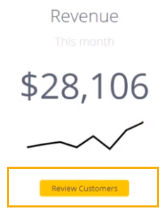
To add an action:
Note:
Don’t forget to click Apply after each step to save your changes.
- In Sisense, open a BloX widget to which you want to add an action.
- In the Actions tab, select the type of action you want (button or type) and copy the relevant snippet. In the Editor, paste the snippet in the actions section. Modify the values as needed.
- In the Configuration tab, under “actions”, modify the look-and-feel of your action as needed.
- Click Apply to add the action to the dashboard.
Code sample:
"actions": [
   {
        "type": "Action.OpenUrl",
        "title": "Review Customers",
        "url": "https://www.sisense.com/"
   }
]
Embedding BloX Widgets
Embedding BloX Widgets
You can embed BloX widgets into your site or application. Sisense supports three methods for embedding widgets: iFrames, QR codes, or direct links.
To embed a BloX widget:
- Open the Widget Designer for the widget.
- In the toolbar of the right pane, click
1.png)
and select how you want to embed the widget. - For iFrames and URLs, a dialog box opens with the code. Copy the code and paste it into your site or application.
For QR codes, a dialog box opens with the QR code image. Download the code and add it your site or application, so when scanned by a mobile device, it will open the widget in view mode.
.r.