Setting Up SSL for Sisense Windows
SSL (Secure Sockets Layer) is a security protocol that encrypts the server-client data channel. In Sisense, SSL secures the link between the Sisense server and the clients’ browsers (where dashboards are created and viewed). With SSL in place, you can access Sisense via an HTTPS secure connection, which is password protected. This is recommended when you want users to be able to access dashboards from outside the organization.
Keep in mind, configuring SSL on your Sisense server and in your IT environment should be performed by an IT Specialist or Web Administrator.
Note:
If you're using a reverse proxy or load balancer, make sure that the communication between the proxy and Sisense is HTTPS.
Strict Transport Security
HTTP Strict Transport Security (HSTS) is a method for preventing any communications from being sent over HTTP to the specified domain and allows only communication over HTTPS. This is useful for preventing man-in-the-middle attacks or users with invalid certificates from accessing your dashboards. This is automatically applied when you enable SSL for the Sisense.
Cookie Security
By default, Sisense web pages have cookies that contain a secureFlag when SSL is set on the Sisense server. This flag instructs the browser that the cookie should only be returned to the Sisense Web Application over encrypted connections (HTTPS).
The procedure below describes how to set up SSL in Sisense from Sisense V7.2 and later. If you're upgrading from an earlier version to Sisense V7.2 or later, see the section Configuring SSL After Upgrading at the end of this topic.
The tutorial below describes how to set up a simple SSL connection in Sisense.
To configure your Sisense SSL settings:
- In your browser, open the Configuration Manager located at http://localhost:3030.
- Toggle the Enable SSL switch to Enabled.
- Upload or enter your SSL certificate. Sisense supports both PFX and CERT certificates. Typically, these certificates are provided by a third-party provider.
When using SSL, the certificate must include the root certificate and any intermediate certificates.
PFX: PFX files contain the public key file (SSL certificate file) and the associated private key file in a single file. If you select PFX, drag the PFX file into the browser or click Browse and navigate to the file. In PFX Password, enter the password you received after your PFX was generated.
CERT-Key: A .cert file is the public key, which is used to verify client authentication requests. It's what's received by an HTTP client from a server in the SSL handshake. If you select CERT-KEY, two boxes are displayed CERT File and Key File. In CERT File, drag the .cert file into the browser or click Browse and navigate to the file. In Key File, drag the key file into the browser or click Browse and navigate to the file. The Key file is the private key to the certificate.
Alternatively, if the files aren't provided, and you have received a coded certificate and key, you can enter these values in the SSL Certificate and SSL Key fields.
4. In Port, enter the port to be used when accessing Sisense. By default, this is 8081, however, if you're implementing SSL, typically the port is set to 443.
5. Click Save.
If you have any problems, see the following tutorial on troubleshooting SSL in Sisense:
Managing Self-Signed Certificates
If you're using a self-signed certificate, you might experience problems connecting to data sources. This is caused by the self-signed certificate being rejected. To fix this, set the NODE_EXTRA_CA_CERTS environment variable file path to a file containing your certificate.
Note:
Self-signed certificates made by IIS aren't supported by NodeJS. If you want to use a self-signed certificate, consider using OpenSSL. Another option is Google, however, Google has their own limitations which you can read about, here.
Sisense doesn't support DER encoded certificates.
To prevent self-signed certificates from being automatically rejected:
- On your Sisense server, right-click This PC (Or My Computer in older versions of Windows) and select Properties.
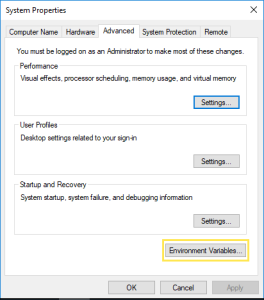
- Click Advanced system settings.
- In System Properties, click Environment Variables.

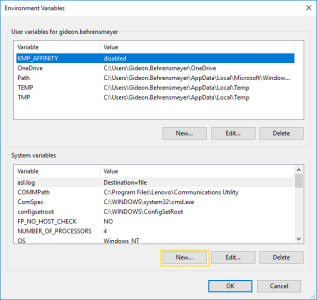
4. In Environment Variables, under the System variables area, click New.

5. In the New System Variable dialog box, in the Variable name field, enter
NODE_EXTRA_CA_CERTS.

6. In Variable value, enter the address of your .ca file.
OR
Select Browse file and navigate to the .ca file.
7. Click OK.
8. Restart your computer. This should resolve connection problems caused by sign certificates.
Configuring SSL After Upgrading
Earlier versions of Sisense used IIS, which meant that part of your SSL configuration was stored in the IIS Manager. As NodeJS is now used as the application server, your Sisense SSL bindings must be removed when you're upgrading to Sisense V7.2 and later from an earlier version for SSL to continue to work.
To configure SSL after upgrading:
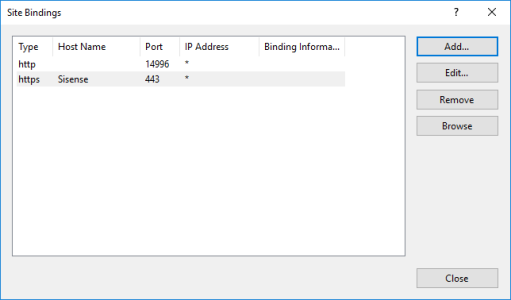
- On the Sisense Server, open the IIS Manager.
- Remove the bindings to port 443.

- Reset IIS.
- In your browser, open the System Configuration at http://localhost:3030/.
- Verify that Enable SSL is enabled.
- Upload or enter your SSL certificate. Sisense supports two types of certificate files, PFX and CERT. Typically, these files are provided by a third-party provider.
When using SSL, the certificate must include the root certificate and any intermediate certificates.
PFX: PFX files contain the public key file (SSL certificate file) and the associated private key file in a single file. If you select PFX, drag the PFX file into the browser or click Browse and navigate to the file. In PFX Password, enter the password you received after your PFX was generated.
CERT-Key: A .cert file is the public key, which is used to verify client authentication requests. It's what's received by an HTTP client from a server in the SSL handshake. If you select CERT-KEY, two boxes are displayed CERT File and Key File. In CERT File, drag the .cert file into the browser or click Browse and navigate to the file. In Key File, drag the key file into the browser or click Browse and navigate to the file. The .key file is the private key to the certificate.
Alternatively, if the files aren't provided, and you have received a coded certificate and key, you can enter these values in the SSL Certificate and SSL Key fields.
- In Port, enter the port to be used when accessing Sisense. By default, this is 8081, however, if you are implementing SSL, typically the port is set to 443.
- Click Save.
- Click Yes to restart the Sisense services.
.r.