Setting Notification Channels
By default, your users are notified via their email addresses registered with Sisense . In addition, Sisense supports a variety of workflows by sending notifications across multiple applications and services. For example, your users can receive notifications through the Sisense mobile application, Zapier, Slack, and other 3rd services via webhooks.
To define how users are notified:
-
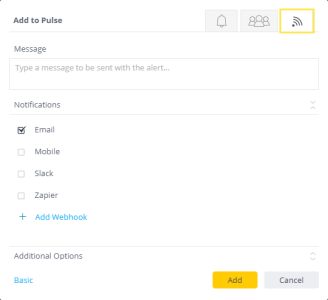
For Build Alerts, select the
1.png) tab
tab -
For Data Alerts, select Advanced Options >
1.png)
-
In the Notifications area, select the relevant channel for your notification. The default channel, Email, is already selected.
You can select one or more of the following channels:- Mobile
- Slack
- Zapier
- Webhook
-
Click Save.
Sisense Mobile
Sisense Mobile enables users to view Sisense dashboards through their mobile devices. You or your users can receive notifications through Sisense Mobile. After selecting the users you want to notify, any users with a Sisense user account and Sisense Mobile will receive a notification when an alert is triggered.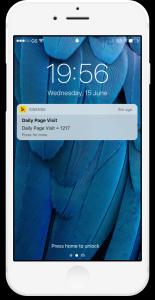
Slack
Slack is a real-time team collaboration messaging platform that allows you to receive incoming Webhooks from external sources such as Sisense . To send notifications through Slack, you need to enter the URL and optionally, your Slack channel or username, where the notification is to be displayed.
You can obtain these details by adding the Incoming WebHooks app into your Slack configuration.
For a quick walkthrough of configuring Pulse notifications in Slack, see the tutorial below.
To obtain a Webhook URL and channel from Slack:
- Add the Incoming WebHooks app to Slack. You can find this app in Slack’s App Directory.
- In the Incoming WebHooks app page, click Add Configuration.
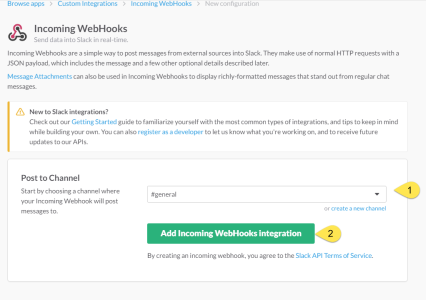
- After you add the Incoming WebHooks app, you can select which channel to post the notifications to. The channel name is optional and displays the notification in the channel associated with your WebHook URL. In the Post to Channel area, select the channel where the notification is to be displayed and click Add Incoming WebHooks integration.
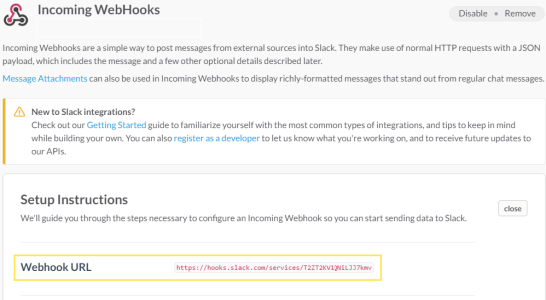
- In the Setup Instructions the Webhook URL is displayed. Copy the Webhook URL.
- In Sisense when sending notifications through Slack, in the URL field, enter the URL copied in the previous step and in the #channel/@username field, enter the channel name if you have defined one.
Zapier
Zapier is an online service that lets you create automated actions connecting disparate business apps and services such as Sisense . To receive notifications through Zapier, you must create a Zap and provide Sisense with the relevant URL when configuring your alerts’ notifications.
When an alert is triggered, Sisense sends the notification to the Webhook you define in Zapier.
To obtain a Webhook URL from Zapier:
- Log in to Zapier and click Make a Zap. The Trigger App page is displayed.
- From the Trigger App page select Webhooks. The Connect to Webhooks by Zapier page is displayed.
- In Step 1 > Set Up Webhook, click Copy to clipboard to copy the Webhook URL you need to provide to Sisense.
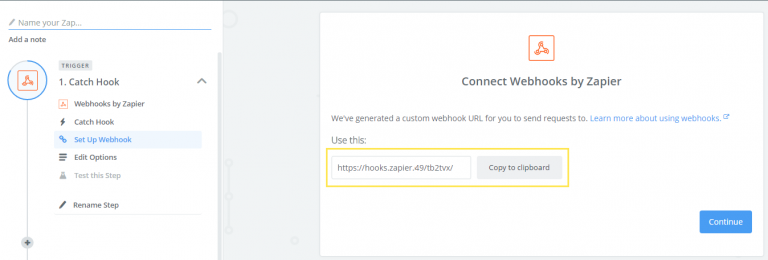
4.In Sisense, when sending notifications through Zapier, in the URL field, enter the URL copied in the previous step.
Webhooks
Webhooks are a system of automated notifications that indicate that an event occurred, in this case an alert being triggered. To send notifications through additional 3rd party channels, you can select Webhook and enter the Webhook name and URL.
Your Webhook server listens for incoming messages from Sisense across the URL specified in the URL field.
When Sisense sends notifications to your custom Webhook, they are sent within a JSON payload. Your Wehbook provider must interpret the payload and display the notification to your users. The following exampleof notifications sent in a JSON payload and a description of the contents of the payload:
{ type: 'kpi',name: 'Total Sales',message: 'Hello World',originDashboardLink: '58128745677f52dc0f000019',measure: 'Revenue',value: 39759625.51502721,condition: 'none',filters:[ { asDimension: false,title: 'Category',value: 'Include all',jaql: [Object],panel: 'scope' }, { asDimension: false,title: 'Gender',value: 'Include all',jaql: [Object],panel: 'scope' } ]
| Data Events | Build Events |
{ type: 'kpi',
 name: 'Total Sales',
 message: 'Hello World',
 originDashboardLink: '58128745677f52dc0f000019',
 measure: 'Revenue',
value: 39759625.51502721,
 condition: 'none',
filters:
  [ { asDimension: false,
      title: 'Category',
value: 'Include all',
      jaql: [Object],
      panel: 'scope' },
    { asDimension: false,
title: 'Gender',
value: 'Include all',
      jaql: [Object],
      panel: 'scope' } ]
|
{ type: 'build', name: 'Success Event', measure: null, value: 1,condition: 'none',filters: null } |
| Name | Type | Description |
|---|---|---|
| Type | String | Type of alert. ‘kpi’ for data events and ‘build’ for build events. |
| Name | String | Name of the alert. |
| Message | String | Notification message. |
| originDashboardLink | String |
Dashboard ID provided by Sisense. You can find the dashboard ID from the URL of the dashboard. For example, the ID of the dashboard below if: http://localhost:8081/app/main#/dashboards/573b4322048e5e382a000001 |
| value | Double |
For data events when a threshold condition is applied, this is the value of the threshold. For build events, the value is 0 for failed builds and 1 for successful builds. |
| condition | String | Type of condition that generated the alert. |
| filters | Object | Object that defines filters applied to the dashboard. |
.r.