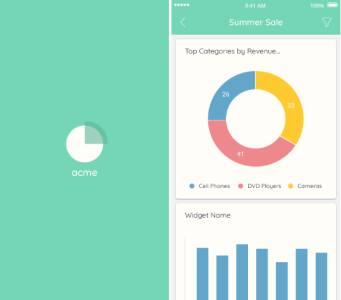
Rebranding Sisense Mobile
Sisense enables you to provide your users with a fully white-labeled version of Sisense Mobile that matches your brand's look and feel.

The following objects can be rebranded:
- App icon and title
- Splash screen
- Mobile notification logo image and colors
- Mobile color palette
- App description and information that appears in the app store
Rebranding Sisense Mobile is a premium Sisense offering. Contact your Sisense representative.
Sisense Mobile Rebranding Process
Once you have purchased a rebranded version of Sisense Mobile, download and complete this checklist , which details all the information and resources you must provide to Sisense.
Examples of resources are:
- Icons in different sizes (iPhone, Android)
- Specific colors
- Mobile app name
- Other configurable options within Sisense Mobile.
A detailed description of each required resource and field is included in the checklist.
Important:
Zip these resource files together, and send the zipped file and your completed checklist to rebranded_mobile@sisense.com, with your Sisense representative copied on the email.
Sisense will create a rebranded mobile app and provide you with a version to try out. The white-labeled mobile app will be fully tested by Sisense QA, but Sisense recommends that you test it for yourself before uploading it to the app stores.
Sisense will provide instructions for signing the application and uploading it to the app stores.
Once Sisense validates that all resources are accounted for and are correct, the rebranding Sisense mobile process typically takes up to one month.
Publishing Your App
Note:
It is your responsibility to publish your application. Use the information in this section to help you do so.
Before Sisense provides you with your rebranded mobile app, Sisense signs the app for you. Both the Google Play Store and the Apple App Store require that all apps are digitally signed with a certificate. Therefore, you must provide Sisense with the relevant certificates as described below. Sisense then returns the signed app to you and you can publish the app in the Google Play Store (Android) or in the Apple App Store (iOS).
For instructions on how to publish, see Resources for Publishing Your Application.
Generating Signing Certificates
Android
Signing Your App
-
For instructions on signing your rebranded Android-based mobile app, see Sign your app.
Note:
- The Android certificate should be in the form of a JKS file.
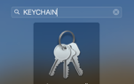
- You must provide all passwords for Keystore (and for the key, if it was set). To create and check the key, and to make sure that the password is correct, go to keystore-explorer.
Important:
When configuring the expected lifespan of your app, it is recommended to set a validity period of 25 years or more. When your key's validity period expires, users will no longer be able to seamlessly upgrade to new versions of your app.
- Google Play App Signing:
If you plan to publish your apps on Google Play, the key you use to sign those APKs must have a validity period ending after 22 October 2033. Google Play enforces this requirement to ensure that users can seamlessly upgrade apps when new versions are available. If you use Google Play App Signing, Google ensures your apps are correctly signed and able to receive updates throughout their lifespans.
- More information:
iOS
-
Go to https://developer.apple.com and create an identifier (App ID) for the new app.
-
Under App Services, select Push Notifications.
-
If you don't have an iOS production certificate, create one. See the instructions, below.
-
Download the certificate to the Mac that has your private key, and add it to the key chain (double click).
-
Open Keychain Access on your Mac, and under My Certificates locate the iPhone Distribution Certificate you have created for the app.
-
Select File > Export Item. Make sure the file format is p12.
-
In developer.apple.com, create a Distribution Provisioning Profile for your app, using the same certificate you created above.
-
Download the certificate to your Mac.
-
Double click the certificate. This will start the process to install it.
For more information, see Code Signing.
Creating a Certificate for the Apple App Store
You need to create a p12 certificate to publish an application on the Apple App Store. There are three main steps in this procedure:
-
Create a .certSigningRequest (CSR) file
-
Create the .cer file
-
Install the .cer file and generate a .p12 certificate
These steps are detailed below.
Note:
Before performing this procedure, make sure you have registered in the iOS Developer Program.
- Create a .certSigningRequest (CSR) File
-
From Utilities or the Launchpad, search for and open Keychain Access.

-
From the Keychain Access toolbar, select Keychain Access > Preferences.
-
Click the Certificates tab.
-
Set both Online Certificate Status Protocol and Certificate Revocation List to Off.
-
Close the window.
-
From the toolbar, open Keychain Access > Certificate Assistant > Request a Certificate From a Certificate Authority.

-
Enter the email address and common name that you used to register in the iOS Developer Program.
-
Leave the CA Email field empty and select Saved to disk and Let me specify key pair information.
-
Click Continue.
-
Select a filename and destination on your local computer.
-
Click Save.
-
Set the Key Size value to 2048 bits.
-
Set Algorithm to RSA.
-
Click Continue.
This creates and saves your certSigningRequest file (CSR) to your local computer. A public and private key is also installed in Keychain Access with the Common Name entered.
-
- Create a .cer File in Your iOS Developer Account
-
Go to https://developer.apple.com/account/resources/certificates/list and sign in to your Apple Developer Account.
-
Click Certificates, Identifiers & Profiles.
-
Click Add + at the top-right of the main panel.
-
Select Apple Distribution.
-
Click Continue.

-
Click Choose File and locate the CSR file on your local machine that you created in the first stage of this procedure.
-
Click Generate.
-
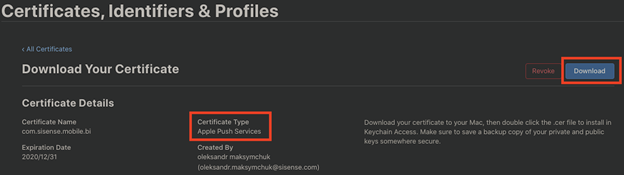
Click Download to download the file.
-
Click Provisioning Profiles.

-
Under Distribution, select App Store and click Continue.
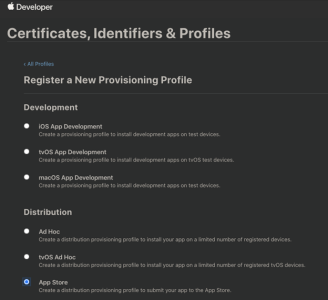
-
In the dropdown, select the relevant app ID, and click Continue.
If multiple certificates are shown, make sure to select the correct one.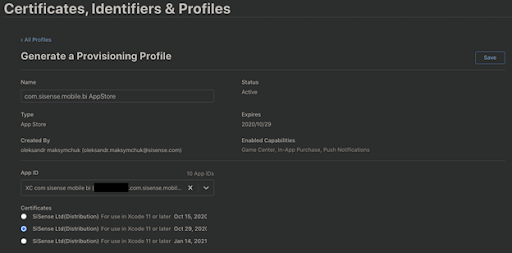
-
Check that the expiration date matches. This is important in case you want to export *.p12 Distribution certificates from Keychain.


-
Click Download to save your provision file.
-
- Install .cer and Generate a .p12 Certificate
-
Locate the .cer file you downloaded in the previous stage and double-click it.
-
Set the Login dropdown to login and click Add .
-
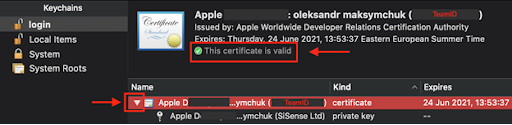
Open Keychain Access and locate the profile created in the first stage of this procedure.
Important:
Make sure that the certificate is “trusted” and “valid”. If not, you won't be able to export it in p12 format.
-
Expand the private key profile to display the certificate you added.
-
Select the private key and the certificate. Do not select the public key.
-
Right-click the selection and select Export 2 items.
-
Make sure that the file format is .p12 and enter a filename and destination on your local computer.
-
Click Save.
-
Set a password and click OK.
-
- Upload the .p12 Certificate to FireBase
-
Navigate to https://console.firebase.google.com/u/0/project.
-
Click Add a project.

-
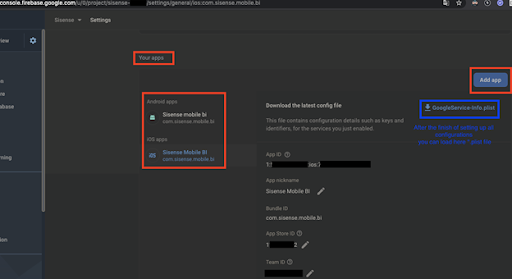
Add the following details:
- Project name
- iOS bundle ID
The same as you mentioned in the Sisense Mobile Checklist.

- App Store ID.
You can find your App Store ID in your app’s URL. In the following example, the App Store ID is 123456789:
https://itunes.apple.com/us/app/yourapp/id123456789
-
Add your Android and/or iOS apps and check if all configurations are set correctly.
-
When you have uploaded your Development APNs certificate and have configured all the settings, download the .plist file.
-
To enable sending push notifications:
- Create an Auth Key or Certificate in the Apple Developer Member Center
- Navigate to https://developer.apple.com/account/resources/certificates/add.
- In the Certificates, Identifiers and Profiles page, click Certificates > Add.

You can now use one certificate for both the sandbox and production environment.
- Install the .cer and export the .p12 with keystore in the same way as was done when signing the certificate.
-
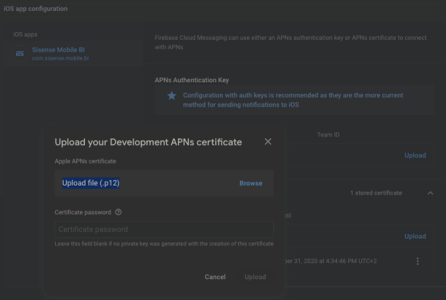
Navigate to https://console.firebase.google.com/u/0/project/YOUR_PROJECT_NAME.
-
Click Settings > Cloud Messaging > iOS App Configuration > APNs Certificate.
-
In the Upload your Development APNs certificate section, upload your .p12 file.
- Create the Authentication Key (Optional)
-
Generate an authentication key for an App ID enabled for push notifications. If you have an existing key, you can use that key instead of generating a new one.
-
In your developer account, navigate to Certificates, Identifiers & Profiles.
-
In the Keys section, select All.

-
In the upper-right corner, click Add +.
-
Enter APNs Auth Key description.
-
Under Key Services , select the APNs checkbox and click Continue .
-
Click Confirm and then Download.
Important:
Save your key in a secure place. This is a one-time download and the key can't be retrieved later.
-
To verify that your APNs authentication key is set up properly and is accepted by APNs, send a test push notification.

-
Sisense Mobile Upgrades
Sisense regularly releases updates for Sisense Mobile. Sisense will periodically (about once a quarter) notify you when an upgraded rebranded version is available, and you can choose whether to upload the app to your store or not.
To apply the upgrade, you might need to regenerate certificates, based on their expiration date.
Sisense performs a full QA cycle on all upgrades, but recommends that you test every version of your application before publishing.
For instructions on how to publish, see Resources for Publishing Your Application.
Contact us at rebranded_mobile@sisense.com for any technical questions related to this process.
Resources for Publishing Your Application
Use these resources to help you learn how to publish and republish your application:
Android *.apk
IOS *.ipa
- https://developer.apple.com/app-store/review/guidelines/
- https://help.apple.com/app-store-connect/#/dev34e9bbb5a
Loading the *.ipa file without TestFlight
.r.