Migrating Dashboards in Sisense
There are several ways to migrate dashboards to other Sisense environments:
- Migrating Dashboards in Sisense (Recommended - described below)
- Migrating Dashboards via REST API
- Exporting and Importing Dashboards
The easiest way is to migrate the dashboards through Sisense as described below, however, if you want to implement version control for your dashboards, you may prefer to export .dash files that represent your dashboards in Sisense.
Administrators and Designers with access to a remote Sisense server can copy dashboards from one Sisense server to another from the Sisense Web Application. When you copy a dashboard or a folder to a remote server, all the dashboards, including those in the selected folders are duplicated into the main Navigation Pane in the target server. Folders are not duplicated on the target server.
Before copying a dashboard to a target server, the Administrator of the target server must provide access to target server. The procedure below explains how to provide access to another server and then how to copy a dashboard from the source server to the target server through the Sisense Web Application.
Note:
When migrating a dashboard to another server, you must be logged in to your local server with the IP address as the URL. You cannot copy dashboards from localhost.
To copy your dashboard to another Sisense server:
-
On the target server, the Administrator needs to provide access for the source server to the target server. On the target Sisense server, select Admin > Trusted Server List.

The Trusted Server List page is displayed.
-
In the Trusted Server List page, click Add Server. The Create a New Server Access dialog box is displayed.

Note:
Some of the dialog boxes may be considered as pop-ups by your ad blockers. Make sure that Sisense is whitelisted or that your ad blocker is disabled when performing this procedure.
-
In the Server field, enter the IP address or hostname of the source server that contains the original dashboard.
-
In the Name field, enter a name for the source server. This is an optional identifier to help you keep track of your servers.
-
Click OK. The server is added to the list and now has copy access to the target server.
-
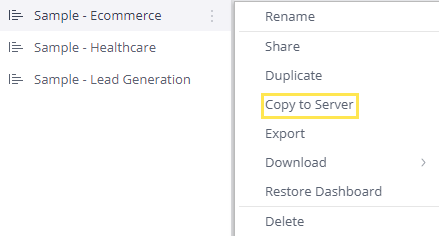
On the source server, from the Navigation Pane, click the dashboard’s menu and click Copy to Server.
OR
To copy multiple dashboards, in the Dashboards list, click the Select Dashboards
 button to display checkboxes next to the dashboard and folders, which allows you to select multiple dashboard to be exported. Then, select the relevant dashboards and folders to be exported and click
  . The Copy Dashboards to Server dialog box is displayed.
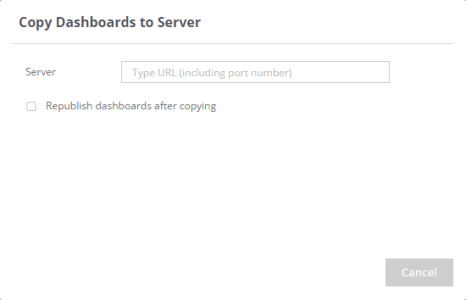
-
In the Copy Dashboards to Server dialog box, enter the following information:
Server: The URL or Hostname of the remote server. Sisense supports SSL connections so dashboards can be transferred securely when SSL is activated.
Republish dashboards after copying: Select to automatically republish the dashboard on the target server after the selected dashboards are copied. Republishing a dashboard refreshes the dashboard definitions (widget types, titles, scripts etc.) for each of the users who share the dashboard.
-
Click OK.
-
If the dashboards already exist on the recipient server, Sisense prompts you to select how you want to handle each dashboard that already exists. You can select one of the following options for each dashboard:
- Skip: No changes are made to the dashboard on the recipient server.
- Overwrite: The new dashboard writes the existing dashboard on the recipient server.
- Duplicate: A new dashboard is created on the recipient server with a number added to the end of the dashboard’s title, for example, “Sample Dashboard (1)”.
After you have defined how the dashboards are to be handled, the selected dashboards are copied to the remote server and displayed in the Dashboard’s list.
Once the copy is completed, you may need to update the data source for your dashboard or set data security rules for your ElastiCube (see the links below for detailed documentation):
Next Steps
.r.