Google Authentication
When you connect to Google from Sisense , you can authenticate your account with your Google credentials if you are working from the localhost. If however, you are connecting remotely to the Sisense server, and the address of the Sisense Web Application is something other than localhost, Google requires that you connect using the OAuth 2.0 protocol. The OAuth 2.0 authorization framework enables a third-party (Sisense) to obtain limited access to an HTTP service such as Google Sheets.
To connect to Google Services through a remote Sisense server, you need to create a Google application to obtain OAuth 2.0 client credentials from Google and then add those credentials to a manifest file on your Sisense server.
See the tutorial below for a full walkthrough of the process for creating a Google app and for configuring your Google connector.
Important:
If Oauth is not configured according to the instructions in this document, you will receive an “Error 400 - Invalid_request: device_id and device_name are required for private IP”.
Creating a Google Application
Google OAuth 2.0 requires you to create a Google API Console project and set up authorized JavaScript origins and redirect URIs. Sisense has built-in credentials for the default Google application so you can connect from localhost. For security reasons, you should create and set up your own Google application to support the Google OAuth 2.0 protocol. Your Sisense Administrator needs to configure it one time (for each connector with OAuth 2.0 authorization flow after each installation). The Google OAuth2.0 flow will work for all users after it.
To create a Google application:
- Go to the Google API Console.
- Select an existing project or create a new one by selecting CREATE PROJECT.

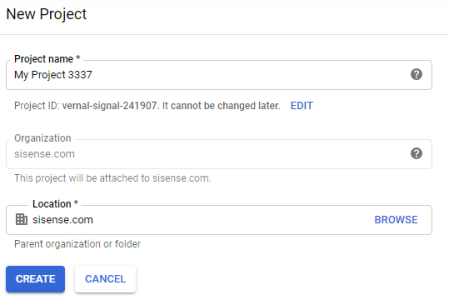
If you are creating a new project, go to Step 3. If you select an existing project, go to Step 4. - In the New Project area, define a project name and select a location. Click CREATE PROJECT

- Click CREATE.
- The API Library opens. Click ← API Library on the top left to close it.
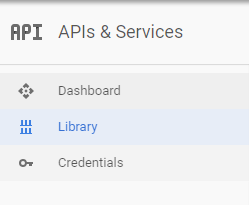
- In the sidebar under “APIs & Services”, select Credentials.
- If this is a new project, click CONFIGURE CONSENT SCREEN.
- In the OAuth consent screen, select the user type:
- Internal: only for users in your organization
- External: for any user with a Google account
- Click CREATE.
- In Application type:
- Public: to grant access to the scopes required by this app
- Internal: to grant access to the scopes required by this app only to users in your organization who have a Google account
- In Application name, enter Sisense.

- In Application logo, upload an image to be the logo for your app.
- In Support email, enter the email address for user support.
- In Scopes, click Add scope and add the necessary scopes.
Scopes are used to grant an application access to only the required Google services. To find out which scopes you need:- On the computer with Sisense installed, navigate to
C:\Program Files\Sisense\DataConnectors\JVMContainer\Connectors. - Open the folder for the Google service you require, such as Google Analytics.
- Open the manifest.js file.
- Search for the word “scope”.
- The search result will show you the scopes required for the connector. For example:
"scope": "http://www.googleapis.com/auth/analytics.manage.users.readonly http://www.googleapis.com/auth/analytics.readonly http://www.googleapis.com/auth/userinfo.profile http://www.googleapis.com/auth/userinfo.email",
- On the computer with Sisense installed, navigate to
- In Authorized domains , enter the domains from where you will connect to the Google API, for example, yourcompanyname.com. Then click Save.
Note:
If you are configuring remote access for SSL setup servers (https://), make sure that both the authorized domain and the callback URL are configured with the https prefix.

- In the sidebar, click Credentials.
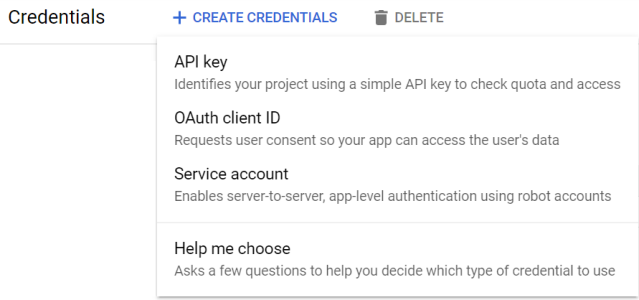
- Click + CREATE CREDENTIALS and select OAuth client ID.

- Under Application type, select Web application (more information here ). In the Name field, you can enter the name you will see in the console.
- In the Authorized JavaScript origins field, enter the origin for your app – a unique combination of protocol, hostname, and port. You can enter multiple origins to allow for your app to run on different protocols, domains, or subdomains. You cannot use public IP addresses, wildcards, paths and trailing slashes. Do not use localhost for production for security reasons (only dev, test and staging environments).
Examples of correct origins:
http://localhost:8080http://myproductionurl.example.com
- The Authorized redirect URI is the path in your application that users are redirected to after they have authenticated with Google. The path will be appended with the authorization code for access.
Note:
- Must have a protocol
- Cannot contain URL fragments or relative paths
- Cannot be a public IP address
- The redirect URI must match the client side domain and be added to console APIs or you will get a redirect_uri_mismatch error.
Note:
If you are configuring remote access for SSL setup servers (https://), make sure that both the authorized domain and the callback URL url are configured with the https prefix.
Google Sheets
http://APP_URL/oauth/R29vZ2xlIFNwcmVhZHNoZWV0cw==/callback
Google Analytics
http://APP_URL/oauth/R29vZ2xlQW5hbHl0aWNz/callback
Google Ads
http://APP_URL/oauth/R29vZ2xlQWR3b3Jkcw==/callback
Google BigQuery
http://APP_URL/oauth/R29vZ2xlQmlnUXVlcnk=/callback
For Sisense it should be in this format:http://APP_URL/oauth/R29vZ2xlIFNwcmVhZHNoZWV0cw==/callback
where '/oauth/R29vZ2xlIFNwcmVhZHNoZWV0cw==/callback' is a hardcoded immutable string.
For example:http://APP_URL/oauth/R29vZ2xlIFNwcmVhZHNoZWV0cw==/callback
where the base URL is:'http://APP_URL/reporting' The origin for this base URL will be 'https://APP_URL'.
Note:
The Google OAuth2.0 redirect URL does not allow spaces, so Sisense has encoded the provider’s name (Google Spreadsheets) into the base64 format – R29vZ2xlIFNwcmVhZHNoZWV0cw==. If you want to use another OAuth2.0 connector, you should add a redirect URL with the appropriate base64 encoded provider’s name.
- Click Create.
- In the sidebar under “APIs & Services”, select Library.

Search for the relevant Google API, open it and click Enable(note that the first three are required if connecting to Google Sheets).- Google Drive API
- Google Cloud Storage JSON API
- Google Sheets API
- Google Analytics Reporting API (this one is enabled by default, but it can be disabled if you have custom configuration in your project)
- From the resulting OAuth client dialog box, copy the Client ID and Client Secret. Add these credentials to a manifest file described in the following section Configuring your Google Connector, below. You may experience a delay of up to five-minutes while Google applies your application’s settings.
Configuring your Google Connector
After you have created an application and retrieved the credentials, add those credentials to a manifest file in your Sisense server.
To set up Google Sheets connector to work with your application, you should add your Client ID and Client Secret into the connector’s manifest.
- Open the manifest file in a text editor. The exact path depends on which version of Sisense you have.
Google Analytics:C:\Program Files\Sisense\DataConnectors\DotNetContainer\Connectors\GoogleAnalytics
OrC:\Program Files\Sisense\DataConnectors\JVMContainer\Connectors\GoogleAnalytics
Google Sheets:C:\Program Files\Sisense\DataConnectors\JVMContainer\Connectors\Google Spreadsheets\manifest.json
OrC:\Program Files\Sisense\DataConnectors\JVMContainer\Connectors\Google Spreadsheets\manifest.json - In the manifest.json file, find the OAuth2 block.
- Add your clientId and clientSecret fields that you received when you created your Google app:
`"oAuth2": { "authUrl": "https://accounts.google.com/o/oauth2/v2/auth", "tokenUrl": "https://www.googleapis.com/oauth2/v4/token", "scope": "https://www.googleapis.com/auth/spreadsheets.readonly https://www.googleapis.com/auth/drive.readonly https://www.googleapis.com/auth/userinfo.profile https://www.googleapis.com/auth/userinfo.email", "clientId": "YOUR_CLIENT_ID", "clientSecret": "YOUR_CLIENT_SECRET", "returnedValues": { "refreshToken": "dToken", "accessToken": "appKey", "userEmail": "userEmail" } }` - Save the file. You don’t need to restart Sisense; all changes will be re-read on the fly.
LIMITATIONS
Sisense has one Google specific limitation in addition to base OAuth2.0 flow limitations:
- You cannot use public IP addresses (e.g.http://172.29.108.109) for the Google OAuth2.0 flow. Google does not accept an IP address when doing OAuth or API calls. Default Google applications will work only with localhost (e.g. http://localhost, http://localhost:port, https://localhost, https://localhost:port). For working with domains (e.g. http://APP_URL.example.com, https://APP_URL.example.com) you should correctly set up your personal Google application.
.r.