Customizing User Roles
This topic describes how to customize the permissions given to the Sisense user roles, using Sisense’s REST API .
Sisense User Roles to learn more about each role type.
For a short video tutorial, see below:
Customizing Roles
You can customize the default roles with Sisense ’s REST API, by defining which permissions to enable or disable for each role. For example, you can prevent a user from drilling into widgets, or exporting data to a CSV file. On the other hand, you may want to let viewers change the widget type and format the style.
The following table lists all the actions that you can customize using the API. 'True' and 'False' indicate values that you can change. 'Never' indicates values that you cannot change.
Dashboards
| Dashboards | Admin | Data Admin | Data Designer | Designer | Viewer |
|---|---|---|---|---|---|
| create Create a new dashboard. |
True | True | True | True | Never |
| duplicate Duplicate an existing dashboard. |
True | True | True | True | False |
| change_owner Change the dashboard' owner. |
True | True | True | True | False |
| toggle_edit_mode Select between Layout and View modes in the dashboard. Layout mode is the default mode in which you can add new widgets and rearrange them on the dashboard. In View mode, the dashboard cannot be rearranged or edited. |
True | True | True | True | False |
| edit_script Edit a dashboard using the Sisense JavaScript API. |
True | True | True | True | Never |
| export_dash Export a dashboard as a .dash file that can be imported back into Sisense. |
True | True | True | True | Never |
| export_jpeg Download a widget as an image in PNG format. The downloaded image represents the current view. |
True | True | True | True | True |
| export_pdf Export the dashboard to PDF format. The exported file includes the current view. |
True | True | True | True | True |
| restore Revert changes made in the dashboard to the latest dashboard that was shared. |
True | True | True | True | True |
| copy_to_server Copy the dashboard to another server. |
True | True | True | True | False |
| import Import a .dash file into the Sisense Web Application. |
True | True | True | True | Never |
| select_palette Change the selected color palette. |
True | True | True | True | Never |
| replace_datasource Select a new data source for a dashboard. |
True | True | True | True | Never |
| undo_import_dash | True | True | True | True | False |
| Filters | |||||
| create Create a new filter. |
True | True | True | True | False |
| on_off Switch filters on or off. |
True | True | True | True | True |
| toggle_expansion Enable the expansion of filter settings to see more filter parameters. |
True | True | True | True | True |
| toggle_auto_update Include the option to update the dashboard following every change |
True | True | True | True | False |
| modify_type Include in the filter options 'Ranking', 'Starred', and 'Text', in addition to 'List'. |
True | True | True | True | False |
| set_defaults Include in the dashboard menu the option to set the dashboard filters as the default filters for the dashboard. |
True | True | True | True | False |
| advanced Include the Advanced menu option for creating custom filters. |
True | True | True | True | False |
| use_starred Include the option to use filters that have been starred |
True | True | True | True | False |
Widgets
| Widgets | Admin | Data Admin | Data Designer | Designer | Viewer |
|---|---|---|---|---|---|
| create Create a new widget. |
True | True | True | True | Never |
| delete Delete a widget. |
True | True | True | True | False |
| rename Rename a widget. |
True | True | True | True | False |
| duplicate Duplicate a widget. |
True | True | True | True | Never |
| copy_to_dashboard Copy a widget to a dashboard. This functionality allows you to drag and drop widgets to additional dashboards in your Navigation Pane. |
True | True | True | True | False |
| edit_script Edit a widget using the JavaScript API. |
True | True | True | True | Never |
| change_type Change the chart type. |
True | True | True | True | False |
| export_csv Export a widget's data to a CSV file. |
True | True | True | True | True |
| export_png Download a widget as an image in the PNG format. The downloaded image represents the current view. |
True | True | True | True | True |
| modify_selection_mode Enable the option to change the filter behavior between 'Slice' (only filtered items are included in the chart) and 'Highlight' (filters items are highlighted). |
True | True | True | True | False |
| drill_to_anywhere Enable the option to drill down into a filed to get an in-depth view of a selected value. If False, the user can only drill down with predefined drill hierarchies (if defined). |
True | True | True | True | True |
| add_to_pulse Include the option to add a widget to Pulse if the widget type is supported. |
True | True | True | True | True |
| Items | |||||
| reorder Reorder the fields and values in the data panel and their representation in the chart. |
True | True | True | True | False |
| modify_type Enables the option to edit values and categories in the data panel. |
True | True | True | True | Never |
| on_off Enable the option to turn fields on or off in the widget. |
True | True | True | True | True |
| select_hierarchies Include the option to select pre-defined hierarchies. |
True | True | True | True | False |
| Filters | |||||
| on_off Switch filters on or off. |
True | True | True | True | False |
| toggle_expansion Enable the expansion of filter settings to display more filter parameters. |
True | True | True | True | True |
| modify | True | True | True | True | False |
| modify_type Include in the filter options 'Ranking', 'Starred', and 'Text', in addition to 'List'. |
True | True | True | True | False |
| use_starred Enables the option to star (bookmark as favorite) a filter selection. |
True | True | True | True | False |
ElastiCubes
| ElastiCubes | Admin | Data Admin | Data Designer | Designer | Viewer |
|---|---|---|---|---|---|
| sql_api Access the SQL API |
True (Cannot be modified) |
True (Cannot be modified) |
False | False | False |
An additional object is not displayed in the Sisense REST API, however, you can still toggle these features through the POST /roles/{idOrName}/manifest/{path} endpoint.
The value of path should be in the format of manage/elasticubes/[value], where [value] is the feature listed in the table below.

| ElastiCubes | Admin | Data Admin | Data Designer | Designer | Viewer |
|---|---|---|---|---|---|
| add Allows the user to add new ElastiCubes. |
True | True | True | False | False |
| schedule_build Allows the user to schedule builds for an ElastiCube. |
True | True | True | False | False |
| modify_data_security_rights Allows editing the row-based data security permissions. |
True | True | True | False | False |
Changing Permissions
To change permissions for a user role:
-
In the Sisense , click Admin at the top-right of the screen, and then REST API in the left menu to view the API documentation.
-
In the API Documentation, select version 0.9 on the top-right of the screen.
-
Click roles to access the different API operations related to roles.
-
Open the operation that you require (see Examples below), and then click Test It Out.
-
In the list of fields that opens, enter or select the required parameters.
your title goes here
The API uses a previous terminology for Designers and Viewers. When entering the role name into the operation parameters, enter 'contributor' for the Designer role, and 'consumer' for the Viewer role.
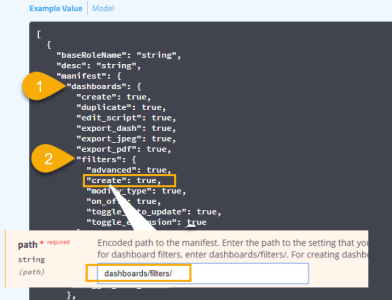
When changing a permission for a role, you must use the Path parameter, which defines the relative path to the permission you want to change in the hierarchy of permissions. To view the current hierarchy of permissions, scroll down to the Example Value in the Responses section. For example, to change the ‘Create’ setting for dashboard filters, enter 'dashboards/filters/'. To create dashboards, enter 'dashboards/'.
Append your path with the "/" symbol.

-
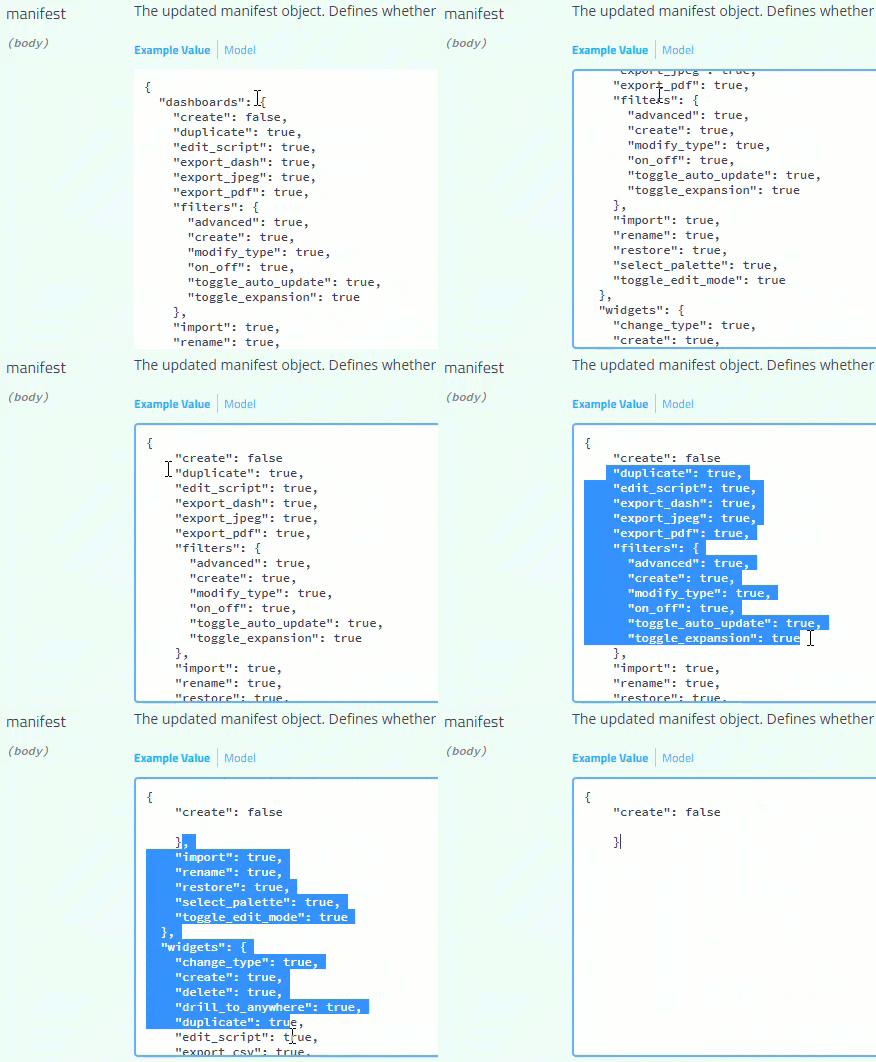
When changing a permission for a role, go right into the list of permissions in the Manifest parameter, and type in the desired permission (for example, change 'true' to 'false').

Then remove everything else from the list of permissions, including the heading ("dashboards":), the extra brackets and the extra commas.

-
Click Execute to apply the changes.
-
Scroll down to the Responses section to verify that the response has no errors.
Once you have no errors, your change is applied to all users assigned the relevant role.
Examples
Here are some examples of what you can do:
| See all permissions for all roles |
Method: Get /roles Parameters
Example API Call
|
| See all settings for a specific role |
Method: GET /roles/{idOrName} Parameters
Example API Call
|
| Change a specific setting for a specific role |
Method: PUT /roles/{idOrName}/manifest/{path} Parameters
Example API Call
|
| Restore a specific setting for a specific role |
Method: DELETE /roles/{idOrName}/manifest/{path} Parameters
Example API Call
|
| Restore all settings for a specific role |
Method: DELETE /roles/{idOrName}/manifest/{path} Parameters
Example API Call
|
.r.