Creating Relationships between Live Tables
Relationships specify the connection between tables and enable you to pull data together in meaningful ways. For example, order information is more useful when you know which customer placed each order.
However, you don’t need to store both the customer and order information in the same table. Customer and order data can be stored in two related tables with a relationship specified between the two tables to view each order and its corresponding customer information.
In practical terms relationships allow you to query and combine data from multiple tables in your dashboard.
When you connect to a data source such as Amazon Redshift, which has multiple schemas, you can select tables from each schema in the Add Data Wizard so long as the tables aren’t the same. When you add these to your model, each table is displayed as a single node that can be joined to other nodes.
If you export the schema later, you cannot import the schema into a Sisense Windows environment.
Notes:
Sisense recommends creating relationships between tables on high-performance databases. If enabling this for other databases, Sisense recommends testing the dashboard performance to ensure that it is not impacted before publishing the dashboard to your users.
To manually create a relationship between tables:
-
Drag a table with the relevant field onto another table with the relevant field.
The Relationship preview window is displayed.
-
Click the columns to be joined from each table. Ensure both fields that you are using to create the relationship are of the same type, for example decimal fields.
-
To check or change the field type, in the left pane, click the field type of the field you want to change and select the new type from the list of possible types displayed below it.
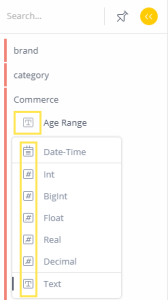
-
Click Save to join the tables.
To delete an existing relationship:
- Click on any part of the existing relationship. The Delete icon is displayed.
- Click
 to delete the relationship.
.r.