Connecting to CSV
Sisense enables easy and quick access to tables contained within CSV files.
There are two options for uploading data, the first is to upload your file to the Sisense Server. Once the file is uploaded, the data will be imported into the ElastiCube as it was at the time the file was uploaded.
The second option is to define the location of your files on the Sisense Server. This is the preferred option if your Excel files frequently change, but remain in the same location on the Sisense Server as the data is taken from the Excel files each time the ElastiCube is built.
When you import multiple files from a folder and build your ElastiCube , the data is combined together in a single table. To build multiple tables with separate tables for each file, you must repeat the process for each file you want to import as a table.
Notes:
- Make sure that all the files adhere to the same structure, including the presence or absence of headers in the first row. Files will be added to the table based on their file names in alphabetical order.
- When you import multiple files from a folder and build your ElastiCube , the data is combined together in a single table. To build multiple tables with separate tables for each file, you must repeat the process for each file you want to import as a table. If you have any questions about data accumulation between builds, contact Sisense Support.
- If your CSV file contains special symbols or foreign characters, the import process may fail. To resolve this issue, convert the CSV file to the UTF-8 format. One way to do this is to open the .csv file in an application like Notepad, and then select File > Save As. At the bottom of the dialog box, open the Encoding settings, select UTF-8 and save the file as a new file.
To import data from your CSV files:
- In the Data page of ElastiCube Manager , open an ElastiCube or create a new ElastiCube .
- In the ElastiCube, click
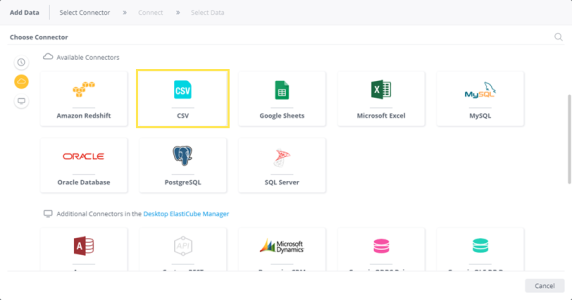
 . The Add Data dialog box is displayed.
- Click CSV to open the CSV settings.

Note:
Server Access is disabled by default.
- Select the relevant option for importing your data:
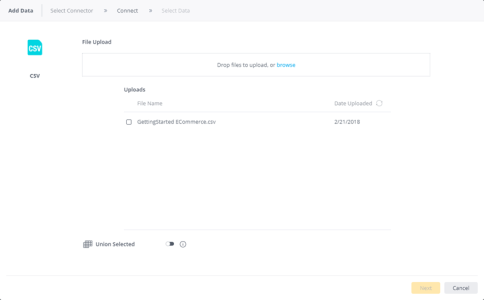
File Upload- Select this option to import your data from your CSV file. If the file is updated later, you'll need to upload it again. To upload the file, click Browse and navigate to the file to be uploaded or drag the CSV file to the File Upload area.

The uploaded file is added to the Uploads list. You can delete the file by clicking and confirming you want to delete the file.
 - Select the relevant CSV file(s) to be uploaded.
- (Optional) Toggle the Union Selected switch to append several CSV files together when the data is imported into the ElastiCube . The data in the files must have the same column and data types.
- After you have finished uploading the relevant CSV files, select them from the upload list and click Next . Continue to Step 5.
- Server Access
This is a security option that helps you mitigate Local File Inclusion (LFI) attacks. Attackers could attempt to provide the application with a full input file path outside the current working directory. This could allow them to see the contents of other files stored on the computer running Sisense . To prevent this, you can define specific paths and folders for CSV and Excel files on the Sisense server.
- Select this option to define the location of your files on the Sisense Server if your CSV files frequently change, but remain in the same location on the Sisense Server as the data is taken from the CSV files each time the ElastiCube is built.
- Select Input Folder Path and enter the full file path with the file name where your Excel files are located. This will display each Excel file in the folder in the next screen where you select what tables to add to the ElastiCube.
OR
Select Input File Path and enter the full file path with the file name and its extension of your CSV file. For example, C:\Example.csv. This file display all the tables in the CSV file on the next screen where you select what tables to add to the ElastiCube . - (Optional) Toggle the Union Selected switch to append several Excel files together when the data is imported into the ElastiCube . The data in the files must have the same column and data types.
- After you have finished defining the locations of your CSV files, click Next and continue to Step 5. A list of CSV files in the directory are displayed.
- Select this option to import your data from your CSV file. If the file is updated later, you'll need to upload it again. To upload the file, click Browse and navigate to the file to be uploaded or drag the CSV file to the File Upload area.
- From the Select Table list, click
 to select preview the columns in the Excel file and display the Settings, which provides more options for customizing your data.
 - In the Settings area, define the following settings:
- Culture: Select the culture for your CSV. This defines settings such as the format of the date and time or delimiter (decimal or comma) used in your CSV file.
- Text Qualifier: Change the value if necessary.
- First Row Contains Field Names: Enables you to specify table column names based on the header in the first row of the spreadsheet.
- Delimiter: Allows you to choose the character that separates values within the CSV file.
- Ignore Rows that Start: Specify rows to ignore that start with a specific symbol, value or letter.
- Ignore Rows that Contain: Specify rows to ignore that contain a specific symbol, value or letter.
- Ignore First Rows: Specify a number of first rows to ignore.
- After you have selected all the relevant tables, click Done. The tables are added to your schema in Sisense.
BaseURL and File Uploads
If you have implemented BaseURLs with Nginx, the maximum CSV or Excel file size you can upload is 1.5mb. To upload files larger than 1.5mb, you need to add the following line of code to your ngnix.conf file located on the Sisense Server:
client_max_body_size 220M;
Where <200M> is the size in megabytes that you want to allow.
Note:
The location of the ngnix.conf file depends on where you installed NgnixThis line should be added to the server object as shown below:
| Before | After |
|---|---|
| location ~/reporting(/.*)$ { set $path $1; proxy_pass http://127.0.0.1:8081$path$is_args$args; proxy_http_version 1.1; proxy_set_header Upgrade $http_upgrade; proxy_set_header Connection "upgrade"; proxy_set_header X-Real-IP $remote_addr; proxy_set_header X-Forwarded-For $remote_addr; proxy_set_header Host $host; proxy_connect_timeout 6000; proxy_send_timeout 6000; proxy_read_timeout 6000;send_timeout 6000; } } |
location ~/reporting(/.*)$ { client_max_body_size 200M; set $path $1; proxy_pass http://127.0.0.1:8081$path$is_args$args; proxy_http_version 1.1; proxy_set_header Upgrade $http_upgrade; proxy_set_header Connection "upgrade"; proxy_set_header X-Real-IP $remote_addr; proxy_set_header X-Forwarded-For $remote_addr; proxy_set_header Host $host; proxy_connect_timeout 6000; proxy_send_timeout 6000; proxy_read_timeout 6000; send_timeout 6000; } } |
Limitations
- You can't preview data when your columns have multiple brackets [, ]
.r.