Managing Users
Last updated: June 28, 2026
| Tier | Deployment |
|
|
|
To manage users, click the Admin tab and search for Users, which is located under
the User Management section.
1.png)
The Users table lists all the users who have access to your system:
- Username: The user's Sisense username
- Email: The user's email address
- Name: The user's name
- Groups: The groups (if any) that the user belongs to. By default, the System Administrator belongs to the Admins group
- Role: The user role assigned to the user
- Origin: The origin of the user, typically your company name and how the user accesses Sisense, for example AD, SSO, or SAML
- Last Active: The date and time the user was last active in your system
Activity includes opening any of the Sisense tabs, viewing dashboards, working with widgets, or exporting reports. This field is blank if the user has never been active in Sisense. - Days Since Last Active: The number of days that have passed since the user was last active
This field is blank if the user has never been active in Sisense.
Adding a New User
You can add users using the following methods:
- Individually or in bulk
- From your Active Directory database
For more information about configuring Active Directory for Sisense , see
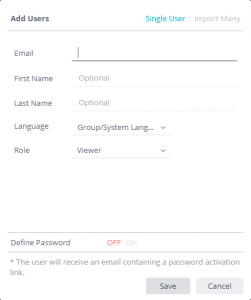
To add an individual user:
-
Click
 .
.
-
Enter the user's email address, first name, and last name.
Sisense supports email addresses without a top-level domain, if that is the standard in your company. -
(Optional) The Language for your account is the language set by an Administrator for your group or server. From the Language list, you can override those settings and select the language you prefer to be displayed in the Sisense .
-
Select the Role of the user:
- Admin: Admins can access the Sisense Admin page to manage ElastiCubes, users, user groups and more. Sisense supports multiple Admin users.
- Data Admin: Data Admins can manage all data sources in the system. They have access to the Sisense Admin page to manage ElastiCube s and Live connections. Data Admins can also add and manage servers. This is useful for migrating Sisense across environments. Data Admins do not have access to User Management and System Configuration.
- Data Designer: Data Designers can create and edit ElastiCube s they created or were shared with them. Data Designers can access the Sisense Admin page to manage the ElastiCube s and Live Connections they have access to in the Data Sources section. Data Designers can see servers, but cannot add new servers. Data Designers do not have access to User Management and System Configuration.
- Designer: Designers can create, design, edit and share Dashboards. Sisense Designers determine whether the user with whom they share a Dashboard has editing rights (is a Designer) or only viewing rights (Viewer).
- Viewer: Viewers can view, explore, drill down, make selections and filter the Dashboards that Designers share with them. Viewers only need a standard web browser (no add-ons or downloads required). They cannot create new Dashboards or edit existing ones.
-
(Optional) Set the Define Password option to ON and enter a password.
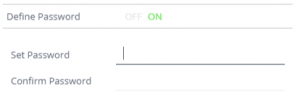
You must personally notify the user of the password that you set for them, which they can change at any time.Note:
You can configure any password policy (length, required characters, etc.) to match the password policy of your company. For instructions, see Managing the Password Policy.
-
Click Save. Sisense sends the new user an email that instructs them to activate their account and set a password.
Adding Multiple Users
If you have set up Sisense to connect with Active Directory, you can add multiple new users.
To add multiple users:
- Click .
- Click Import Many.
- In the text box, enter a comma separated list of emails and click Next.
- Assign user rights to the users that you entered and verify that the user count and permissions match your license.
- Click Add. Sisense sends an activation email to every user you just added.
Editing an Existing User
To edit an existing user:
- Click Admin and select the Users tab on the left.
- Click
 on the right of the user's
entry in the list.
on the right of the user's
entry in the list. - Make the required changes, including:
- Change the user name, email, and language
- Change the user's password
- Add the user to or remove the user from a Group
- Click Save.
Logging in as Another User
Admins, System Admins, and Tenant Admins can start an authenticated session as another user directly from the Users table (Log in as user). This lets you reproduce issues and verify per-user configuration exactly as that user sees it, with a full audit trail and a one-click return to your own session. Every action performed during the session is audited under your own account.
Note:
This feature is enabled by default. Admins can turn it off for the deployment using the Enable impersonation for Admins toggle under Admin > Security & Access > Security Settings > Authentication Settings. For more information, see Security Settings.
Who can be impersonated: An actor can log in only as a user whose role is strictly below their own, following the ladder Super Admin → Admin → Tenant Admin → all other roles (Data Admin, Designers, Viewers, and so on). The Super Admin can never be impersonated. Tenant Admins can impersonate only users within their own tenant. Self-impersonation and nested (chained) impersonation are not permitted.
Local-password, Active Directory, and SSO (SAML/OIDC) users are all valid targets. The support user, internal system/service accounts, and disabled or offboarded users cannot be impersonated.
To log in as another user:
- Click Admin and select the Users tab on the left.
- In the row of the user you want to impersonate, select the Log in as user action.
- In the confirmation dialog, enter a reason for the session (required by default), and confirm.
- The current tab becomes the impersonation session. A persistent banner is shown at the bottom of the screen ("Impersonating <user> — all actions are audited under your account") for the duration of the session.
- To end the session, click Return to admin in the banner. This restores your original admin session and returns you to Admin > Users.
Impersonation sessions are time-limited (30 minutes by default, with a hard cap of 40 minutes) and are subject to per-actor rate limits and a concurrent-session cap. While impersonating, security-sensitive operations are blocked, including changing the user's password, creating Web Access Tokens or API tokens, and resetting multi-factor authentication. The start and end of every session, and every action performed during it, are recorded in the audit logs. For more information, see Audit Logs.
Deleting a User
When you delete a user, their dashboards will also be deleted.
To delete a user:
- Click Admin and select the Users tab on the left.
- Click
 at the right of the user's
entry in the list.
at the right of the user's
entry in the list. - In the confirmation screen, click Delete.