Jump To Dashboard (JTD)
Last updated: June 11, 2026
| Tier | Deployment |
|
|
Jump To Dashboard (JTD) is a Sisense-certified add-on. This means that it comes installed together with Sisense and you do not need to perform any separate download or installation. However, it is disabled by default, and you must enable it (see below) in order to use it.
Overview
The JTD add-on creates shortcuts from a widget in one dashboard to another dashboard via a browser tab or a popup window.
The JTD add-on supports charts, pivots, and indicators. JTD is useful for presenting additional information about specific series on demand by jumping across dashboards without the need to present all of the data in a single dashboard.
To use JTD, you can click a widget, or right-click a value in the widget, and jump to the relevant dashboard.
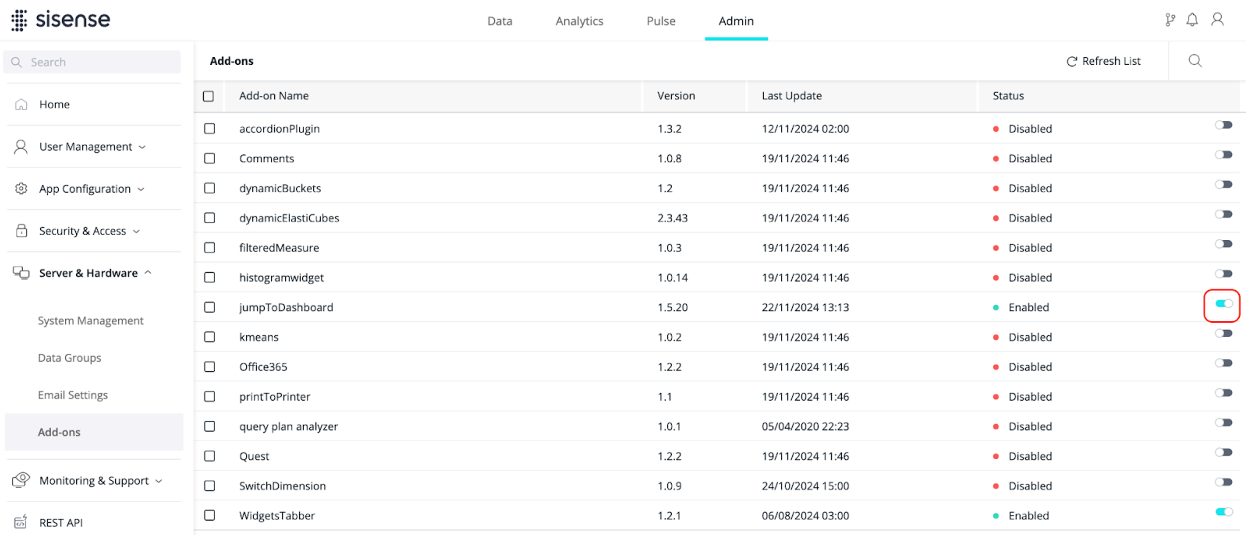
Enabling JTD
Only administrators can enable JTD. To enable JTD:
-
Select the Admin tab.
-
Select Server & Hardware > Add-ons.
-
In the jumpToDashboard row, toggle the switch on.
Using JTD
-
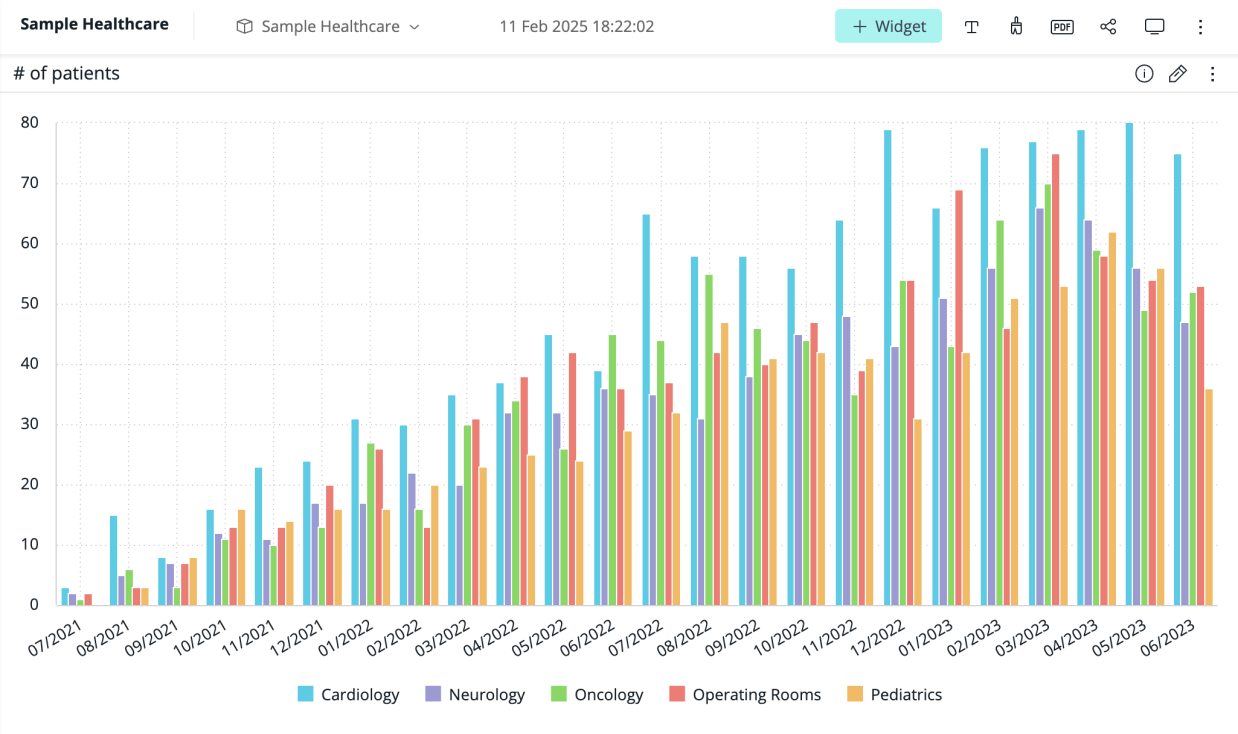
Create a parent dashboard (the dashboard to jump from).
-
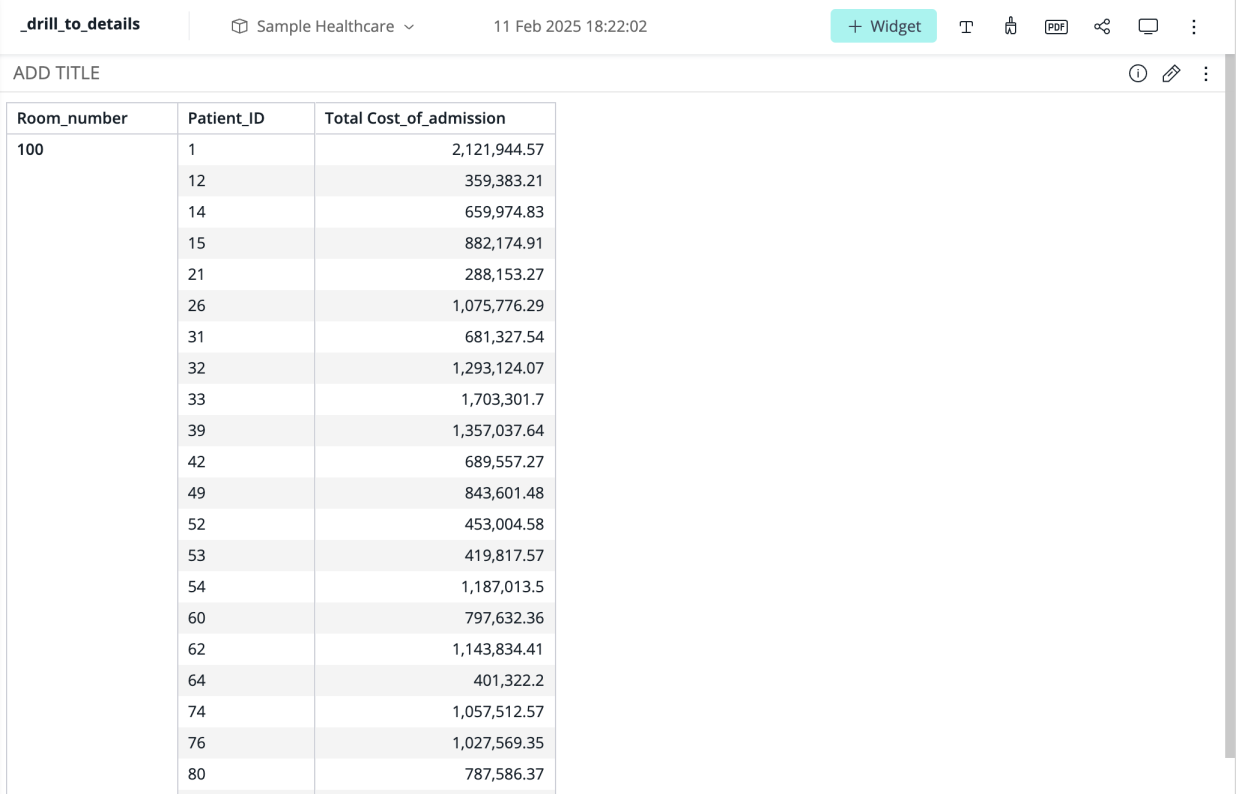
Create a target dashboard you would like to jump to and name it with “_drill_” in the prefix. This prefix ensures that it is displayed in the list of target dashboards which can be jumped to, and also that it is hidden from the list of dashboards in the navigation panel for end users.
Note:
An administrator can set up a different prefix in the global JTD settings. See the Configuring Global JTD Settings section below for more details.
-
In the widget of the parent dashboard that will trigger a jump to action, click
 to open Edit mode.
 -
Click
 > Jump to Dashboard Settings to configure how the target dashboard will be presented to the end users.
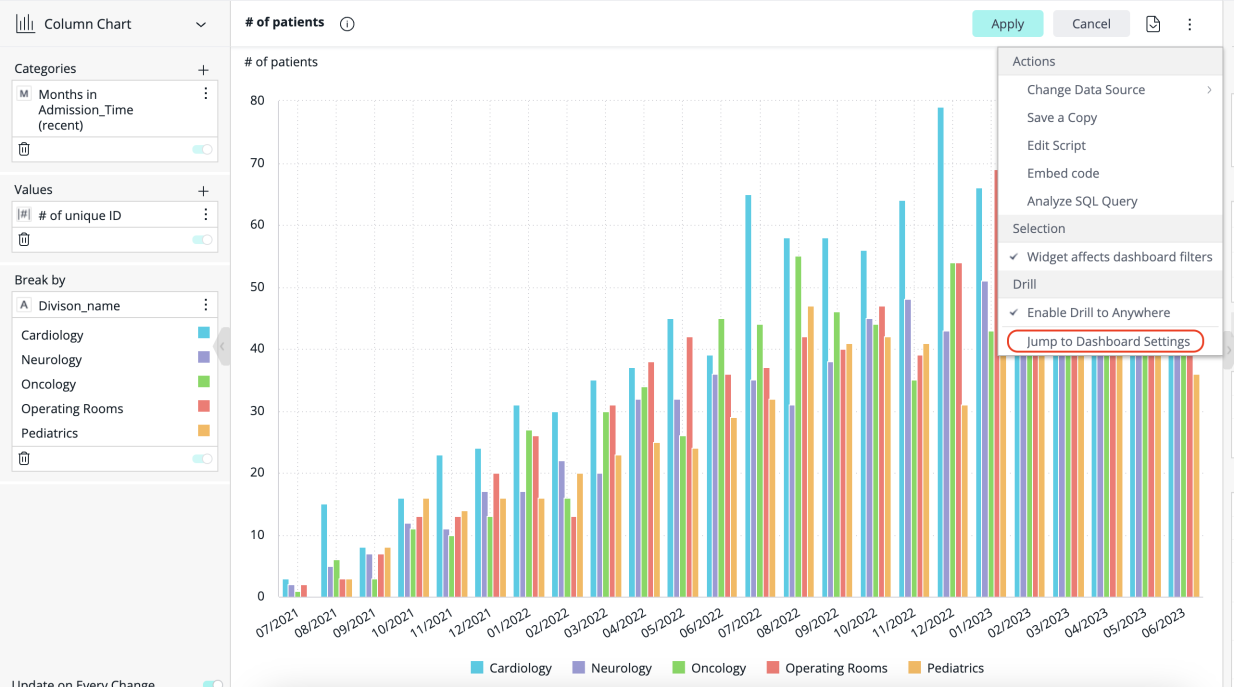
-
Apply the changes and refresh the page.
-
You can now see the
 icon, indicating that a target dashboard that you can jump to exists for this widget. Depending on the widget type, click the widget or right-click a value and select Jump to <name of target dashboard> to jump to your target dashboard.
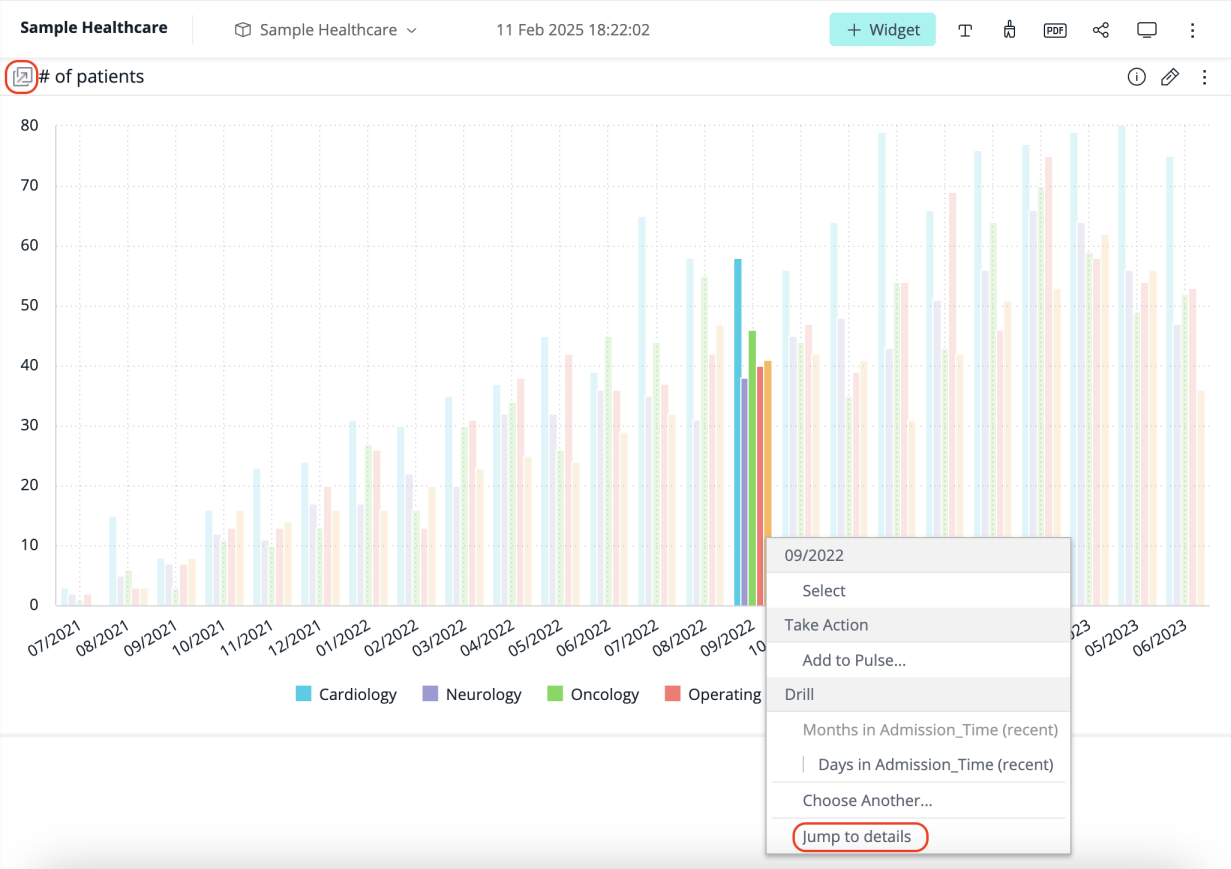
The target dashboard opens, along with a newly created filter for the value that was right-clicked. Depending on your settings, it may also inherit any filters that were applied to the parent dashboard.

Configuring Global JTD Settings
There are two different layers of the JTD add-on customization: the global add-on configuration file and widget-level configuration. The global configuration settings define the default behavior for all target dashboards and can only be modified by administrators.
Some behaviors can be modified per specific target dashboards – see Configuring JTD Per Widget for more details.
Note:
Widget-level customization overrides any configurations defined in the global configuration file.
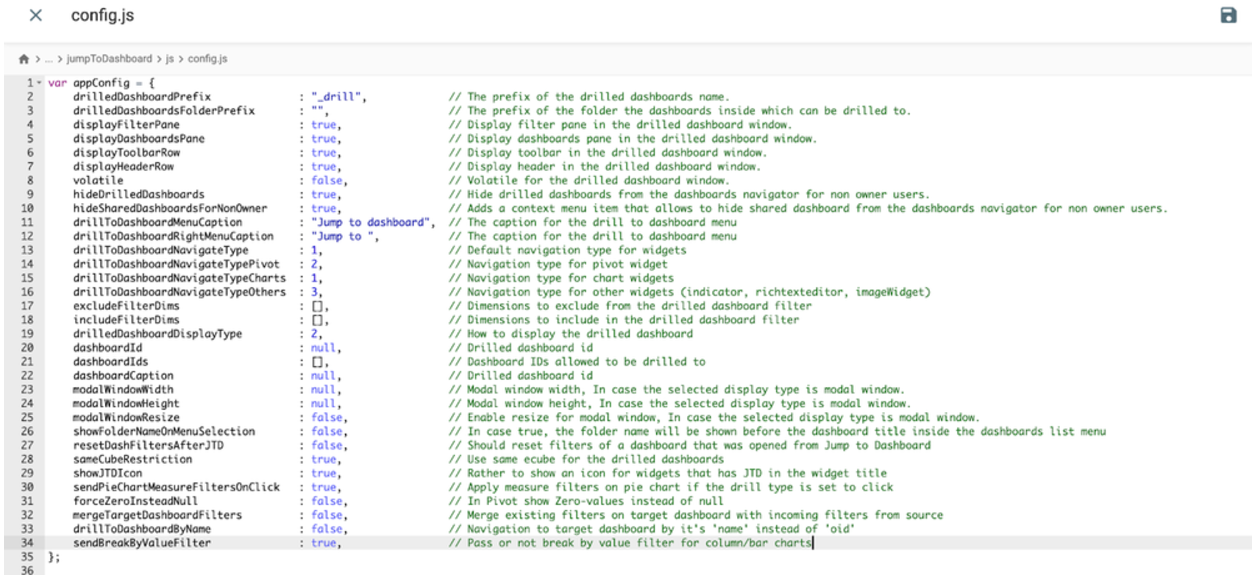
Jump To Dashboard Configuration File
To open the configuration file, click the Admin tab > System Management (under App Configuration) > File Management > plugins > jumpToDashboard > js > config.js.
Examples:
-
If you want to change the prefix "_drill" for your target dashboards, you can modify the value for the
drilledDashboardPrefixparameter and save the file. This will work globally for all target dashboards. -
If you want to jump from one dashboard based on ElastiCube A to another dashboard based on ElastiCube B, set the
sameCubeRestrictionparameter to false.
In the same way, you can modify the default display type for all 'jump to' dashboards at once by modifying this config file.
Note:
The changes in the global configuration settings will only be applied to the UI configuration default settings for new widgets, while the previously created ones will keep their existing settings.
|
Parameter |
Description |
Configured In |
Value Types |
Values |
Widget-level configuration |
|
drilledDashboardDisplayType |
Defines how to display the drilled dashboard. |
Configuration File/Widget |
DisplayTypeId |
Default Value: 2 Possible Values: 1 - New tab 2 - Popup window 3 - Current tab |
✅ |
|
drilledDashboardPrefix |
The prefix in the target dashboard name. |
Configuration File |
String |
Default Value: “_drill_” Possible Values: Any prefix |
⛔ |
|
drilledDashboardsFolderPrefix |
The prefix of the folder, the dashboards inside which can be drilled to. |
Configuration File |
String |
Default Value: null |
⛔ |
|
displayFilterPane |
Determines whether to display the filter panel in the target dashboard window. |
Configuration File/Widget |
Boolean |
Default Value: true |
✅ |
|
displayDashboardsPane |
Determines whether to display dashboards panel in the target dashboard window. |
Configuration File/Widget |
Boolean |
Default Value: true |
✅ |
|
displayHeaderRow |
Determines whether to display the application header in the target dashboard window. |
Configuration File/Widget |
Boolean |
Default Value: true |
✅ |
|
displayToolbarRow |
Determines whether to display the toolbar in the target dashboard window. |
Configuration File/Widget |
Boolean |
Default Value: true |
✅ |
|
volatile |
Does not preserve changes applied to the destination dashboard by a user, such as editing widgets by a Designer, changing sorting, making a selection on a widget, etc. (by a Designer or a Viewer). |
Configuration File/Widget |
Boolean |
Default Value: false |
✅ |
|
hideDrilledDashboards |
Hides drilled dashboards from the dashboards navigator for non-dashboard owner users. |
Configuration File |
Boolean |
Default Value: True |
⛔ |
|
[DEPRECATED*] drillToDashboardMenuCaption * With the addition of UI Configuration settings, this menu is no longer relevant and has been replaced with the ‘Jump to Dashboard Settings’ menu. This parameter will be ignored. |
The caption for the drill to dashboard menu. |
Configuration File |
String |
Default Value: Jump to Dashboard Possible Values: Any |
⛔ |
|
drillToDashboardRightMenuCaption |
The caption for the drill to dashboard right menu. |
Configuration File |
String |
Default Value: Jump to Dashboard Possible Values: Any |
⛔ * The option to change this setting per widget that existed before is now removed. Existing widgets, previously configured via widget script, will keep their configurations. However, new widgets will follow the setting defined in the global configuration. |
|
drillToDashboardNavigateType drillToDashboardNavigateTypePivot drillToDashboardNavigateTypeCharts drillToDashboardNavigateTypeOthers |
Determines how to navigate to the configured drilled dashboard. |
Widget |
NavigateTypeId |
Default Value: 1 Possible Values: 1 – Right-click a pivot cell or a data point in a chart 2 – Click a link in pivot measured cells 3 – Click an indicator widget, text widgets, or image widget |
✅ * Configurable on widget level only for widgets that support multiple navigation options (Line charts, Pivot tables). |
|
modalWindowWidth |
Modal window width when the selected display type is modal window. |
Configuration File/Widget |
Number |
Default Value: null |
✅ |
|
modalWindowHeight |
Modal window height when the selected display type is modal window. |
Configuration File/Widget |
Number |
Default Value: null |
✅ |
|
modalWindowResize |
Enable resize for modal window, in case the selected display type is modal window. |
Configuration File/Widget |
Boolean |
Default Value: false |
✅ |
|
excludeFilterDims |
Dimensions to exclude from the drilled dashboard filter. |
Configuration File/Widget |
Array of DIM |
Default Value: [] Possible Values: “[table.dimension]” |
✅ |
|
includeFilterDims |
Dimensions to include in the drilled dashboard filter. |
Configuration File/Widget |
Array of DIM |
Default Value: [] Possible Values: “[table.dimension]” |
✅ |
|
[DEPRECATED*] showFolderNameOnMenuSelection * With the addition of UI Configuration settings, this menu is no longer relevant and has been replaced with the ‘Jump to Dashboard Settings’ menu. This parameter will be ignored. |
Determines if to show the folder name or not inside the dashboards menu on edit widget mode. |
Configuration File |
Boolean |
Default Value: false |
⛔ |
|
resetDashFilterAfterJTD |
Resets the filters of a target dashboard. Combine this with mergeTargetDashboardFilters if you want your dashboard filters to be displayed in the target dashboard. |
Configuration File |
Boolean |
Default Value: false |
✅ |
|
showJTDIcon |
Determines if you show an icon for widgets that have JTD in the widget title. |
Configuration File |
Boolean |
Default Value: true |
⛔ * The option to change this setting per widget that existed before is now removed. Existing widgets, previously configured via widget script, will keep their configurations. However, new widgets will follow the setting defined in the global configuration. |
|
mergeTargetDashboardFilters |
Determines if you want your dashboard filters to be displayed in the target dashboard. Combine this with resetDashFilterAfterJTD. |
Configuration File |
Boolean |
Default Value: false |
✅ |
|
[DEPRECATED*] dashboardId * With the addition of UI Configuration settings, this menu is no longer relevant and has been replaced with the ‘Jump to Dashboard Settings’ menu. This parameter will be ignored. |
Drilled dashboard ID. When set to null, a drilled dashboard menu will be available in the widget editor. |
Configuration File / Widget |
String |
Default Value: null Possible Values: Dashboard ID |
N/A |
|
dashboardIds |
Multiple target Dashboards. |
Widget |
Array of objects |
[]{id:””, caption:””} |
✅ * For navigation type ‘right-click’, the dashboards can be selected from the list. For other navigation types, only the first dashboard will open. |
|
dashboardCaption |
Drilled dashboard caption. By default, it is the same as the dashboard title. |
Widget |
String |
Default value: null |
✅ |
|
sameCubeRestriction |
Use the same data model for the drilled dashboards. |
Configuration File |
Boolean |
Default value: true |
⛔ |
|
sendPieChartMeasureFiltersOnClick |
If a pie chart has no categories (just measures), when this parameter is set to ‘true’, the measure filter (if any) will be set as a target dashboard filter. |
Configuration File |
Boolean |
Default value: true |
⛔ |
|
forceZeroInsteadNull : false |
Display “0” values instead of “null” in Pivot tables. |
Configuration File |
Boolean |
Default value: false |
⛔ |
|
sendBreakByValueFilter |
If set to ‘true’, a ‘break by’ value will be passed as a filter to the target dashboard. |
Configuration File |
Boolean |
Default value: true |
⛔ |
|
drillToDashboardByName |
Navigate to the target dashboard by its title instead of dashboard ID. That is, the widget-dashboard connection will be established by the dashboard name instead of ID. |
Configuration File |
Boolean |
Default value: false |
⛔ |
|
ignoreFiltersSource |
Remove the datasource object/property from the filter jaql. When a filter does not have a datasource, it is applied to the target dashboard datasource. Make sure that the field used in the filter exists in the target datasource (otherwise, users will get an error). |
Configuration File |
Boolean |
Default value: false |
⛔ |
|
sendFormulaFiltersDuplicate |
Controls the behavior of filters which are set on formulas in the widget. By default ("none"), unique filters on dimensions in a formula are passed to the target dashboard according to "Apply filters to the target dashboard" settings. However, if multiple filters on the same dimension exist in a formula, none of them are passed. An Administrator can specify the configuration value to define the order number of the non-unique filter that should be applied ("1", "4", etc.). In such a case, if the selected filter is not found (for example, if the configuration value is set to 3, but only two non-unique filters exist), the last available filter (e.g., the second one) will be passed to the target dashboard. |
Configuration File |
Number |
Default value: "none" |
⛔ |
Configuring JTD Per Widget
When configuring JTD settings per widget, for each setting for which there is also a global setting, the specific widget settings will override the global settings.
To configure the JTD settings for a widget:
-
In the relevant widget, click
> Jump to Dashboard Settings.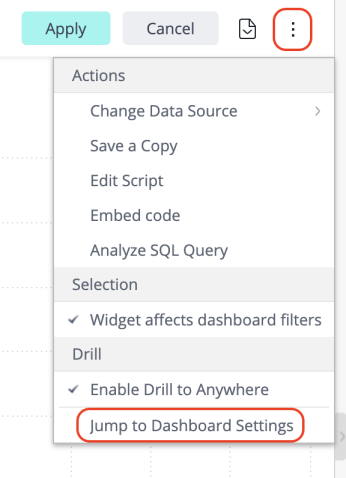
The Jump to dashboard Settings window opens.
-
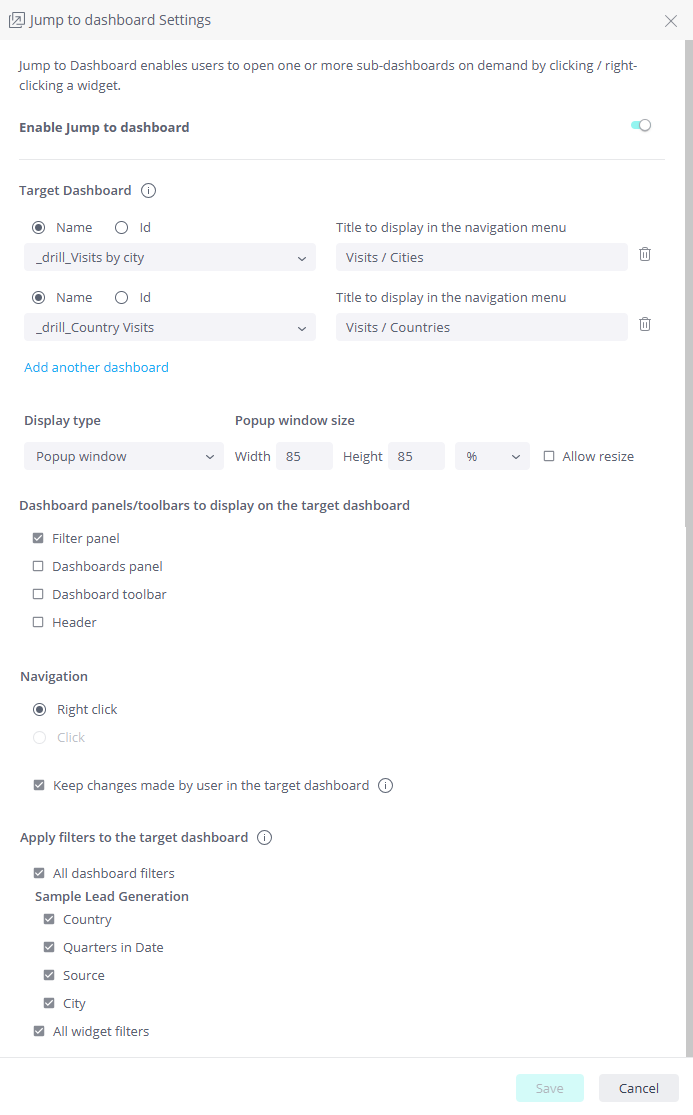
Configure the settings:
-
Enable Jump to dashboard - Toggle to enable/disable JTD. You can configure all of the JTD settings and save them, and they will only be applied when you toggle this setting to enable JTD.
-
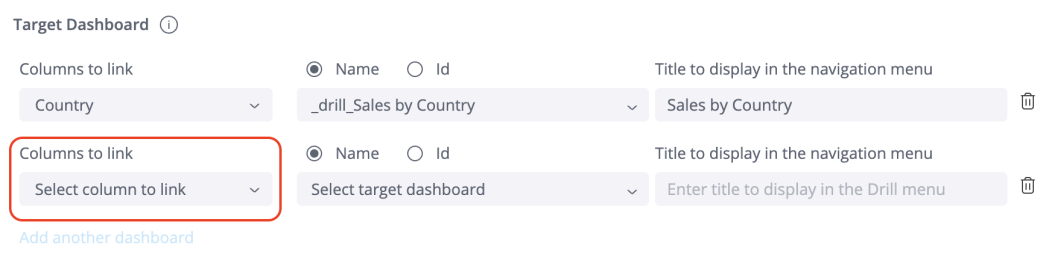
Target Dashboards - By default, there is one target dashboard. You can also have multiple target dashboards, but that requires that your navigation type (see more about that configuration setting below) is "Right-click menu"; if your Navigation type is "Click", you can only have one target dashboard, which is the dashboard you will jump to when clicking on the parent widget. At least one target dashboard must be selected in order to enable the Save button.
You can select the target dashboards by Name or ID:-
Name - Select the target dashboards from the list of dashboards with the "_drill_" prefix.
Note: This prefix can be different, as defined in the global configuration settings.
-
ID - Select the target dashboards by their IDs. They do not necessarily have to have the "_drill_" prefix.
Note:
Both the 'Name' and 'ID' options here are only used to find and select the target dashboard. However, the method of selecting does not affect whether the connection between the parent widget and the target dashboard is made by dashboard name or ID. The connection is determined by the global configuration parameter
drillToDashboardByName. By default, the parameter is False, and the connection will be made by the target dashboard ID. This means that even if the dashboard is renamed, users will still be able to jump to it. WhendrillToDashboardByNameis True, the connection will be made by the dashboard title, even if you selected the target dashboard by typing its ID. Therefore, renaming the dashboard will break the connection if no other dashboard with the specified title is available. -
Title to display in the navigation menu - Set the title to be displayed in the navigation menu. For example, for clarity to the end users you may want to display the existing dashboard name, but without the "_drill_" prefix.
-
Add another dashboard - Add another target dashboard. If you have multiple dashboards, you can select some by Name and some by ID.
-
*For Pivot widgets only: Column to link - Select a specific column to link to a dashboard to enable jumping from that column. You can set different columns to link to different dashboards. You can also select "All columns" to link to one dashboard, and then you can also select a specific column to link to a different dashboard; in this case, all columns except the specific column with its own link will link to one dashboard, and the specific column with its own link will link to a different dashboard.
Note:
Pivot tables support navigating to the target dashboard via both click and right-click. However, only one navigation type can be selected per widget. This means that the same navigation from all columns of a given Pivot will be applied.
-
-
Display Type - Select whether the target dashboards will open in a Popup window (this is the default; in this case, you should also set the popup window's size, and select/clear the checkbox to set whether or not end users are allowed to resize it), or in a New tab, or in the dashboard in the Same tab.
-
Dashboard panels/toolbars to display on the target dashboard - Select/Clear the relevant checkboxes to determine which of the available panels and toolbars to display on the target dashboard.
Note:
If the selected display type is ‘Same tab’, the target dashboard will be loaded in the current tab without a page refresh. Therefore, in this case, when the current dashboard is not embedded in an iFrame, the UI panels/toolbars will always be visible. When the current dashboard is embedded, the target dashboard will inherit its URL parameters.
-
Navigation - Select whether you want to jump to a target dashboard by clicking on a widget, or by right-clicking on a value in the widget.
Note:
For most widgets, only one navigation type is currently supported.
Navigation
Widgets
Click
Indicator, Text widget, Pie chart with no categories, Pivot, Line chart
Right-click
Pivot, Pie chart (with categories), Line chart, Bar chart, Column chart, Area chart, Scatter chart, Polar chart
This setting is still displayed in the configuration popup to provide better visibility for users configuring Jump to Dashboard.
-
Click - Jump to a target dashboard by clicking on a widget. You can only have one target dashboard, which is the dashboard you will jump to when clicking on the parent widget.
-
Right-click menu - Jump to a target dashboard by right-clicking a value in a widget and selecting the target dashboard from the right-click menu. You can have one or multiple target dashboards if using the right-click menu to jump to dashboards.
-
-
Keep changes made by user on target dashboard - When users jump to a target dashboard, they can not only view it, but also interact with it, such as by setting certain filters, applying sorting, etc. By default, those changes to the target dashboard are saved (this corresponds to the configuration parameter “volatile: false”). However, if the "Keep changes made by user on target dashboard" checkbox is not selected, those changes will not persist (“volatile: true”).
-
Apply filters to target dashboard - Select which parent dashboard and widget filters to apply to the target dashboard. If "All parent dashboard filters" and "All parent widget filters" are selected, then filters added in the future will also be applied to the target dashboard. However, if they are not selected, or if any of the individual filters are not selected, then filters added to the parent dashboard in the future will not automatically be applied to the target dashboard (to apply them, the designer would have to manually select them from the JTD settings in the widget editor).
Note:
Filters set directly on formulas in the widget editor are listed under widget filters.
Exception: When multiple filters on the same dimension exist in the formula and the
sendFormulaFiltersDuplicateglobal setting is set to "none", the filter dimension does not appear in the list and none of these filters are passed. -
Reset dashboard filters after JTD - Resets the filters of a target dashboard. Combine this with "Merge target dashboard filters" (see the following configuration setting) to display your dashboard filters in the target dashboard.
-
Merge target dashboard filters - Displays your dashboard filters in the target dashboard. Combine this with "Reset dashboard filters after JTD" (see the previous configuration setting).
Important:
-
If
mergeTargetDashboardFiltersis true andfilterRelationsexists, all filters passed to the target dashboard will be converted to single-level (non-cascading) filters. -
When merging date filters, the filters on the source and target dashboards must share the same table, column, and time resolution (for example, both must be set to ‘Days').
-
-
Click Save to save the JTD settings.
-
Exit the widget Edit mode (the JTD settings are already saved, so it does not matter whether you click Apply or Cancel).
Note:
Different widget types may have slightly different settings options. Therefore, if you save the JTD settings, and then in the widget editor you change the widget type, all of the JTD settings will be reset.
Migration of Existing Scripts
In previous versions, JTD was configured via a widget script. In versions L2025.1 SP1 and newer, the configuration is done via the UI, as described above. Upon upgrade, the JTD configuration parameters from the script will be moved to the new UI. The actual migration will happen when a designer opens the JTD settings for a specific widget. Some settings will be kept if configured for existing widgets, but will not be configurable on the widget level configuration for new widgets and existing widgets with default values for such settings. For example, hiding the JTD icon or changing the ‘Jump to’ caption in the right-click menu will now only be possible to configure on the global level by an admin.
A fallback mechanism is provided that enables you to revert to configuring the widget using the script by adding the following parameter: widget.scriptConfig = true; The UI settings will be disabled in such a case. To return to using the UI configuration, change the property to false.
Limitations
Filters on formulas excluded via widget script configuration are migrated automatically to the UI settings starting from version L2025.2 SP2. The migration happens during the initial switch from script to UI configuration, once you open and save the widget-level configuration pop-up window for the first time. If the UI configuration for a widget was previously already saved, it must be updated by excluding the formula filters and saved again.