Deploying Sisense on EC2 with Amazon FSx for Lustre
Last updated: June 10, 2026
| Tier | Deployment |
|
|
Amazon FSx for Lustre provides a high-performance file system optimized for fast processing of workloads such as that of Sisense. Using AWS CloudFormation, you can launch a cluster of worker nodes on Amazon EC2, and then launch Sisense onto your cluster.
Prerequisites
- Amazon Linux 2 OS (Amazon Linux 2 AMI (HVM), SSD Volume Type)
- Installation user with UID 1000 should be named "ec2-user"
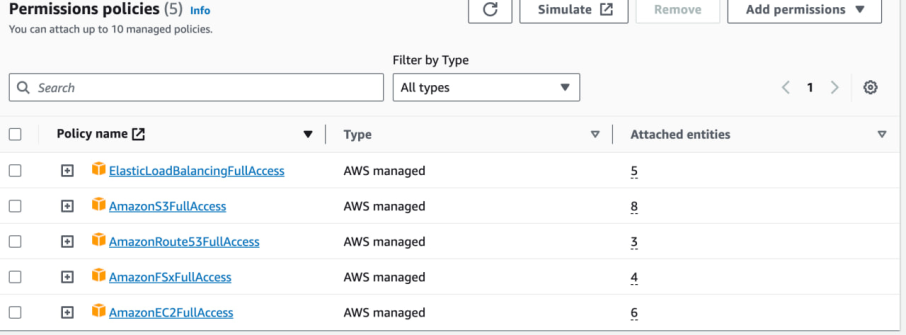
- Create an IAM Role based on the following policies and add it to each EC2 instance:
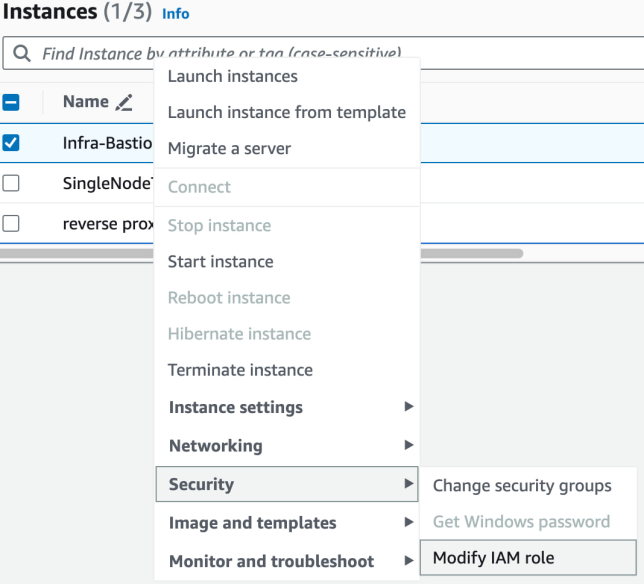
Select one of the EC2 instances and click Security > Modify IAM role:
Create an IAM Role based on the following policies:
-
Create an EBS CSI policy:
- Log in to the AWS Management Console and open the IAM console at https://console.aws.amazon.com/iam/.
- In the navigation pane on the left, select Policies.
- Select Create policy.
-
Choose the JSON tab and enter the following JSON policy:
{
  "Version": "2012-10-17",
  "Statement": [
    {
      "Effect": "Allow",
      "Action": [
        "ec2:AttachVolume",
        "ec2:CreateSnapshot",
        "ec2:CreateTags",
        "ec2:CreateVolume",
        "ec2:DeleteSnapshot",
        "ec2:DeleteTags",
        "ec2:DeleteVolume",
        "ec2:DescribeAvailabilityZones",
        "ec2:DescribeInstances",
        "ec2:DescribeSnapshots",
        "ec2:DescribeTags",
        "ec2:DescribeVolumes",
        "ec2:DescribeVolumesModifications",
        "ec2:DetachVolume",
        "ec2:ModifyVolume"
        ],
      "Resource": "*"
    }
  ]
}
For details about the IAM policy language, see IAM JSON policy reference.
- Choose Review policy and the Policy Validator reports any syntax errors.
- On the Review policy page, enter a Name and an (optional) Description for the policy. It is recommended that the policy name include EBS_CSI so it can be easily identified in the future.
- Review the policy Summary to see the permissions that are granted by this new policy.
- Choose Create policy to save the policy.
-
Add the newly created EBS CSI Policy to the used IAM role.
- Create a new Security Group with Inbound port 988 to the node groups.
-
Allow all inbound traffic within the Security Group for inter node communication.
-
Based on your configuration and requirements, allow traffic for ssh, https, or http protocols. Note that for http, Sisense uses port 30845 by default.

- Tag EC2 instances with Key kubernetes.io/cluster/$cluster_name and set the value to true.
-
In installer/extra_values/installer/installer-values.yaml, which is stored in the installation directory, set the "ebs_csi" value for "enabled" to true (if it is "false", change it to "true"):
## AWS EBS CSI Drivers.
ebs_csi:
enabled: true
Deploying Sisense
-
In one of your new instances, enter the following command to download the Sisense tar.gz file.
wget [sisense-linux-deployment-link]
Contact Sisense to receive the latest Linux archive file. -
Extracting the tar.gz file:
tar zxf [sisense-linux-deployment-package-name] -
Navigate to the directory where you extracted the tar.gz file.
cd sisense-[sisense-version] -
Edit the config.yaml file.
vim cluster_config.yaml
After running this command, the parameters of the cluster_config.yaml file are displayed. -
In the cluster_config.yaml file, define the following parameters:
storage_type: fsx
## AWS FSX
fsx_dns_name: "<fsx_dns_name>"
fsx_mount_name: "<fsx_mount_name>"
And add a new parameter:
cloud_provider: aws
The node name of each node should be equal to the AWS Private DNS Name of the EC2 instance. For example:
k8s_nodes:
{ node: ip-172-31-6-182.us-west-2.compute.internal, internal_ip: 172.31.6.182, external_ip: 54.187.192.203, disk_volume_device: /dev/sdb, roles: "application, query" }
{ node: ip-172-31-9-110.us-west-2.compute.internal, internal_ip: 172.31.9.110, external_ip: 34.221.225.21, disk_volume_device: /dev/sdb, roles: "application, query" }
{ node: ip-172-31-1-81.us-west-2.compute.internal, internal_ip: 172.31.1.81, external_ip: 35.92.200.132, disk_volume_device: /dev/sdb, roles: "build" }
-
Run the configuration script.
./sisense.sh cluster_config.yaml
Your configuration settings are displayed with a message to confirm that you want to deploy Sisense with these settings. -
Enter Yes to confirm that you want to deploy Sisense. Enter No to abort the deployment. If you entered Yes, Sisense will be deployed. If there are any issues, you can view the installation logs here: [installation-dir]/sisense-ansible.log. When this installation is complete a list of endpoints is displayed for accessing Sisense and managing your deployment. The URLs are listed below. In addition, you can run the following command to return the URL to access Sisense.
kubectl cluster-infoThis displays the URL of your Sisense application. You can enter this address into your browser to access Sisense. To verify that all your services are running as expected, you can enter the URL of Sisense with the port and /app/test to the end of the address in your browser. This displays the status of each of your services. For example, 0.0.0.0:PORT/app/test.