Data Access Security
Last updated: June 10, 2026
| Tier | Deployment |
|
|
|
Sisense enables you to define data security rules that control which users can access which portions of the raw data in a data model, at row granularity.
Example:
Each widget only shows the data permitted by the data security rules that apply, including totals, averages and so on.
The data browsers used while building dashboards and widgets only show the data permitted by the data security rules that apply.
You can define a single dashboard that automatically displays different results for each user (or user group), based on the rows which that user is permitted to see.
Example Use Cases:
- A Sales Order table has a column representing the salesperson that closed a deal.
- You created a quarterly performance dashboard for your salespeople, but want each of them to see only their own data.
- You do not want any of them to be exposed to data that represents the performance of others.
Watch this video about data security:
How Data Access Security Works
The Sisense security model is designed to work as both a 'Grant access' model and a 'Deny access' model. When applying a data security rule, you determine whether access is blocked for everyone or open to everyone.
Note:
Assigning no value to Everyone is the same as blocking everyone.
The best practice is to leave 'Everyone else' set to 'Nothing', while granting groups and users access to specific data values. The model accumulates grants, meaning that the most restrictive combination wins. So if both a group and one of its members have conflicting rules, the more restrictive combination wins.
Example:
| Rule 1 | Rule 2 | Result |
|---|---|---|
| Everything | Nothing | Nothing |
| Allow 1 | Nothing | Nothing |
| Everything | Block 1 | Everything except 1 |
| Allow 1, 2 | Block 1 | 2 |
| Allow 1 | Block 1 | Nothing |
| User Rule | Group Rule | Default Rule | Result |
|---|---|---|---|
| Y | Y |
Y |
The more restrictive of the user and group rules |
| Y |
Y |
Group rule | |
| Y |
Y |
User rule | |
|
Y |
Default rule |
Each data model contains tables and each table contains fields.
A data security rule defines that a specific user can only see any data of an entire row of a table, if a specific field in that row has a specific value(s).
Example:
In a Sales widget, a salesperson (for example, Dan) will only see the sales amounts from the rows of a Sales model whose Salesperson field contains the value Dan (rows 1 and 4).
Sales Table
| # | Salesperson | Product | Amount |
|---|---|---|---|
| 1 | Dan | HD-TV | $100 |
| 2 | Matthew | TV | $300 |
| 3 | Amber | Media Center | $700 |
| 4 | Dan | Player | $200 |
| 5 | Matthew | Air Conditioner | $600 |
Dan will not see any part of a row in the data model that does not contain the value Dan in the Salesperson field, nor will any amounts from this row be included in totals.
If a widget that shows the amount spent per product is shared with Dan, then he will only see HD-TV and Player and the sales total will be $300.
Note:
The entire row of data is not seen by the relevant user even when the field to which the rule applies does not appear in the widget.
Defining Data Access Security for a Data Model
In Sisense, all users who have access to your data models can see all of the data. If you define any data security rules, the default behavior is inclusionary, meaning that you define which values of a field a user is allowed to see.
Example:
You can allow each sales rep to see transactions for their own customers, and prevent sales reps from seeing the transactions of other customers. In this case, you define a row-based data security rule for each sales rep, based on the customer IDs of each customer.
In some cases, you might want to allow all of your users to see all of your data except for a few specific restricted rows. In this case, exclusionary rules are preferred.
Example:
Assume that your company has thousands of customers, and your policy is that all sales reps can see information for most of your customers, not only for their own customers. You might have certain customers whose data is sensitive and should only be accessed by certain authorized sales reps. In this case, it is easier to manage a definition that allows access to everything, except the few restricted customers, than to manage a list of the thousands of customers whose data is freely available to all sales reps.
To allow or restrict certain rows of data to a specific user or group of users, you can set the default data security behavior for each table and then define when the rule applies.
Note:
When multiple data security rules exist for a specific field-user or field-group combination, the "Inclusionary" rules will be combined with "OR" logic between them. "Exclusionary" rules will be combined with "AND" logic between them.
To change the data security behavior for a rule:
-
There are two ways to access the Data Security settings:
-
From the Data page, click the ElastiCube menu button (
 ) and, from the menu, select Data Security.
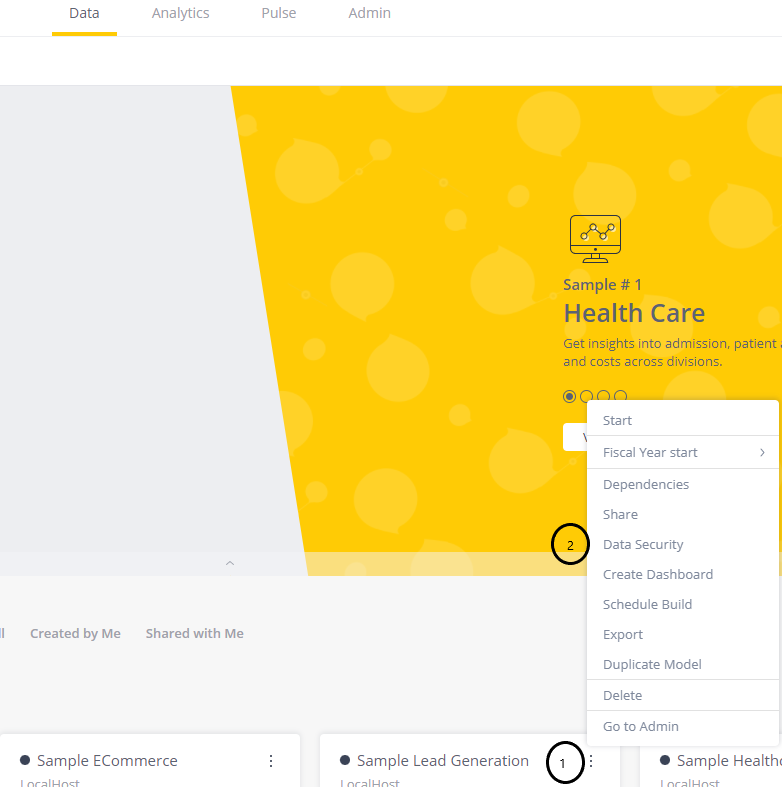
-
-
Click + Add field (or, if any fields already exist, + Add another field) to display a list of fields that you can apply data security rules to.
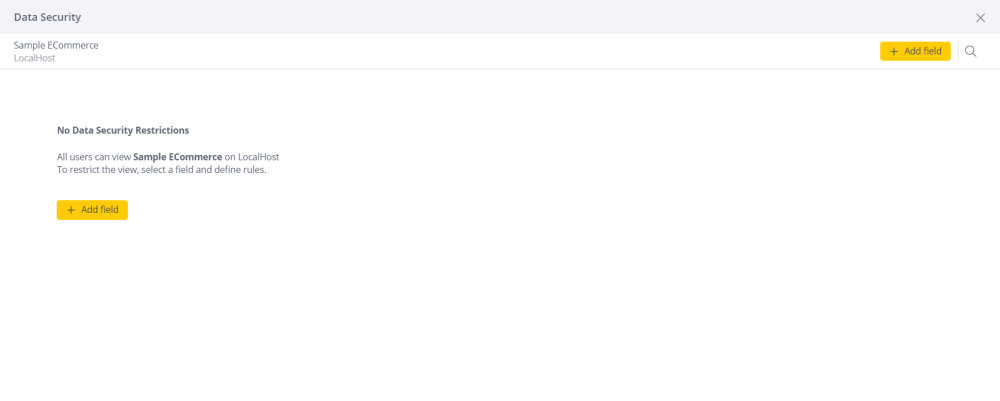
-
Select the field you want to apply data security to. The field is added to the page. By default, the field is fully restricted so no one can see any values.

Note:
Sisense supports up to 1450 values in the result set of a specific dimension (column and table). In some cases, up to 3500 values may be supported. If the number of Values built based on your rules exceeds 3500, and possibly even exceeding 1450, try a different approach. For example, instead of excluded values, try including them in your rule or create multiple rules.
-
Click Scope limitations to set the scope of your rules. The following options are displayed:
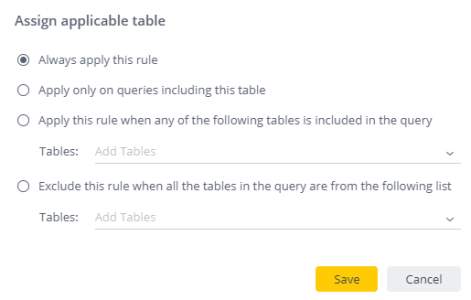
-
Always apply this rule: Select this option to always apply your rule. This option limits the number of results that are returned for a Viewer because applying your rule forces joins between related tables.
-
Apply only on queries including this table: Select this option if you want to restrict the application of data security rules only to cases where the table containing the data security field is directly included in the query. This is useful when you have a specific table whose values you must secure, but you do not want to secure related tables.
-
Apply this rule when any of the following tables are included in the query: Select this option if you want to restrict the application of a data security rule only to cases where at least one table from a group of tables are directly included in the query. This is useful when you have a list of tables whose data should be secured, but the rest of the tables do not include sensitive data.
-
Exclude this rule when all the tables in the query are from the following list: Select this option if you want to restrict the application of a data security rule and exclude cases where columns from any one of a specific group of tables are directly included in the query to prevent it being applied in cases that are irrelevant. This is useful if you have a list of tables whose data doesn't need to be secured, as long as they aren't combined with restricted tables.
-
-
Click Save.
-
Click + Add User / Group to define who is affected by the rule. By default, everyone is affected.
-
Under Values, click
 to open a list of values you can apply rules to and set access rights to that value. Multiple values can be selected.
 -
Set the access rights for the value you selected. There are two options:
-
Allow Access: The selected users / user groups can see this data no matter what the value is in this field.
-
Block Access: The selected users / user groups cannot see this data no matter what the value is in this field.
After you have set the access rights, the rule is applied to your data.
-
How Does Data Level Security Work for Tables with Relationships?
Sisense protects your data across relationships. This allows you to define your data security rules in a single field, and ensures your data is protected across your model, whenever it relates to your data security rules.
As described above, each widget only shows any data of an entire row of a table, if a specific field in that row has a specific value.
A widget may further restrict the data shown to a specific user when a rule is defined for a table that has a relationship to a table that has a field in the widget.
This means that a widget only shows the data permitted by the combined data security rules assigned to all the tables that have any field in the widget.
As described above, the entire data row is restricted even when the field to which the rule applies doesn't appear in the widget. The entire row of data is also restricted even when the field of the relationship between the two tables doesn't appear in the widget.
Use Case - Expanding Upon the Example Above
- The Sales table has a column that has a relationship with a Deal Contacts table that holds the contacts that were involved in each deal.
- You created a Deal Contacts widget for your salespersons.
- As described in the example above, the Sales table has a data security rule that maps each user to their matching field value, so that each sales person only sees their own data.
- Even though the Deal Contacts table doesn't have any data security rules defined for it, the Deal Contacts widget only enables each sales person to see the contacts associated with their own sales, because of the data security rule assigned to the Sales table.
Configurable Filter Security Parameters
There are additional configuration parameters that dictate how data security is applied to the filter values displayed to the dashboard users.
The toggles for these parameters are located in Admin Tab > Server & Hardware > System Management > Configuration > 5 clicks on Sisense logo on System Configuration page > Base Configuration > Security.
When a dashboard is created, the filter settings and values chosen by the designer are automatically incorporated. It's important to note that the designer's data security permissions may differ from those of the dashboard viewer. In cases where this discrepancy exists, extra verification steps are implemented to ensure that only permissible filter values are shown to the viewer. This verification process is activated each time the dashboard is loaded or whenever a filter is adjusted. Due to the computational intensity of this procedure, there's an option to disable it for better performance, especially if it's deemed unnecessary.
Note:
Regardless of these settings, widget values will always comply with the viewer's data security limitations. When a filter is unlocked, viewers can select filter values of their own, but these choices are still governed by their individual data security permissions.
In instances where a filter is present but lacks selected values, the additional security verification is skipped. Similarly, widget-specific filters are not subject to this verification process.
Scope:
-
security.applyDataSecurityOnFilters - The data security rules are checked for the tables that are filtered. This means that before being displayed to the user, the values of a filter are checked against data security rules that are set on the column the filter is based on. Upon this validation, only the permissible values are displayed (if no value is permissible, the ‘Include all’ filter selection is shown).
Note:
If this toggle is disabled, no additional verification is run, regardless of the state of the security.applyDataSecurityOnFiltersRelations toggle.
-
security.applyDataSecurityOnFiltersRelations - All of the data security rules defined for the dashboard’s datasource are checked. This means that before being displayed to the user, the values of a filter are checked against the data security rules that are set on each related column in the datasource. This operation is much heavier, so this option has a much bigger impact on dashboard loading performance. When it is necessary to use this configuration due to strict security requirements, the impact can be reduced by setting scope limitations to your data security rules (as described in Defining Data Access Security for a Data Model).
Once the filters have been displayed, widget query performance is not affected by the use (or not) of these parameters.
Note:
Both of these parameters are toggled on by default and both of them impact performance. These parameters should be toggled off if their related functionality is not required.
Tip:
For more information, see Row-Level Security Implementation Using OR Operator Across Multiple Dimensions on the Sisense Community site.