Setting Up Custom Email Servers
Last updated: June 10, 2026
| Tier | Deployment | Availability |
|
|
Classic Mode Only |
Sisense includes a default email server configuration that uses Mandrill by MailChimp to send automated emails such as dashboard reports or password reset emails. This configuration can be used for POC and testing environments.
Important:
-
Custom email servers allow all your email transactions to be completely managed on your side.
-
Branding configuration overrides the custom e-mail server configuration. Therefore, make sure to set the same values for your branding configuration that you set here for your custom email server configuration.
In Sisense, you can set up your custom email server for sending Sisense emails to your users. There are two ways you can set up your custom email server, through Sisense or through the REST API.
Optimized Email Delivery
In the default email service Sisense splits emails to individual recipients, causing higher load on the emailing flows. However, for custom email servers, Sisense optimizes sending emails to groups of recipients.
- If a group of users are expected to receive the same email with the same contents, Sisense sends a single email, with each recipient in the BCC field. In this case, the TO field is empty.
- If the email is sent to one recipient, Sisense enters their address in the TO field.
Setting Up Your Email Server through Sisense
To set up a custom email server:
-
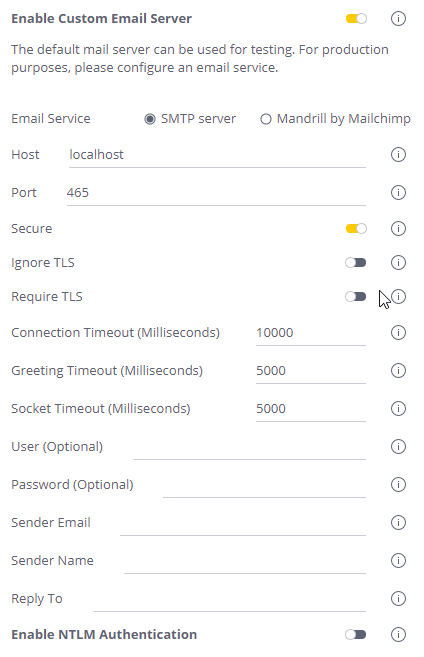
In the Admin page, select Email Settings.
-
Select Enable Custom Email Server.
-
Select the Email Service. For custom email servers, select SMTP Server. If you are modifying the Sisense Mandrill server to work with your server, select Mandril by MailChimp.
-
If you selected Mandrill by Mailchimp, enter the following information:
API Key: The API key provided by Mailchimp.
Sender Email: The email address that is displayed as the Sender Email address in emails to your user.
Sender Name: The name that is displayed as the Sender Name in emails to your user. - If you selected SMTP Server, enter the following information:
- Host: The hostname or IP address to connect to. By default, this is 'localhost'.
- Port: The port to connect to (defaults to 25 or 465).
- Secure: When you send an email, some email servers check if secure transport (TLS) is available for that address or domain. This value determines if the connection should use TLS (if true) or not (if false). The default value is false. The connection may be upgraded to TLS if the email server requires it.
- Ignore TLS: If this is true and Secure is
false, TLS will not be used even if the email server attempts to upgrade the connection to
TLS-secure.
This field should be set to true when connecting to a non-secure SMTP server. - Require TLS: If this is true and Secure is false, it forces the connection to be upgraded to TLS-secure even if the email server doesn't advertise support for TLS.
- Connection Timeout: How many milliseconds to wait for the connection to establish.
- Greeting Timeout: How many milliseconds to wait for the greeting after connection is established.
- Socket Timeout: How many milliseconds of inactivity to allow.
- User: The user name of the user. As non-secure or restricted SMTP servers do not require authentication, do not include this field when connecting to a non-secure SMTP server.
- Password: The user's password for the email server. As non-secure or restricted SMTP servers do not require authentication, do not include this field when connecting to a non-secure SMTP server.
- Sender Email: The email address that is displayed as the Sender Email address in emails to your user.
- Sender Name: The name that is displayed as the Sender Name in emails to your user.
- Enable NTLM Authentication: Enable if your custom email server supports NTLM authentication.
- Reply To: An email address for replies that overrides the reply-to email across the entire system.
-
Click Save to save your changes.
After your changes are saved, the default values of the email server are replaced with your own.
Setting Up Your Email Server through the REST API
Through the Sisense REST API, you can send an HTTP POST request to issue Sisense emails through your own custom email server instead of the default Sisense email server. The REST API exposes properties that you can configure for the custom email servers such as security, timeout, and logging properties.
When authenticating an HTTP request, Sisense only supports the basic authentication through the Authorization method using plain text.
To set up a custom email server:
- In Sisense, click Admin, and then Rest API.
- In version 1.0 of the REST API, select Settings, then POST /settings/email_server, and then click Try It Out.
- In the body of your call, define the values of the following keys, for example:
{
 "enable": true,
 "host": "smtp.ethereal.email",
 "port": 587,
 "secure": true,
 "ignoreTLS": false,
 "requireTLS": false,
 "connectionTimeout": 300,
 "greetingTimeout": 300,
 "socketTimeout": 300,
 "user": "myuser@mydomain.com",
 "pass": "mypassword",
 "logger": false,
 "debug": false
 }
Tip:
For more information, see:
-
Google SMTP - 534-5.7.9 Application-specific password required
-
Outlook365 Error - 432 4.3.2 Concurrent connections limit exceeded.
on the Sisense Community site.