Changing the Sisense Display Language
Last updated: June 10, 2026
| Tier | Deployment |
|
|
|
Sisense supports multiple languages, making it easier to extract meaningful insights from your data in your users' local language.
Sisense has translated text that your users might see, including menu names, buttons, messages, and other elements. Translating the text does not affect your data or how it is displayed.
Sisense has been localized to the following languages:
- Chinese (Simple)
- French (France)
- German
- Italian
- Japanese
- Portuguese (BR)
- Russian
- Spanish (ES)
- Spanish (LA)
- Dutch
- Korean
- Turkish
Note:
The following content is not localized:
- Built-in JavaScript editor
- ElastiCube Manager and Server Console
- Sisense documentation and online help
- REST API and documentation
- Sisense automated emails
Note:
-
You can use your own translation of Sisense automated emails by defining your own. The translations for each language are in the translations folder. Within each language folder, there is an email-templates.js file. You can modify email-templates.js files in order to customize the translations. However, be aware that your changes will be overwritten upon upgrading. So if you do customize the translations in email-templates.js files, you will need to restore the relevant translation files from backups after each upgrade.
-
The emails/language.js file contains the default Sisense strings used for building emails from templates. If for any reason there are strings missing from the email-templates.js file, the relevant strings from emails/language.js will be used. This file should not be modified.
Changing Sisense's Default Language
Administrators can select the default language for Sisense. Setting the default language affects all users and groups that access the Sisense dashboard. Additionally, administrators can set the language for specific groups and users when adding new users or groups, or by editing a group or user account.
After selecting a new language, each string with a translation is displayed in that language across all your users' interfaces.
If you have defined a custom translation, the name of the language as defined in the settings.json file is displayed in this list. See Embedding Custom Languages for more information.
Sisense's default language is English. After changing the system language, you can revert back to English or any
other language by selecting it from the list.
To modify your default language:
- In Sisense, in the top menu, click Admin.
- From the left menu click Settings.
- Select the relevant language from the Language list. After selecting the language, the UI is immediately translated.
- Click Save. Sisense is translated in the selected language.
Embedding Custom Languages
Sisense enables you to display your own translations by replacing the values of strings in any language you choose.
You can embed customized languages by modifying configuration and resource files, replacing the string values according to your requirements.
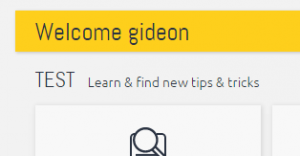
For example, in the homepage, the word "Explore" is displayed. In the resource file home.js, you can modify the value of this string to display your own text as shown below.

|
"welcome_user": "Welcome",
"explore": {
"explore": "Explore",
"learn": "Learn & find new tips & tricks",
"links": {
|
|
"welcome_user": "Welcome",
"explore": {
"explore": "TEST",
"learn": "Learn & find new tips & tricks",
"links": {
|
In addition to modifying the resource files, you must modify the settings.json file and specify your language's name and update the version. In this example, the language has been changed to "test" and the version increased from 1.0.0 to 1.0.1.
{ "displayName": "test", "version": "1.0.1" }
The value of "displayName" is displayed as your language's name in the Default Language list on the System Configuration page. In the example, the display name was set to "test".
Upgrading Sisense may replace the bundled translation files. If you want to modify a bundled language, copy all of the translation files to a new directory, and change the copied versions to prevent your translation from being overwritten.
To customize the language:
- Access the /opt/sisense/storage/translations/ directory.
Note:
From Sisense version L8.2.6 and later, email translations are located under /opt/sisense/storage/translations/en-US/email-templates.js.
- In the /translations directory, copy the en-us(default) directory, paste it in the \translation directory, and rename it.
- In the new directory, open each resource file and translate the strings into the desired language, saving each file after your changes are made.
- Open the settings.json file and replace the following key values:
- displayName - Enter the name of the language.
- version - Enter the name of the new version. Currently, the version is 1.0.0. For each version, increase this value, for example, 1.0.1.
- Save the changes in a file called settings.json in your new language folder.
- In the top menu, click Admin.
- Search for General Settings.
- Select your customized translation from the Default Language list. Your customized translation displays.
- Click Save.